dbt(Data Build Tool) Tutorial
1. Introduction
If you are a student, analyst, engineer, or anyone in the data space and are curious about what dbt is and how to use it. Then this post is for you.
If you are keen to understand why dbt is widely used, please read this article .
2. Dbt, the T in ELT
In an ELT pipeline, the raw data is loaded(EL) into the data warehouse. Then the raw data is transformed into usable tables, using SQL queries run on the data warehouse.
Note: If you are interested in learning to write efficient SQL for data processing, checkout my e-book: Efficient Data Processing in SQL
dbt provides an easy way to create, transform, and validate the data within a data warehouse. dbt does the T in ELT (Extract, Load, Transform) processes.
In dbt, we work with models, which is a sql file with a select statement. These models can depend on other models, have tests defined on them, and can be created as tables or views. The names of models created by dbt are their file names. dbt uses the file names and its references in other files(aka models) to automatically define the data flow.
E.g. The file dim_customers.sql
represents the model named dim_customers. This model depends on the models stg_eltool__customers
and stg_eltool__state
. The dim_customers model can then be referenced in other model definitions.
with customers as (
    select *
    from {{ ref('stg_eltool__customers') }}
),
state as (
    select *
    from {{ ref('stg_eltool__state') }}
)
select c.customer_id,
    c.zipcode,
    c.city,
    c.state_code,
    s.state_name,
    c.datetime_created,
    c.datetime_updated,
    c.dbt_valid_from::TIMESTAMP as valid_from,
    CASE
        WHEN c.dbt_valid_to IS NULL THEN '9999-12-31'::TIMESTAMP
        ELSE c.dbt_valid_to::TIMESTAMP
    END as valid_to
from customers c
    join state s on c.state_code = s.state_code
We can define tests to be run on processed data using dbt. Dbt allows us to create 2 types of tests, they are
Generic tests: Unique, not_null, accepted_values, and relationships tests per column defined in YAML files. E.g. see core.ymlBespoke (aka one-off) tests: Sql scripts created under thetestsfolder. They can be any query. They are successful if the sql scripts do not return any rows, else unsuccessful.
E.g. The core.yml
file contains tests for dim_customers and fct_orders models.
version: 2

models:
  - name: dim_customers
    columns:
      - name: customer_id
        tests:
          - not_null # checks if customer_id column in dim_customers is not null
  - name: fct_orders
3. Project
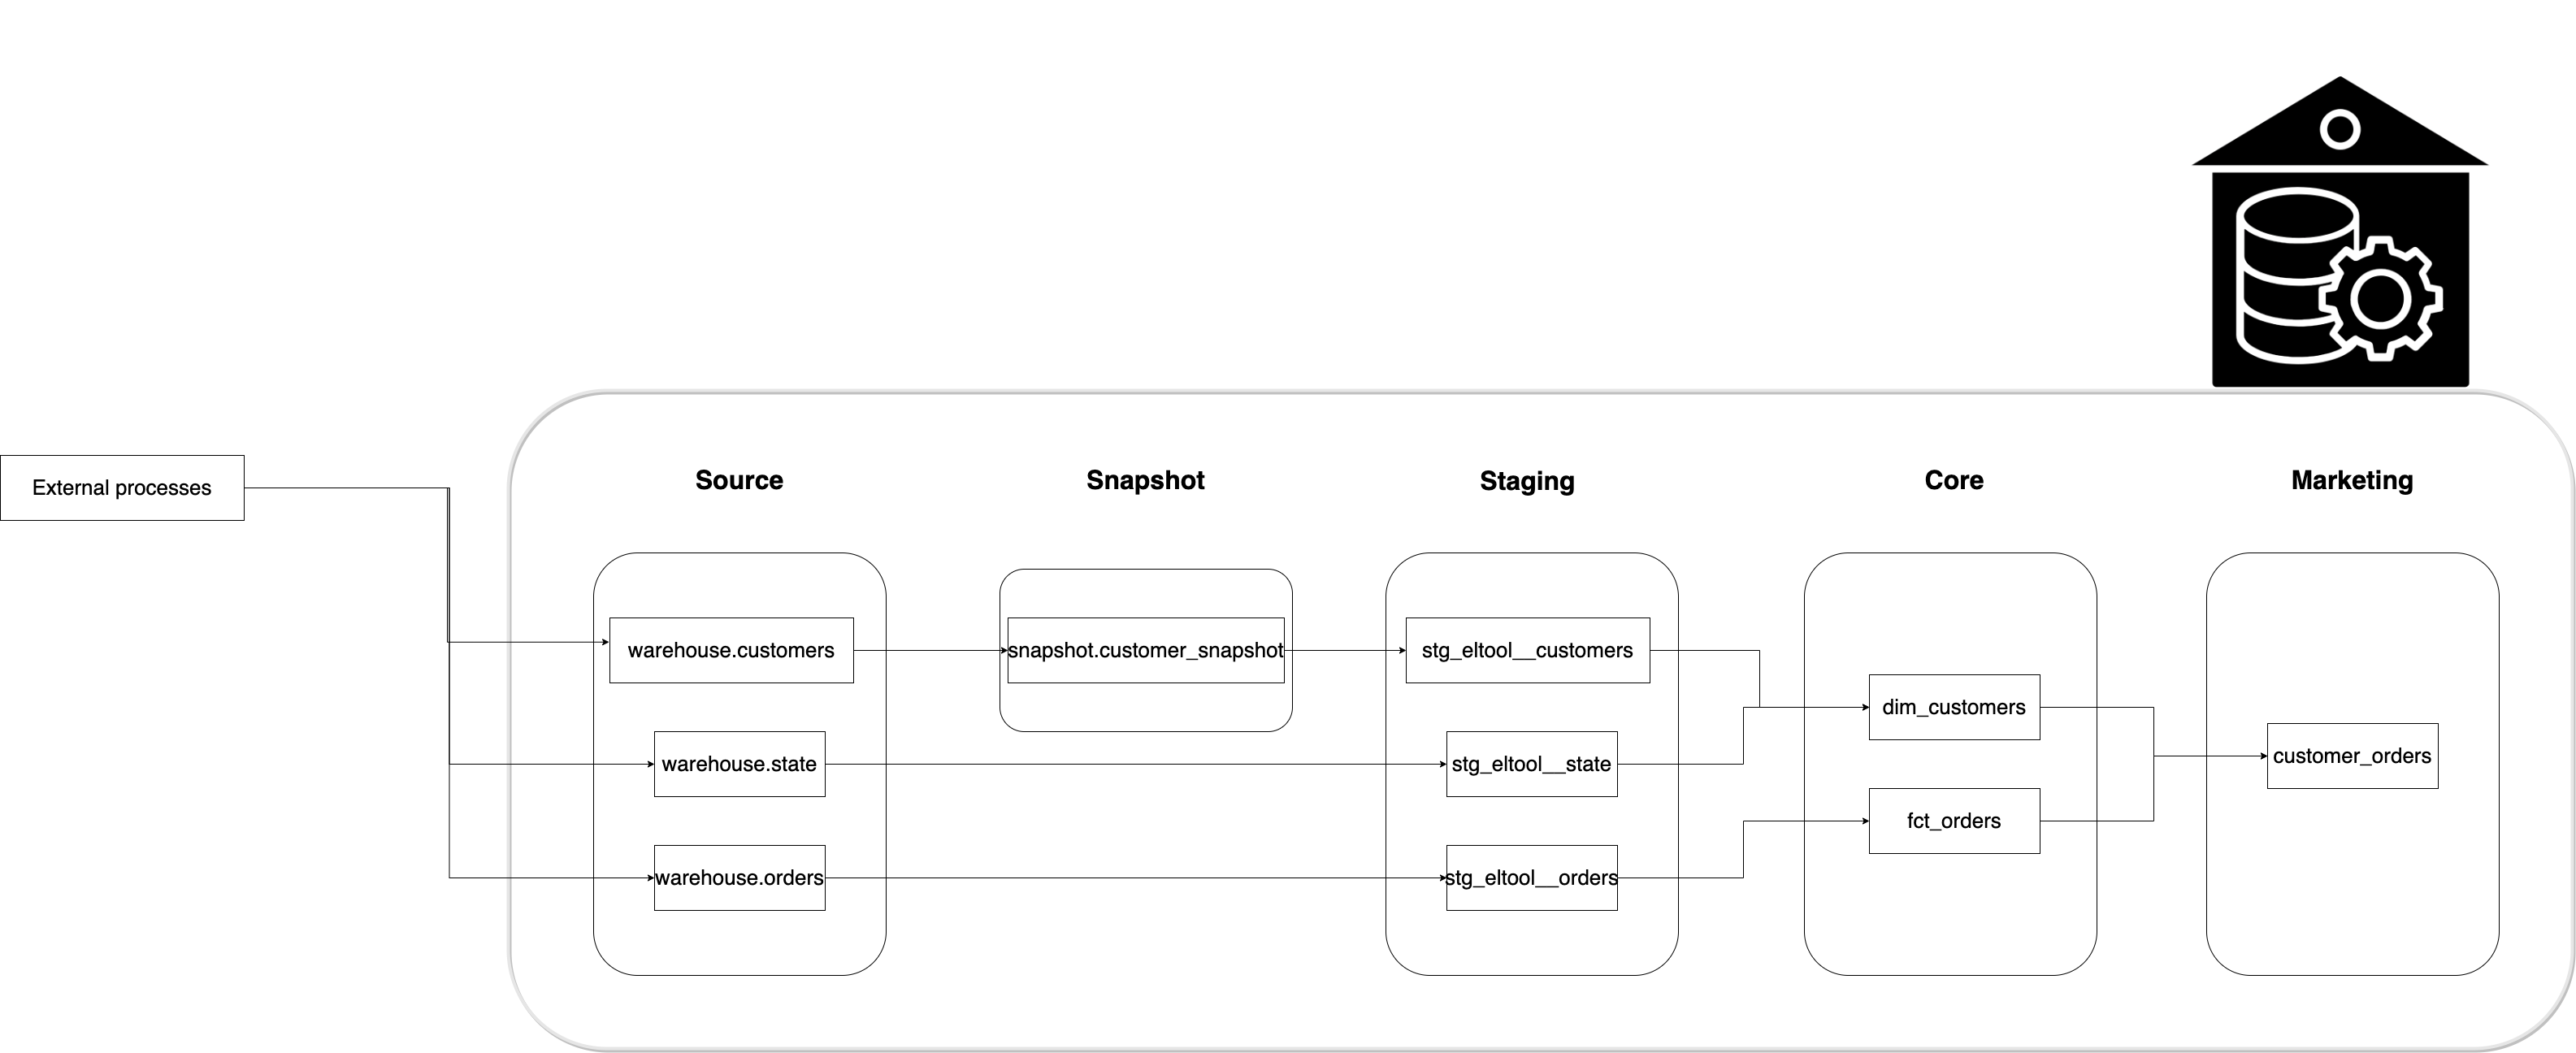
We are asked by the marketing team to create a denormalized table customer_orders, with information about every order placed by the customers. Let’s assume the customers and orders data are loaded into the warehouse by a process.
The process used to bring these data into our data warehouse is the EL part. This can be done using a vendor service like Fivetran , Stitch , or open-source services like Singer , Airbyte or using a custom service.
Let’s see how our data is transformed into the final denormalized table.

We will follow data warehouse best practices like having staging tables , testing, using slowly changing dimensions type 2 and naming conventions.
3.1. Project Demo
Here is a demo of how to run this on CodeSpaces(click on the image below to open video on youtube):

Prerequisites
Clone the git repo as shown below:
git clone https://github.com/josephmachado/simple_dbt_project.git
cd simple_dbt_project
Setup python virtual environment as shown below:
rm -rf myenv
# set up venv and run dbt
python -m venv myenv
source myenv/bin/activate
pip install -r requirements.txt
Run dbt commands as shown below:
dbt clean
dbt deps
dbt snapshot
dbt run
dbt test
dbt docs generate
dbt docs serve
Go to http://localhost:8080 to see the dbt documentation. If you are running this on GitHub CodeSpaces the port 8080 will be open automatically. Press Ctrl + c to stop the document server.
In our project folder you will see the following folders.
.
├── analysis
├── data
├── macros
├── models
│   ├── marts
│   │   ├── core
│   │   └── marketing
│   └── staging
├── snapshots
└── tests
analysis: Any.sqlfiles found in this folder will be compiled to raw sql when you rundbt compile. They will not be run by dbt but can be copied into any tool of choice.data: We can store raw data that we want to be loaded into our data warehouse. This is typically used to store small mapping data.macros: Dbt allows users to create macros, which are sql based functions. These macros can be reused across our project.
We will go over the models, snapshots, and tests folders in the below sections.
Note: The project repository has advanced features which are explained in the uplevel dbt workflow article . It is recommended to read this tutorial first before diving into the advanced features specified in the uplevel dbt workflow article article.
3.2. Configurations and connections
Let’s set the warehouse connections and project settings.
3.2.1. profiles.yml
Dbt requires a profiles.yml file to contain data warehouse connection details. We have defined the warehouse connection details at ./profiles.yml.
The target variable defines the environment. The default is dev. We can have multiple targets, which can be specified when running dbt commands.
The profile is sde_dbt_tutorial. The profiles.yml file can contain multiple profiles for when you have more than one dbt project.
3.2.2. dbt_project.yml
In this file, you can define the profile to be used and the paths for different types of files (see *-paths).
Materialization is a variable that controls how dbt creates a model. By default, every model will be a view. This can be overridden in dbt_project.yml. We have set the models under models/marts/core/ to materialize as tables.
# Configuring models
models:
    sde_dbt_tutorial:
        # Applies to all files under models/marts/core/
        marts:
            core:
                materialized: table
3.3 Data flow
We will see how the customer_orders table is created from the source tables. These transformations follow warehouse and dbt best practices.
3.3.1. Source
Source tables refer to tables loaded into the warehouse by an EL process. Since dbt did not create them, we have to define them. This definition enables referring to the source tables using the source
function. For e.g. {{ source('warehouse', 'orders') }} refers to the warehouse.orders table. We can also define tests to ensure that the source data is clean.
- Source definition: /models/staging/src_eltool.yml
- Test definitions: /models/staging/src_eltool.yml
3.3.2. Snapshots
A business entity’s attributes change over time. These changes should be captured in our data warehouse. E.g. a user may move to a new address. This is called slowly changing dimensions, in data warehouse modeling.
Read this article to understand the importance of storing historical data changes, and what slowly changing dimensions are.
Dbt allows us to easily create these slowly changing dimension tables (type 2) using the snapshot feature. When creating a snapshot, we need to define the database, schema, strategy, and columns to identify row updates.
dbt snapshot
# alternative run the command 'just snapshot'
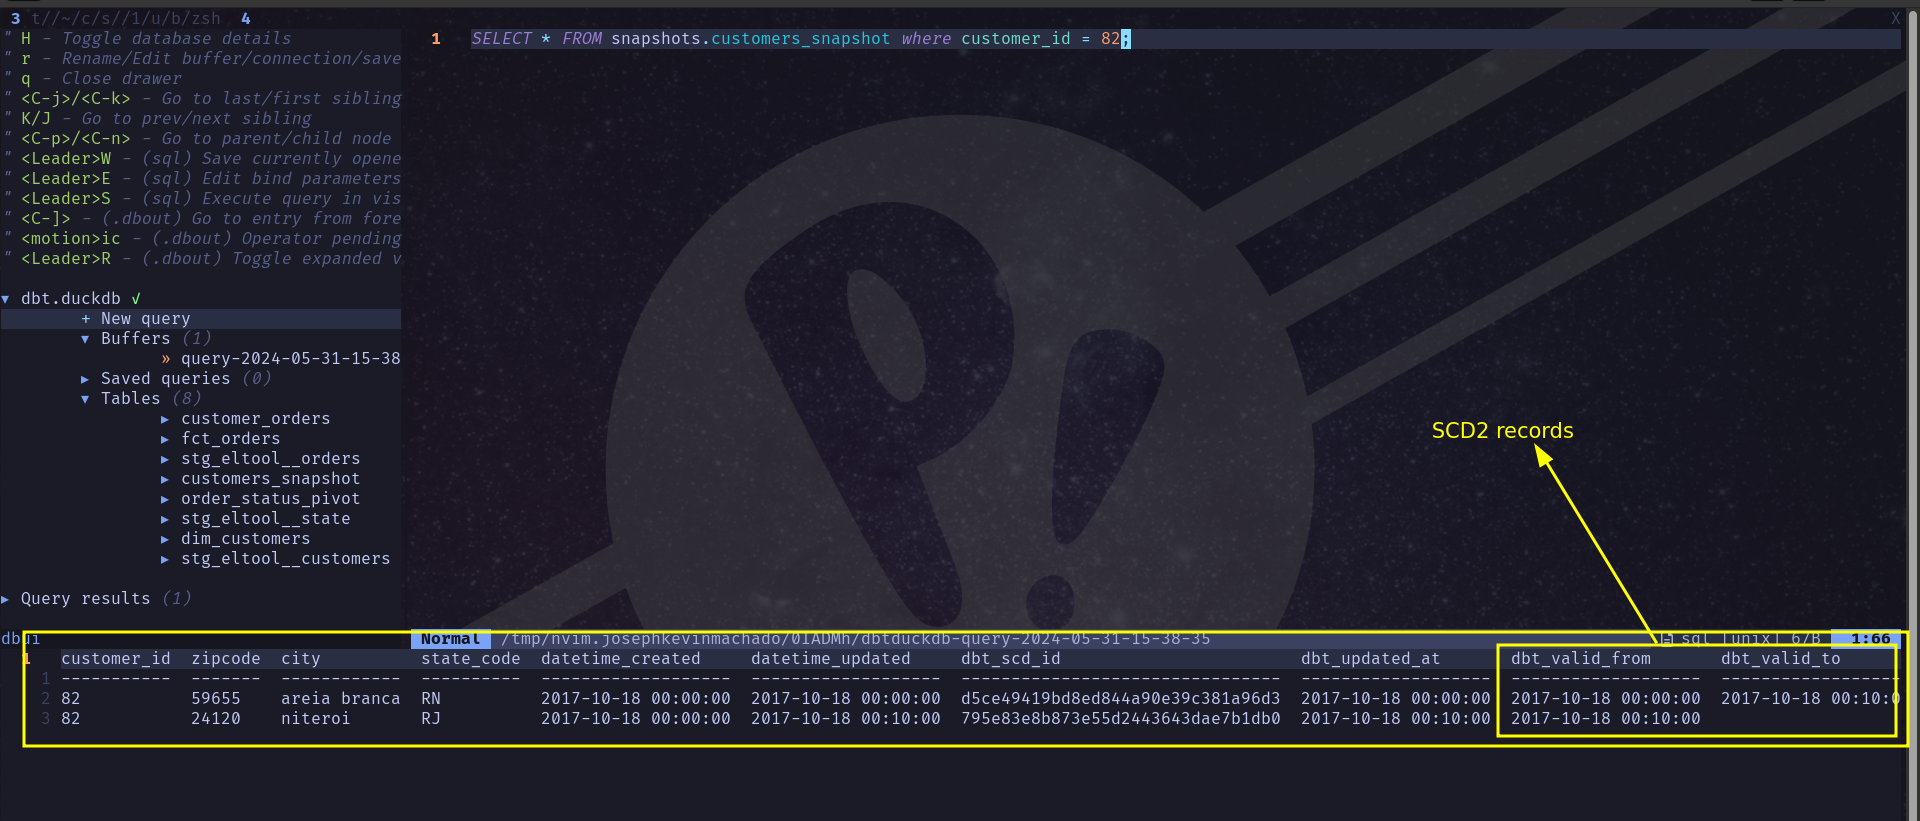
dbt creates a snapshot table on the first run, and on consecutive runs will check for changed values and update older rows. We simulate this as shown below
# Remove header from ./raw_data/customers_new.csv
# and append it to ./raw_data/customers.csv
echo "" >> ./raw_data/customers.csv
tail -n +2 ./raw_data/customer_new.csv >> ./raw_data/customers.csv
Run the snapshot command again
dbt snapshot
Raw data (raw_layer.customer) & Snapshot table (snapshots.customers_snapshot)

The row with zipcode 59655 had its dbt_valid_to column updated. The dbt from and to columns represent the time range when the data in that row is representative of customer 82.
- Model definition: /snapshots/customers.sql
3.3.3. Staging
The staging area is where raw data is cast into correct data types, given consistent column names, and prepared to be transformed into models used by end-users.
You might have noticed the eltool in the staging model names. If we use Fivetran to EL data, our models will be named stg_fivetran__orders and the YAML file will be stg_fivetran.yml.
In stg_eltool__customers.sql we use the ref function instead of the source function because this model is derived from the snapshot model. In dbt, we can use the ref function to refer to any models created by dbt.
- Test definitions: /models/staging/stg_eltool.yml
- Model definitions: /models/staging/stg_eltool__customers.sql ,stg_eltool__orders.sql ,stg_eltool__state.sql
3.3.4. Marts
Marts consist of the core tables for end-users and business vertical-specific tables. In our example, we have a marketing department-specific folder to defined the model requested by marketing.
3.3.4.1. Core
The core defines the fact and dimension models to be used by end-users. The fact and dimension models are materialized as tables, for performance on frequent use. The fact and dimension models are based on kimball dimensional model .
- Test definitions: /models/marts/core/core.yml
- Model definitions: /models/staging/dim_customers ,fct_orders.sql
Dbt offers four generic tests, unique, not_null, accepted_values, and relationships. We can create one-off (aka bespoke) tests under the Tests folder. Let’s create a sql test script that checks if any of the customer rows were duplicated or missed. If the query returns one or more records, the tests will fail. Understanding this script is left as an exercise for the reader.
- One-off test: /tests/assert_customer_dimension_has_no_row_loss.sql
3.3.4.2. Marketing
In this section, we define the models for marketing end users. A project can have multiple business verticals. Having one folder per business vertical provides an easy way to organize the models.
- Test definitions: /models/marts/marketing/marketing.yml
- Model definitions: /models/marts/marketing/customer_orders.sql
3.4. dbt run
We have the necessary model definitions in place. Let’s create the models.
dbt snapshot # just snapshot
dbt run
# Finished running 5 view models, 2 table models, 2 hooks in 0 hours 0 minutes and 3.22 seconds (3.22s).
The stg_eltool__customers model requires snapshots.customers_snapshot model. But snapshots are not created on dbt run ,so we run dbt snapshot first.
Our staging and marketing models are as materialized views, and the two core models are materialized as tables.
The snapshot command should be executed independently from the run command to keep snapshot tables up to date. If snapshot tables are stale, the models will be incorrect. There is snapshot freshness monitoring in dbt cloud UI .
3.5. dbt test
With the models defined, we can run tests on them. Note that, unlike standard testing, these tests run after the data has been processed. You can run tests as shown below.
dbt test # or run "just test"
# Finished running 14 tests...
3.6. dbt docs
One of the powerful features of dbt is its docs. To generate documentation and serve them, run the following commands:
dbt docs generate
dbt docs serve
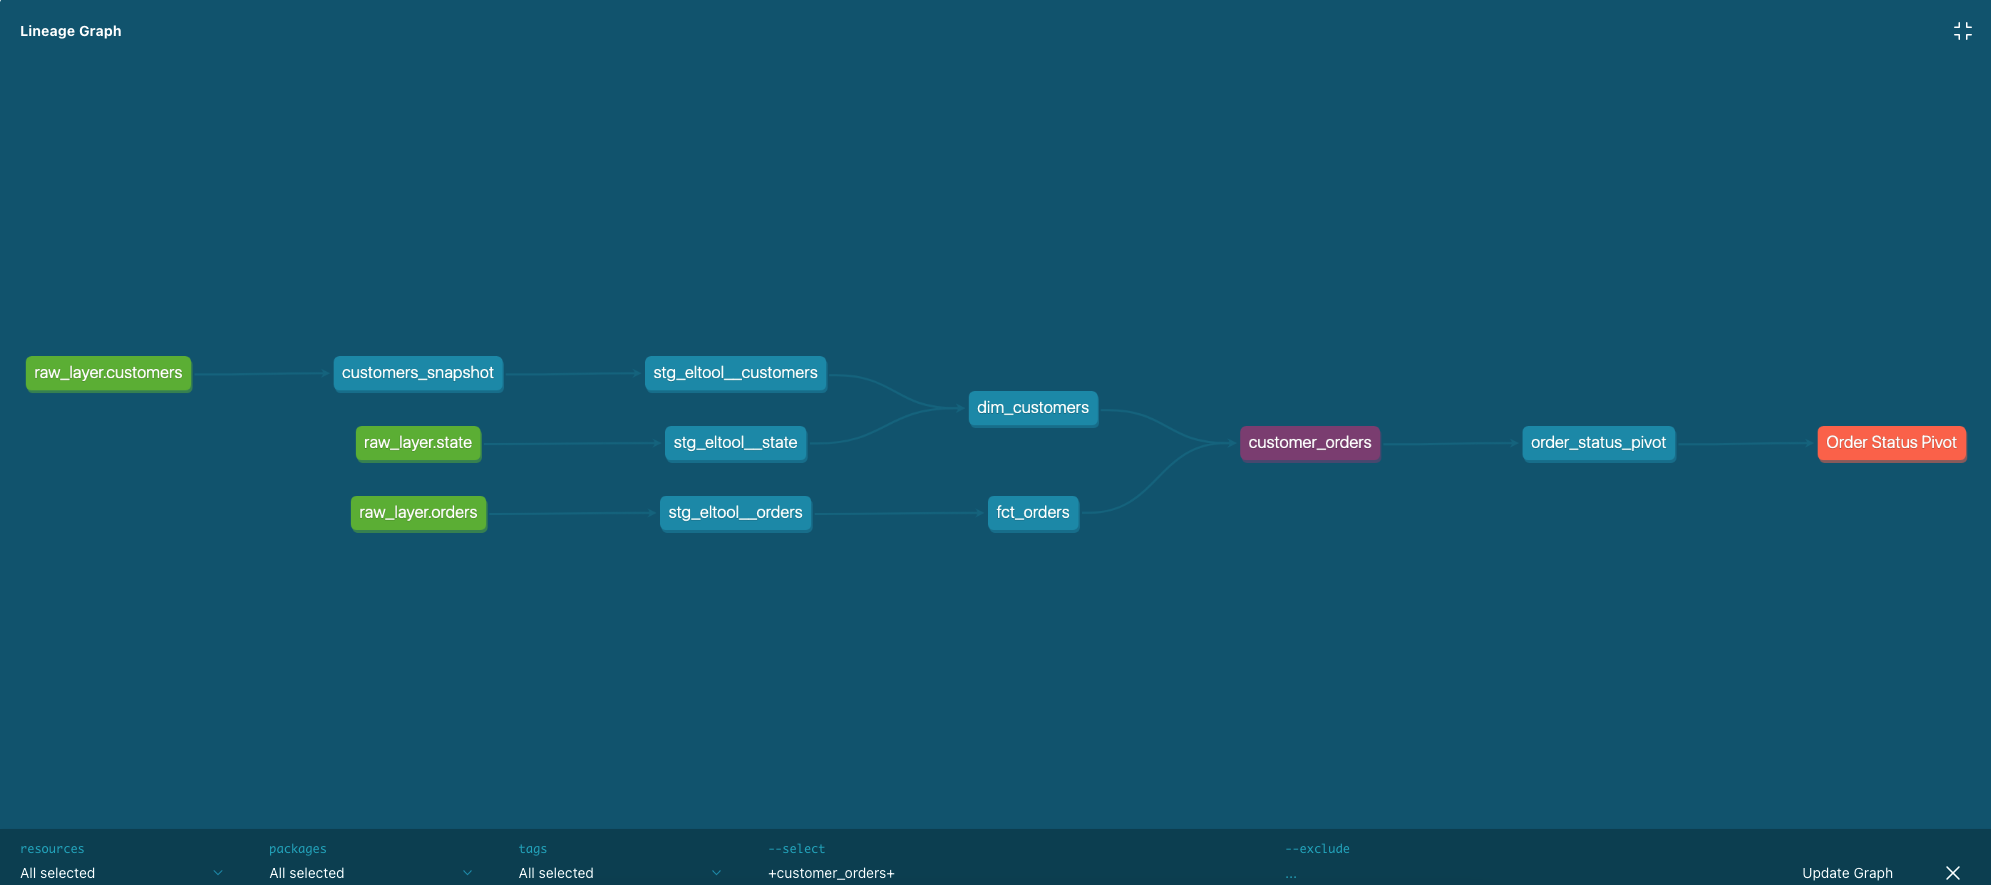
You can visit http://localhost:8080 to see the documentation. Navigate to customer_orders within the sde_dbt_tutorial project in the left pane. Click on the view lineage graph icon on the lower right side. The lineage graph shows the dependencies of a model. You can also see the tests defined, descriptions (set in the corresponding YAML file), and the compiled sql statements.

3.7. Scheduling
We have seen how to create snapshots, models, run tests and generate documentation. These are all commands run via the cli. Dbt compiles the models into sql queries under the target folder (not part of git repo) and executes them on the data warehouse.
To schedule dbt runs, snapshots, and tests we need to use a scheduler. Dbt cloud is a great option to do easy scheduling. Checkout this article to learn how to schedule jobs with dbt cloud. The dbt commands can be run by other popular schedulers like cron, Airflow, Dagster, etc.
4. Conclusion
Dbt is a great choice to build your ELT pipelines. Combining data warehouse best practices, testing, documentation, ease of use, data CI/CD , community support and a great cloud offering, dbt has set itself up as an essential tool for data engineers. Learning and understanding dbt can significantly improve your odds of landing a DE job as well.
To recap, we went over
- Dbt project structure
- Setting up connections
- Generating SCD2 (aka snapshots) with dbt
- Generating models following best practices
- Testing models
- Generating and viewing documentation
dbt can help you make your ELT pipelines stable and development fun. If you have any questions or comments, please leave them in the comment section below.
5. Further reading
6. References
If you found this article helpful, share it with a friend or colleague using one of the socials below!