Intro
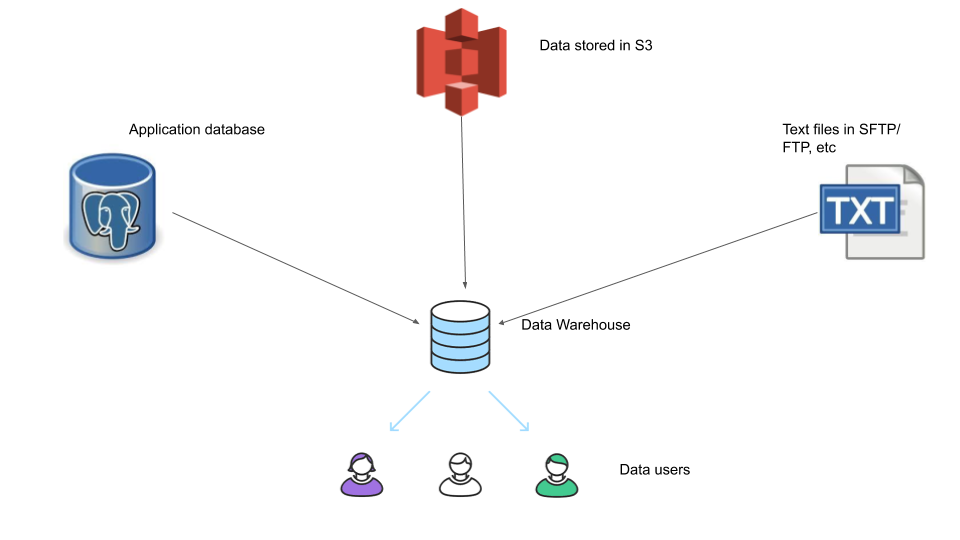
A very common use case in data engineering is to build a ETL system for a data warehouse, to have data loaded in from multiple separate databases to enable data analysts/scientists to be able to run queries on this data, since the source databases are used by your applications and we do not want these analytic queries to affect our application performance and the source data is disconnected as shown below.
If you are building such a data engineering platform and are overwhelmed by all the options available, this article will help you get a “low effort” ELT system up and running with a focus on ease and simplicity over complex features.
I have heard these questions from engineers trying to set up their companies data platform.
Our data is somewhere around X GB, what tools should we use?
We’re a small team of X engineers/analysts, so we’d like to keep things simple but also prefer to use industrial standard tools.
These are very good questions to be asking before starting any data related project. In this article we will go over the different parts of this data engineering platform, ELT vs ETL and answers the questions above.
Before starting
When designing and building a data warehouse, there are a few key points to remember, they are
1. Understand the business and the data
Understand how the company’s business model works,(aka how they make money), what the users of the data care about and the terms used by these users and the reason for them caring about these terms.
2. Document
Make sure to document your data models, what each column mean, any caveats in your data and how the data is generated.
3. Data quality
The most important thing the data users care about is the quality of the data, make sure to have monitoring, alerting systems to alert you in case of quality issues.
Components of a Data Engineering Platform
All data engineering platforms have 3 main sections, they are
Extract- extracting data from source systemsTransform- transforming the data according to business/data model requirementsLoad- loading the data into a destination table
We add another layer, which is what the data users use, the presentation layer(aka Dashboards)
Dashboard- used by data users to gather insights from the cleaned data
When we operate in production environment, it is crucial to have a monitoring and alerting system to alert you in case something breaks, or data quality tests fail
Monitoring- used by engineers/analysts to check status of the data pipelineAlerting- used to alert engineers/analysts in case of failuresscheduling- used by engineers to schedule the ETL runs
ETL vs ELT
ETL is the traditional processing framework, involving extraction of data from source systems, doing some transformations(cleaning) the data and finally loading the data into a data warehouse.
ELT is similar, but in a different order as the name suggests. With the advent of powerful data warehouses like snowflake, bigquery, redshift spectrum that allow separation of storage and execution, it has become economical to store data in the data warehouse and then transform them as required. Since these systems allow for cheap storage and are able to perform a wide range of transformations and eliminates the need for a separate transformation system, they have become quite popular.
KISS (keep it simple, stupid)
When designing a data engineering platform, most engineers jump to very powerful tools, which may not be necessary and adds to the complexity of the design and maintenance. In most cases a simple data engineering platform with easy to use tools will be much more efficient in terms of
- the speed of getting data pipelines up and running
- getting new engineers up to speed
- spending less time worrying about the service management
- complexities
- providing business value
- overall engineering cost
Managed open source service v open source
This is a tricky one, since usually engineers have very strong feelings about using open source systems. Open source is great, but if all you need to do is bring data to a data warehouse and do some transformations in the data warehouse with industry standard security, monitoring and alerting systems, managed open source service are amazing.
For example if you want to move data from multiple different OLTP databases and some files in different locations into a data warehouse without affecting the application performance, you will have to work with complex CDC systems or you can get a account from stitch and set up log based data replication to do it for you. Here is a brief comparison of OS tools vs managed OS services.
| function | Open source | Managed services |
|---|---|---|
| Extract | Debezium or SQL script to pull to data | Stitch or fivetran |
| Transform | Open source SQL/ Apache Spark | fivetran or dbt cloud |
| Load | SQL script | Stitch or fivetran |
| Dashboard | Metabase / graphana | AWS Quicksight or looker or tableau |
| Monitor | Airflow | dbt cloud |
| Alert | Airflow with custom logic | dbt cloud |
| Schedule | Airflow | dbt cloud |
vendor lock-in
Vendor ELT tools are not without its downfalls. Vendor lock-in is when your data pipelines becomes too dependent on the vendor tool, that it becomes impractical to change vendors or move to open source when you have very complex requirements. A good compromise is to choose a managed service provider which does the service management but uses an underlying open source system. For example stitch uses singer.io, Astronomer offers managed Airflow, etc.
Simple ELT system
In this section we will build a simple ELT system using service providers that manage open source tools for us. The aim of this project is to show how easy it is to quickly build and manage a simple data engineering platform without spending a lot of time or money on development, troubleshooting or service management.
Pre requisites
- AWS account and AWS S3 bucket setup here
- AWS RDS Postgres setup here
- Stitch account
- DBT cloud account
- pgcli
- Download customer data from here
after setting up the prerequisites you must have
- An AWS S3 bucket
- An AWS RDS Postgres endpoint, user, database name and port details
- A Stitch account
- A DBT cloud account
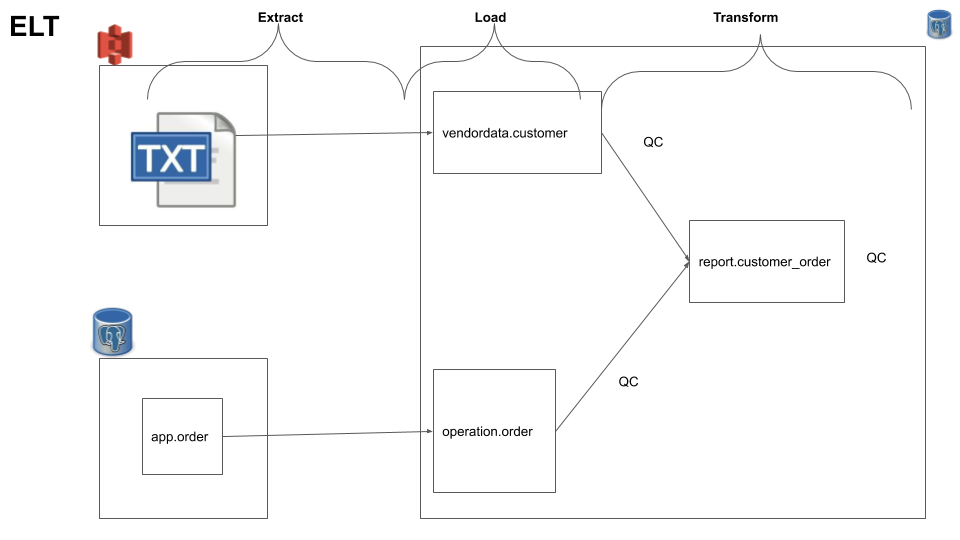
Design
This is going to be our ELT system design.
Data setup
Before we begin setting up stitch integration and dbt transformations we need to setup our Data. In this example we will use a AWS RDS postgres as our source database and our data warehouse as well. For most cases postgres combined with the appropriate data model will work fine for a data warehouse, unless your data is truly large( approximately > 200GB, this may vary on the type of machine used to run postgres).
1. Upload data to AWS S3
In our project we assume a data vendor drops customer information into a S3 bucket, in order to replicate this we need to upload the customer.csv that you downloaded into your S3 bucket you created. Note down its S3 file path, you will need this later when we setup the stitch integration.
2. Create schemas and order_status table in your postgres instance
Once you have the AWS RDS Postgres instance setup, you can create the schemas and the order table. Log into your postgres instance using the pgcli tool as such
CREATE SCHEMA app;
CREATE SCHEMA report;

CREATE TABLE IF NOT EXISTS app.order(
    order_id varchar(50),
    customer_order_id varchar(50),
    order_status varchar(20),
    order_purchase_timestamp timestamp
);


INSERT INTO app.order(order_id, customer_order_id, order_status, order_purchase_timestamp)
VALUES ('e481f51cbdc54678b7cc49136f2d6af7','9ef432eb6251297304e76186b10a928d','delivered','2020-07-01 10:56:33');

INSERT INTO app.order(order_id, customer_order_id, order_status, order_purchase_timestamp)
VALUES ('53cdb2fc8bc7dce0b6741e2150273451','b0830fb4747a6c6d20dea0b8c802d7ef','delivered','2020-07-02 20:41:37');

INSERT INTO app.order(order_id, customer_order_id, order_status, order_purchase_timestamp)
VALUES ('6942b8da583c2f9957e990d028607019','52006a9383bf149a4fb24226b173106f','shipped','2020-07-03 11:33:07');
Now that we have our base data infrastructure set up, we can start creating and automating our ELT process.
Integration setup (EL)
In this section we will setup a Extract and Load data pipeline using stitch.
1. EL for AWS S3 -> Data Warehouse
Follow steps here to set up the AWS S3 integration using stitch, with the following parameters
- Source S3 path and the file delimiter
- data warehouse connection details (endpoint, port, username, password and database name)
- the destination data warehouse schema name as
vendordataand table name ascustomer - the run frequency can be set to
2min
Once you switch on the stitch data pipeline, you will see that the data extraction and load is complete from the UI
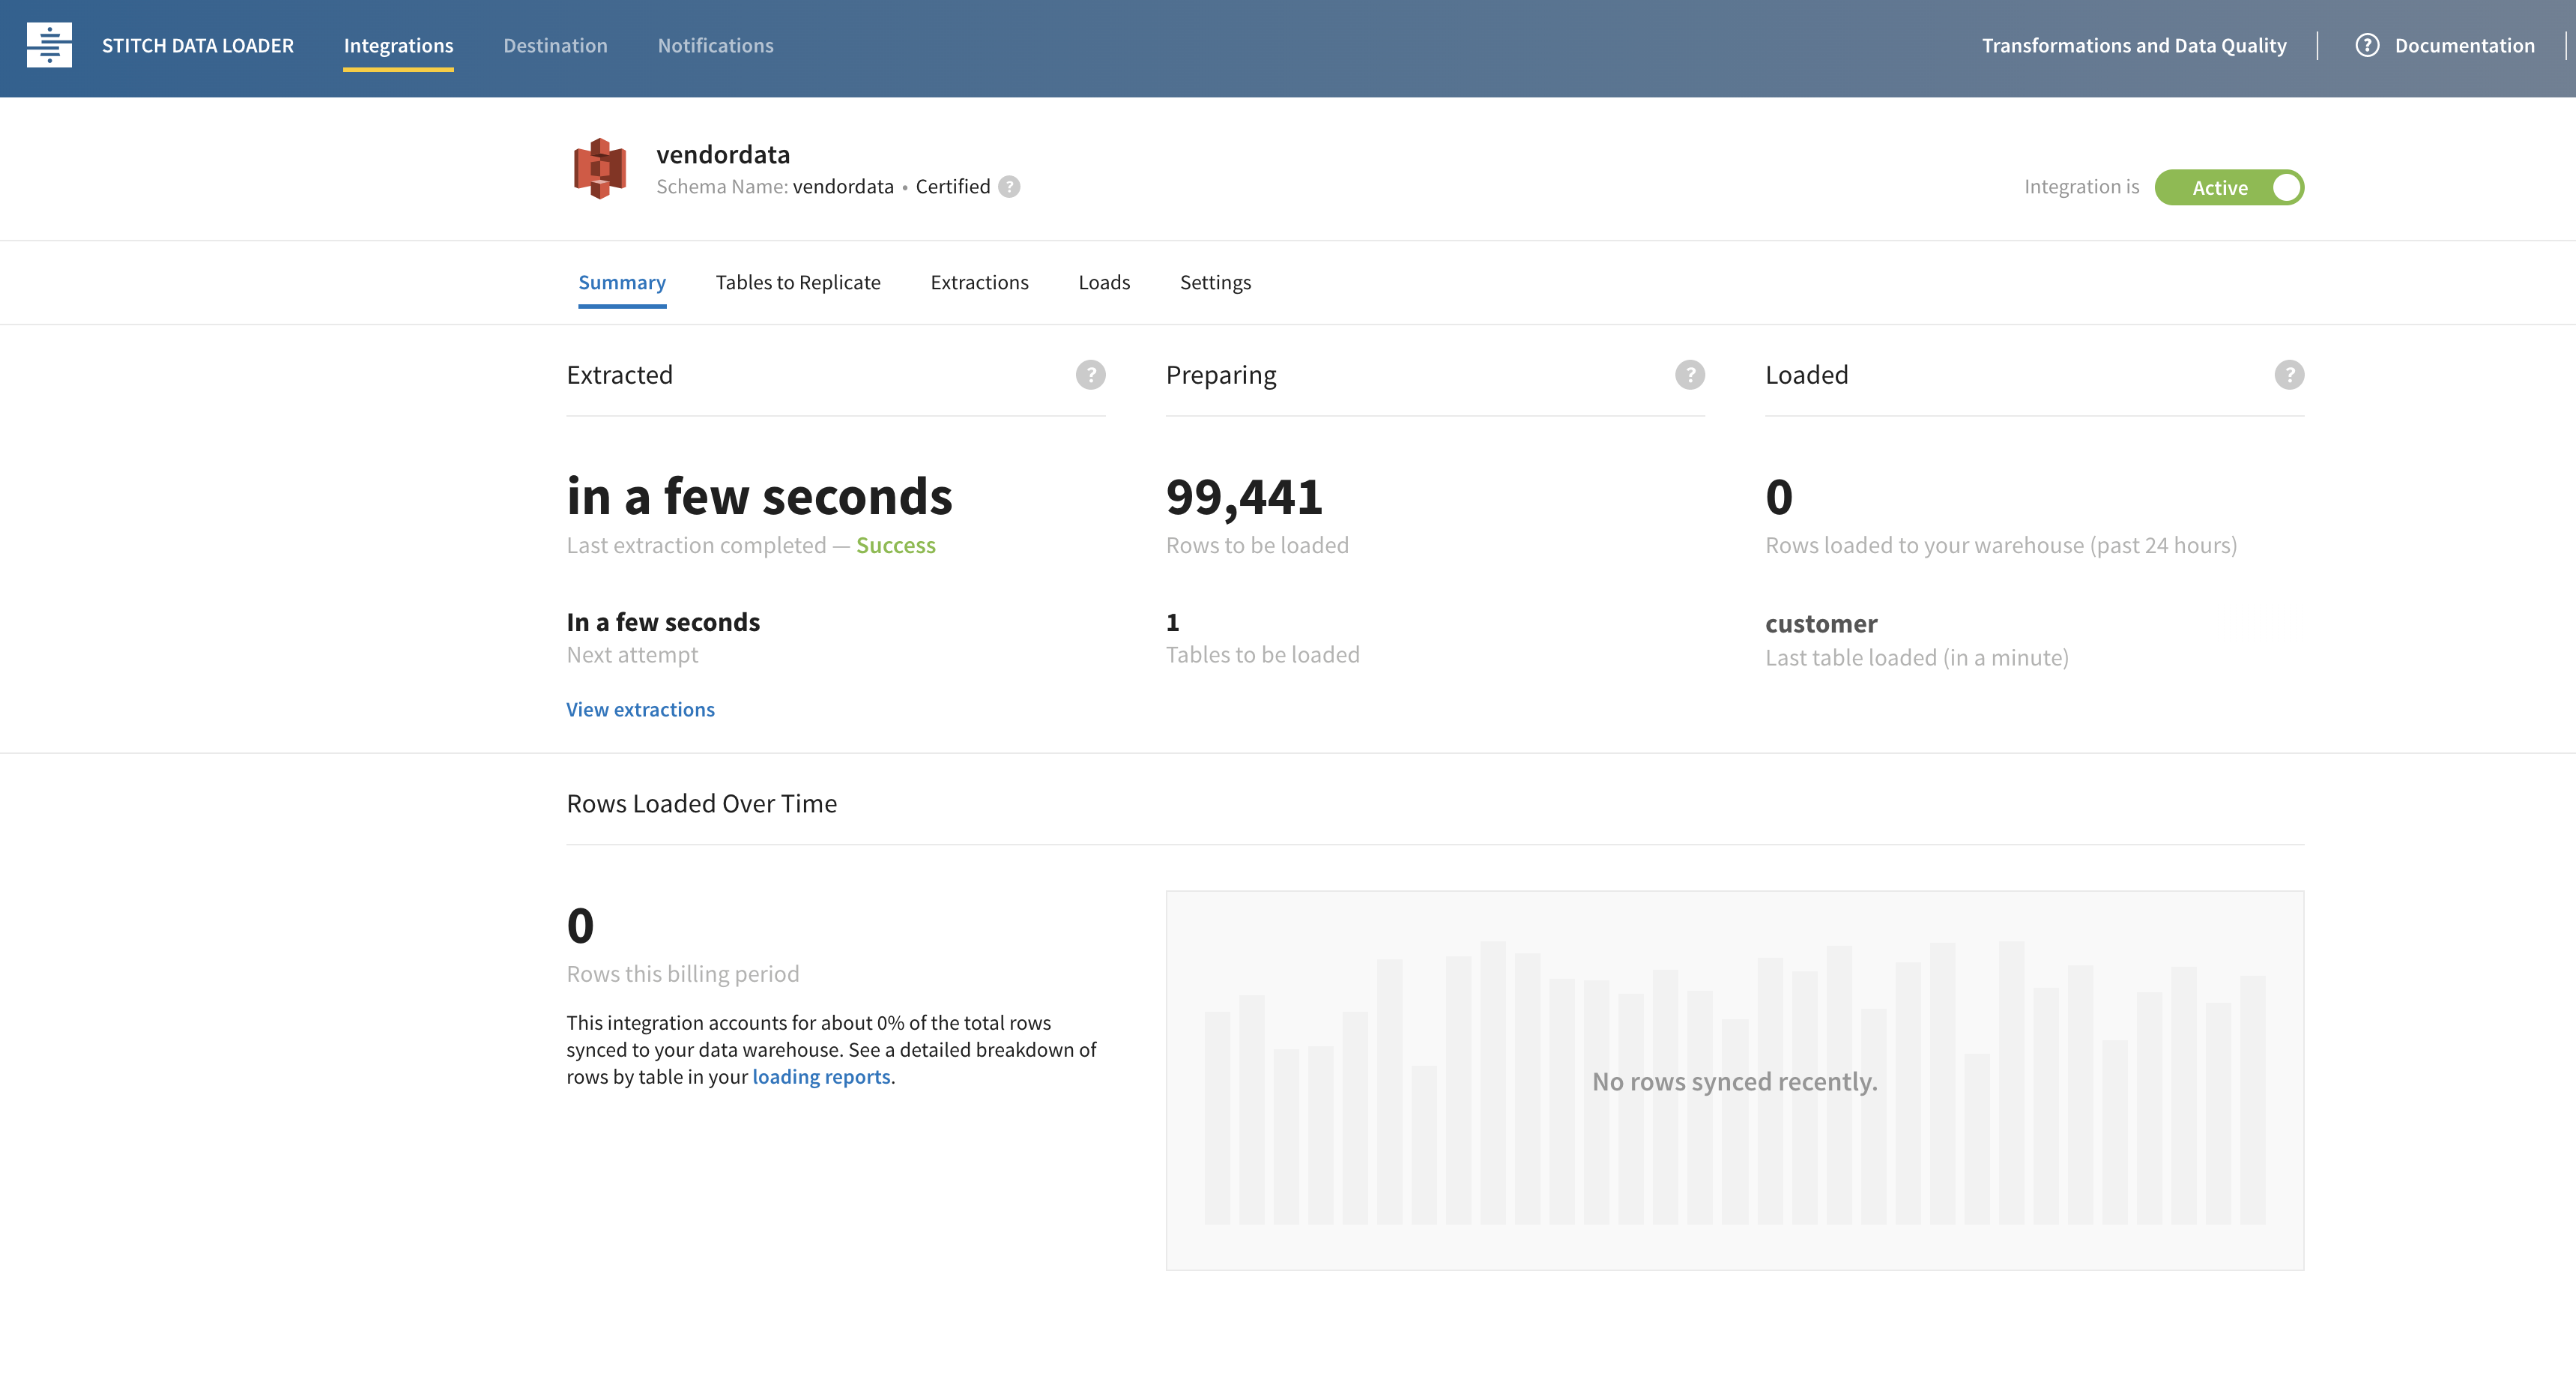
After waiting for a few min and making sure the loaded section in the UI shows some columns, You can check if the data was loaded by waiting for at least on data load to run(check this on stitch dashboard) and logging into your data warehouse as such
You can modify the run frequency by choosing the integration and settings and using a custom schedule as such.

2. EL for app database -> Data Warehouse
Follow steps here to setup an app database to data warehouse integration using stitch, with the following parameters
- Source database connection details (endpoint, port, username, password and database name)
- Source table to replicate -
app.order - Destination schema name -
operation - data warehouse connection details (endpoint, port, username, password and database name) (not needed if you have already set the destination details in the previous section)
- run frequency can be set to
10min
Once you switch on the stitch data pipeline, you will see that the data extraction and load is complete from the UI

After waiting for a few min and making sure the loaded section in the UI shows some columns, You can check if the data was loaded by logging into your data warehouse as such
You will notice that the data is duplicated this is due to key based replication constraint with Stitch, check this Key-Based Incremental Replication
Transformation setup (T)
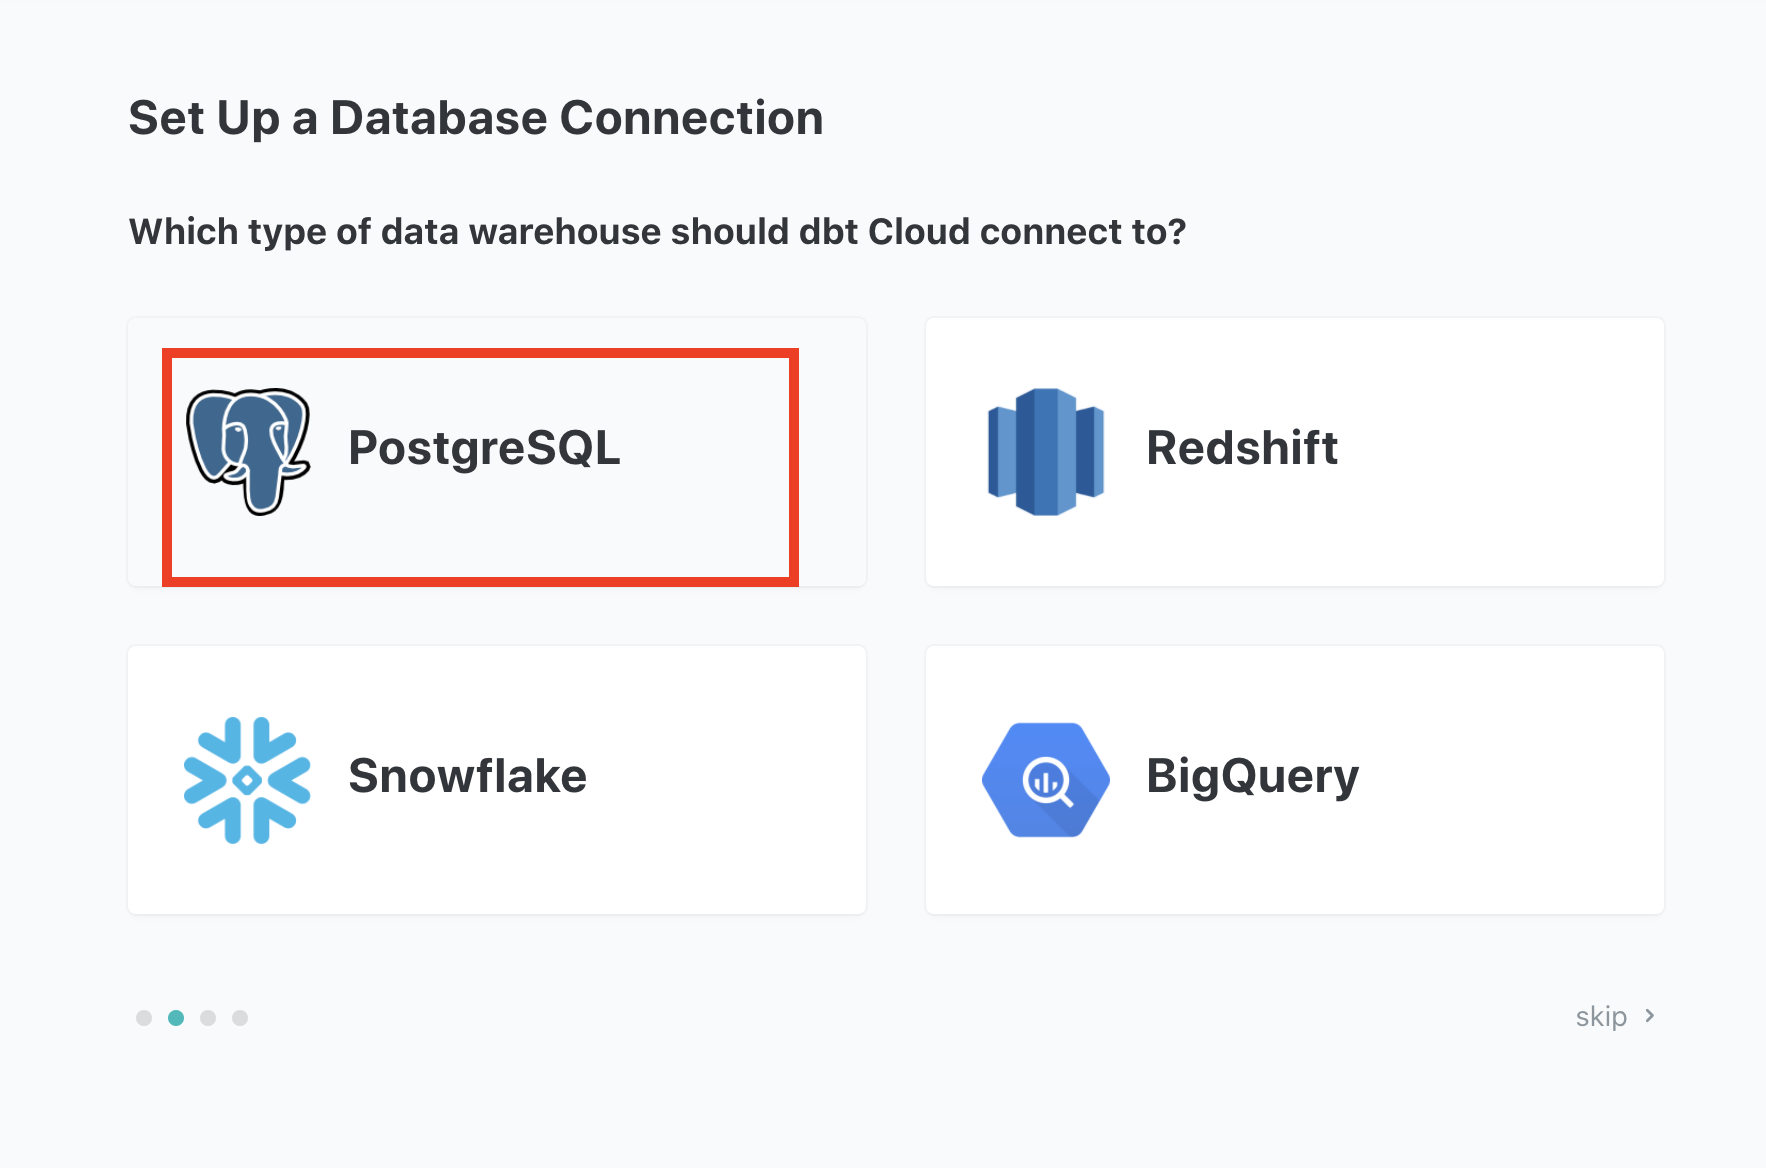
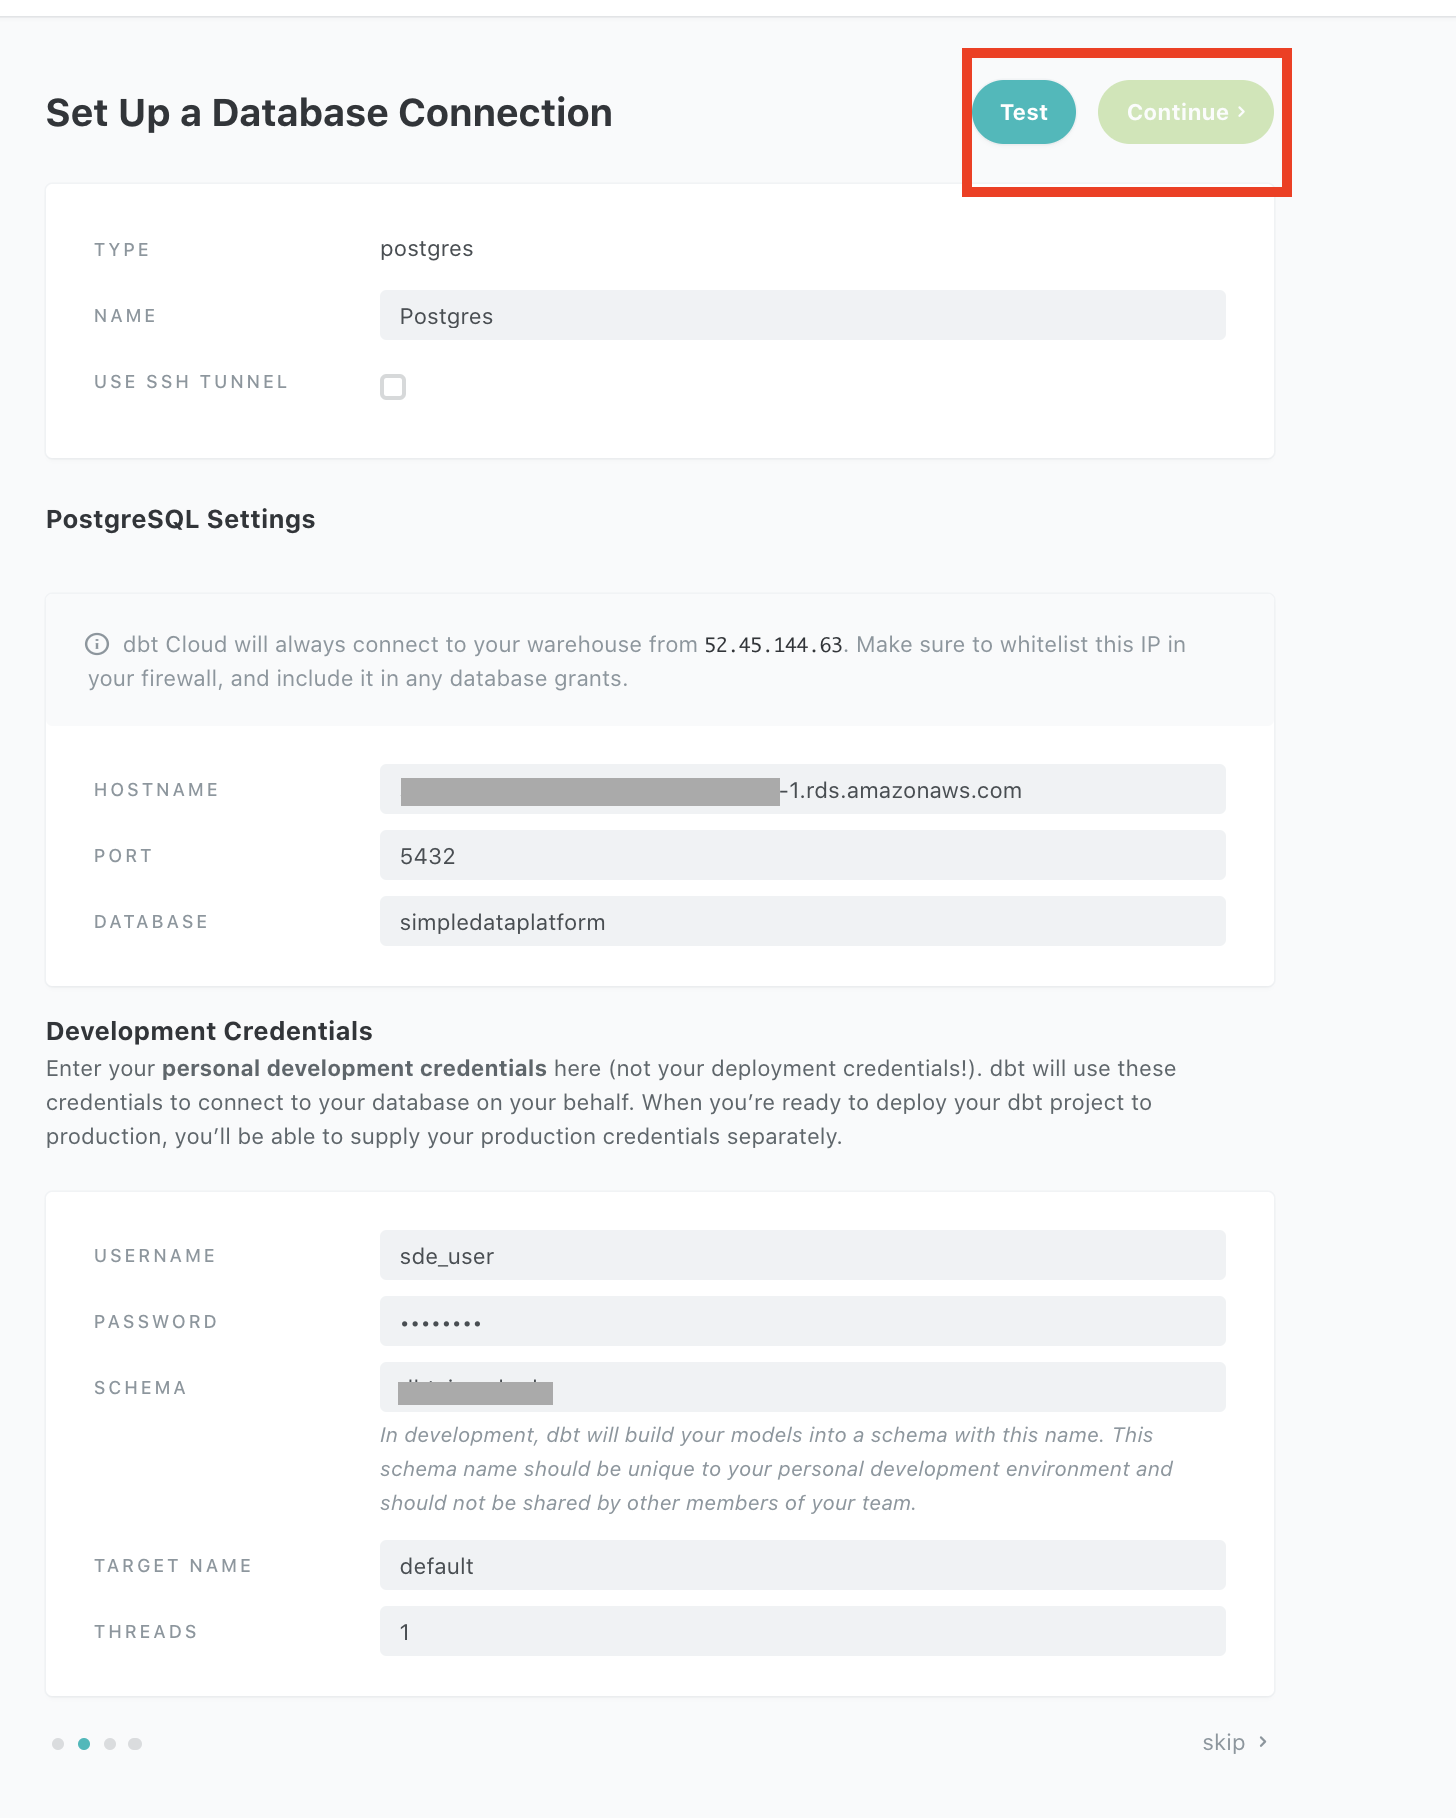
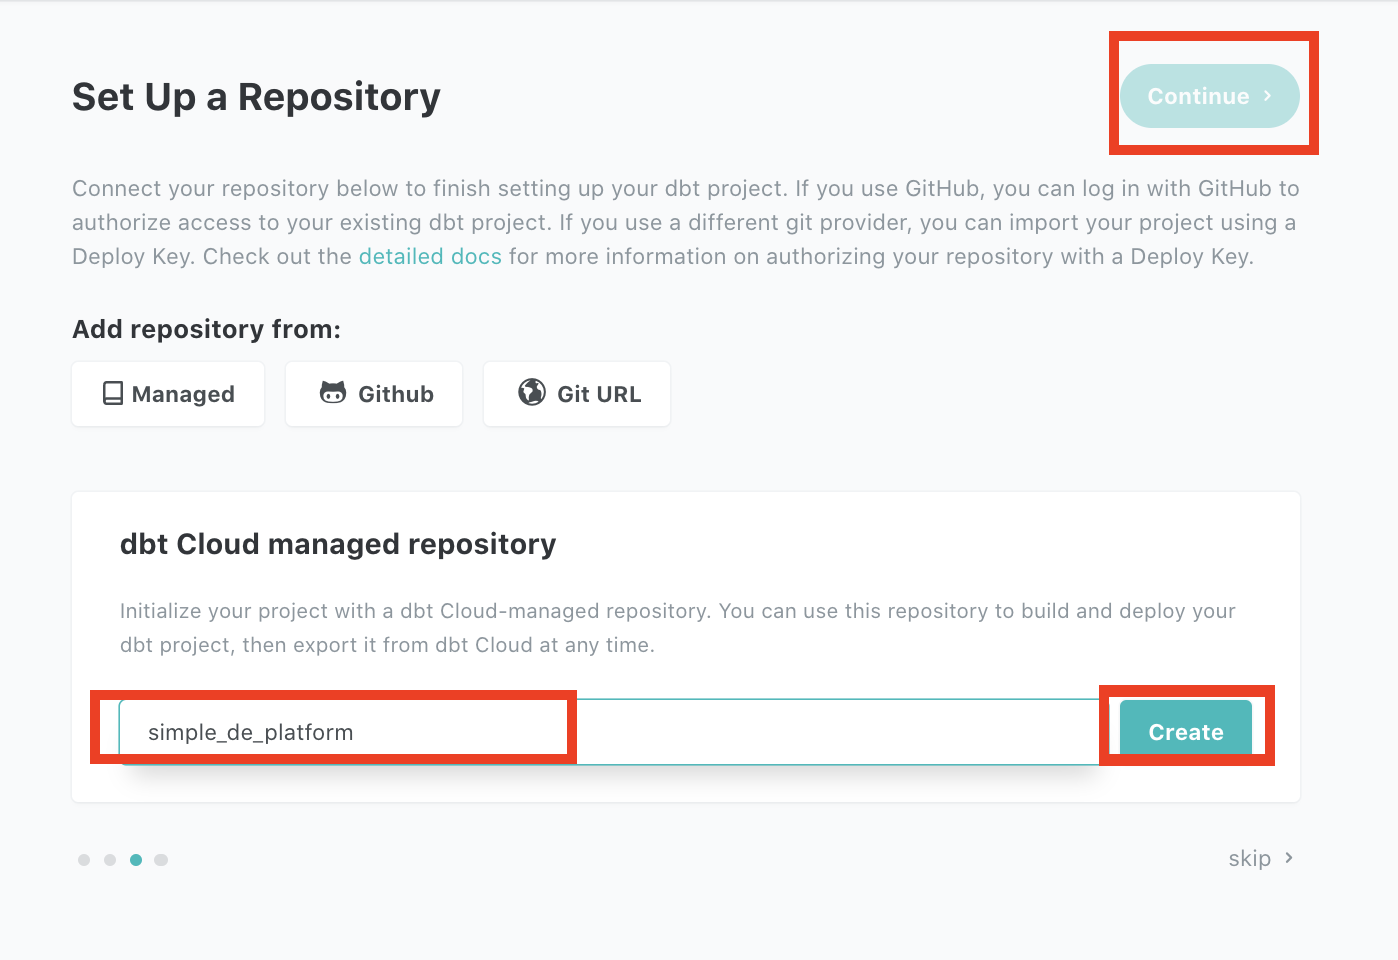
Now that we have the data required in our data warehouse, we can work on transforming the data as needed. In our use case let’s assume we are building a reporting database. We are going to be using dbt cloud service, which provides managed dbt instances.
1. setup a dbt project
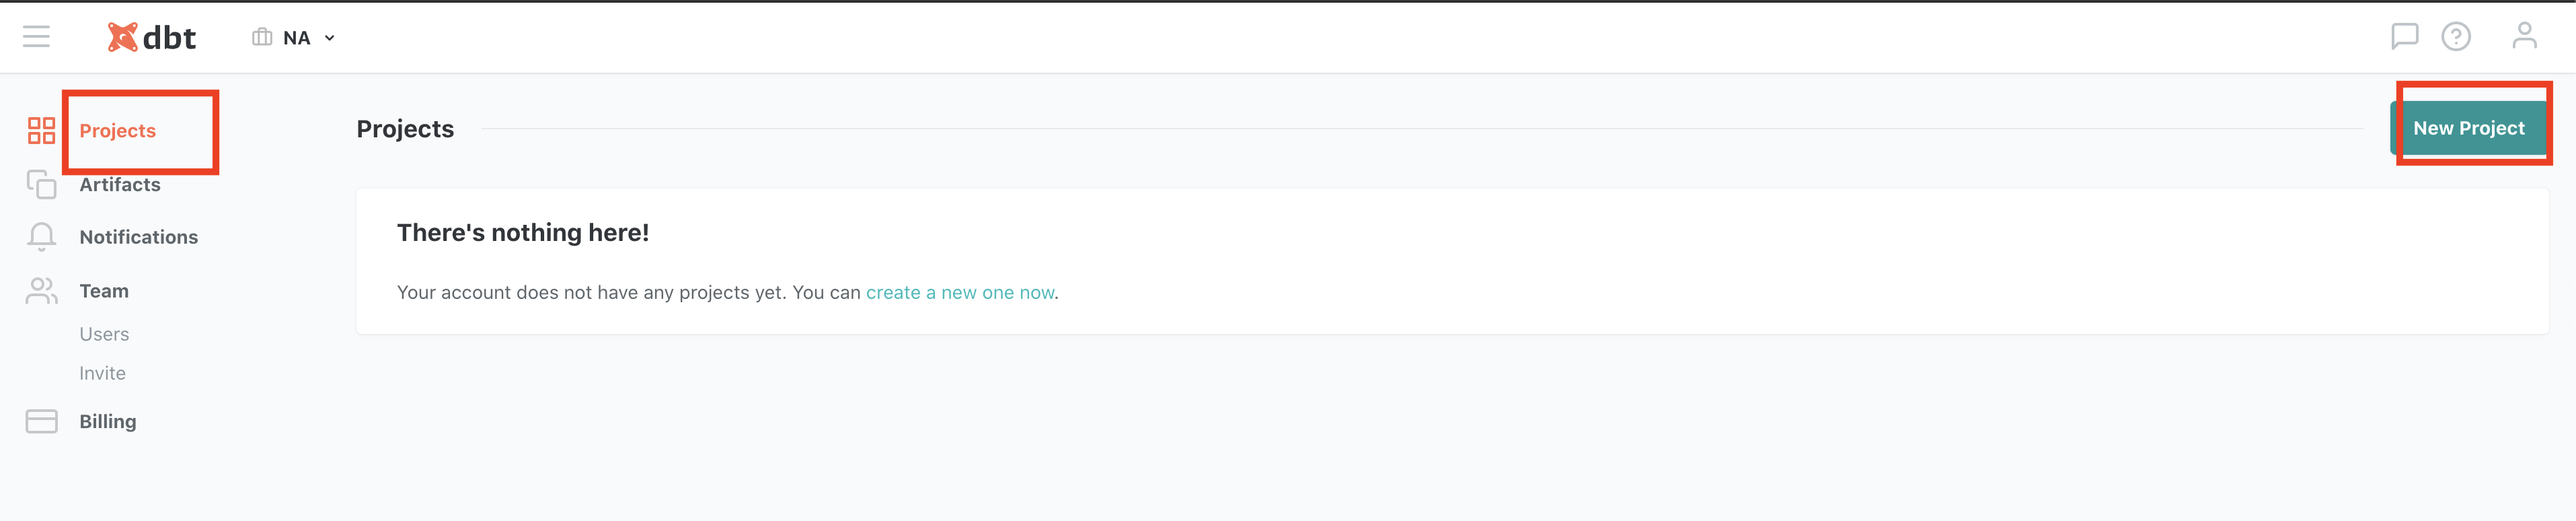
In the dbt cloud console, choose the hamburger icon on the top left then choose Account settings -> Projets-> New Project

Follow the steps below to setup a project in our postgres instance and a code repository for the project

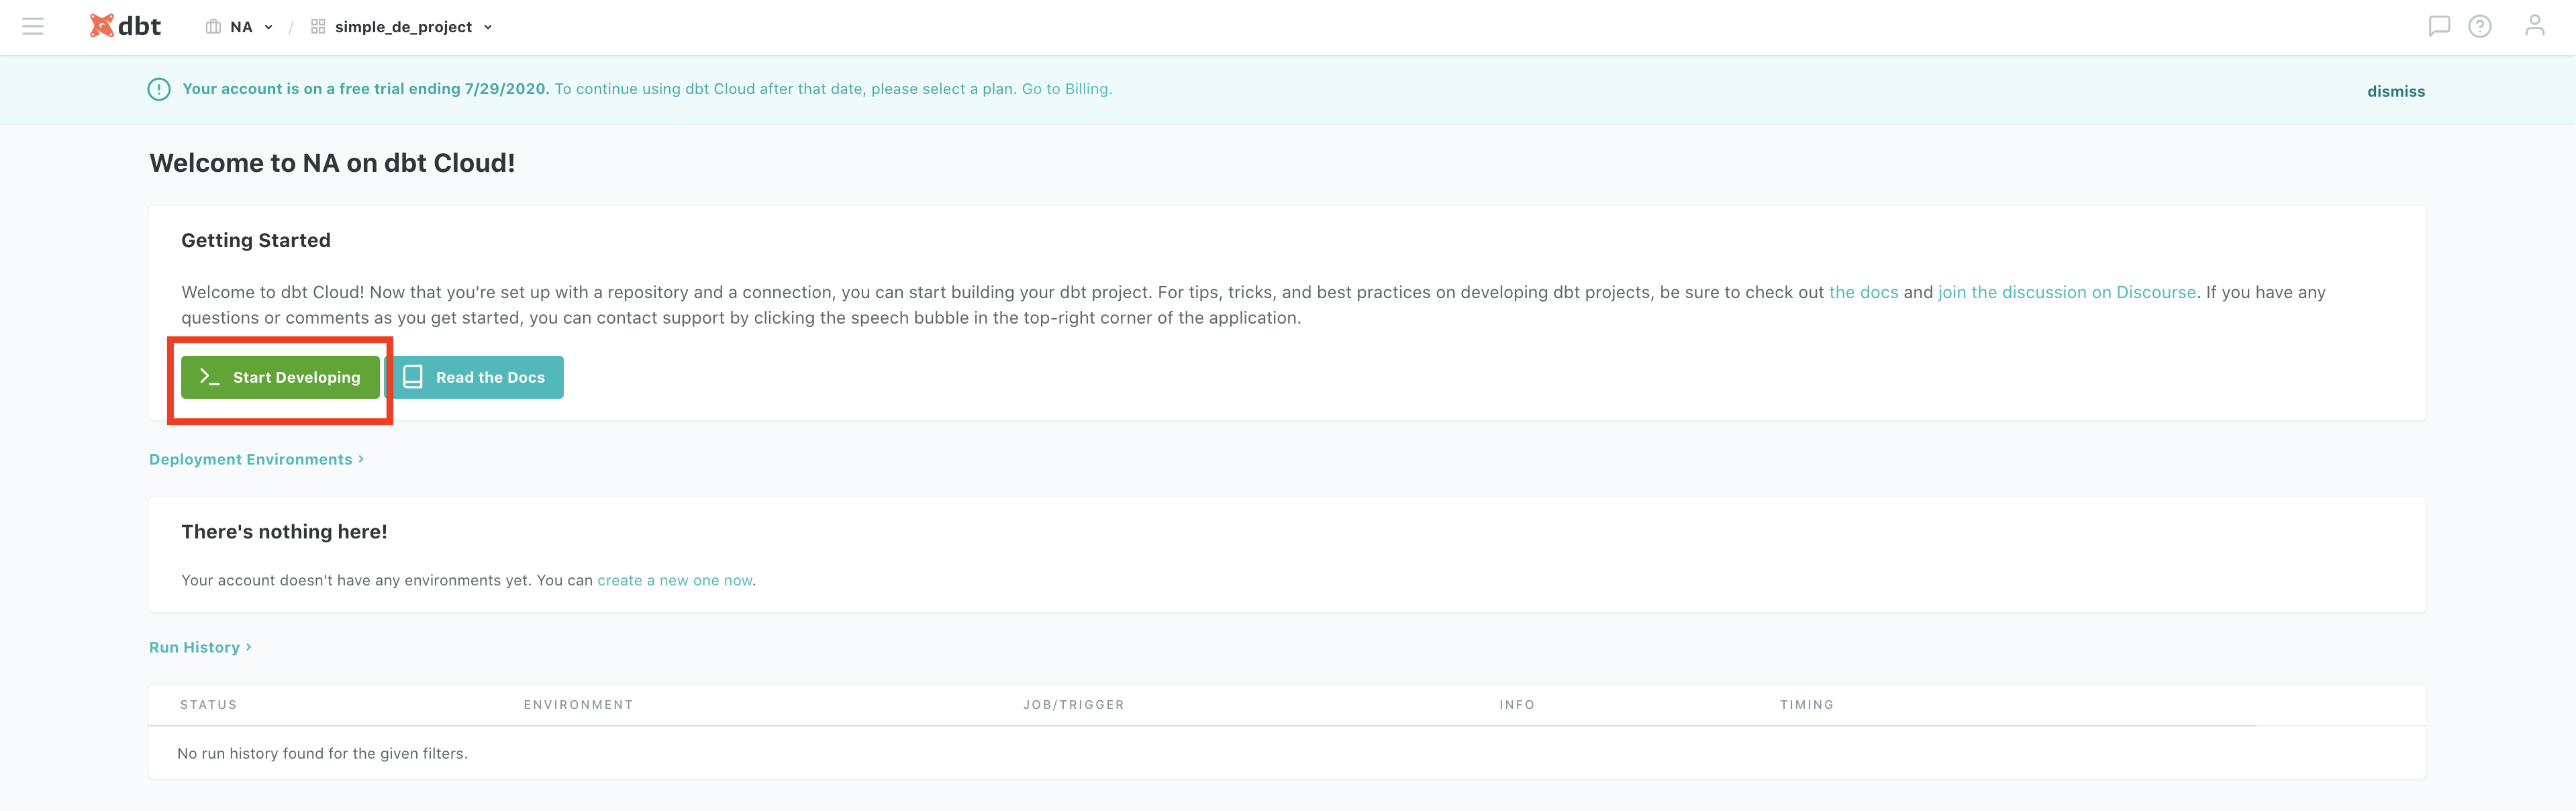
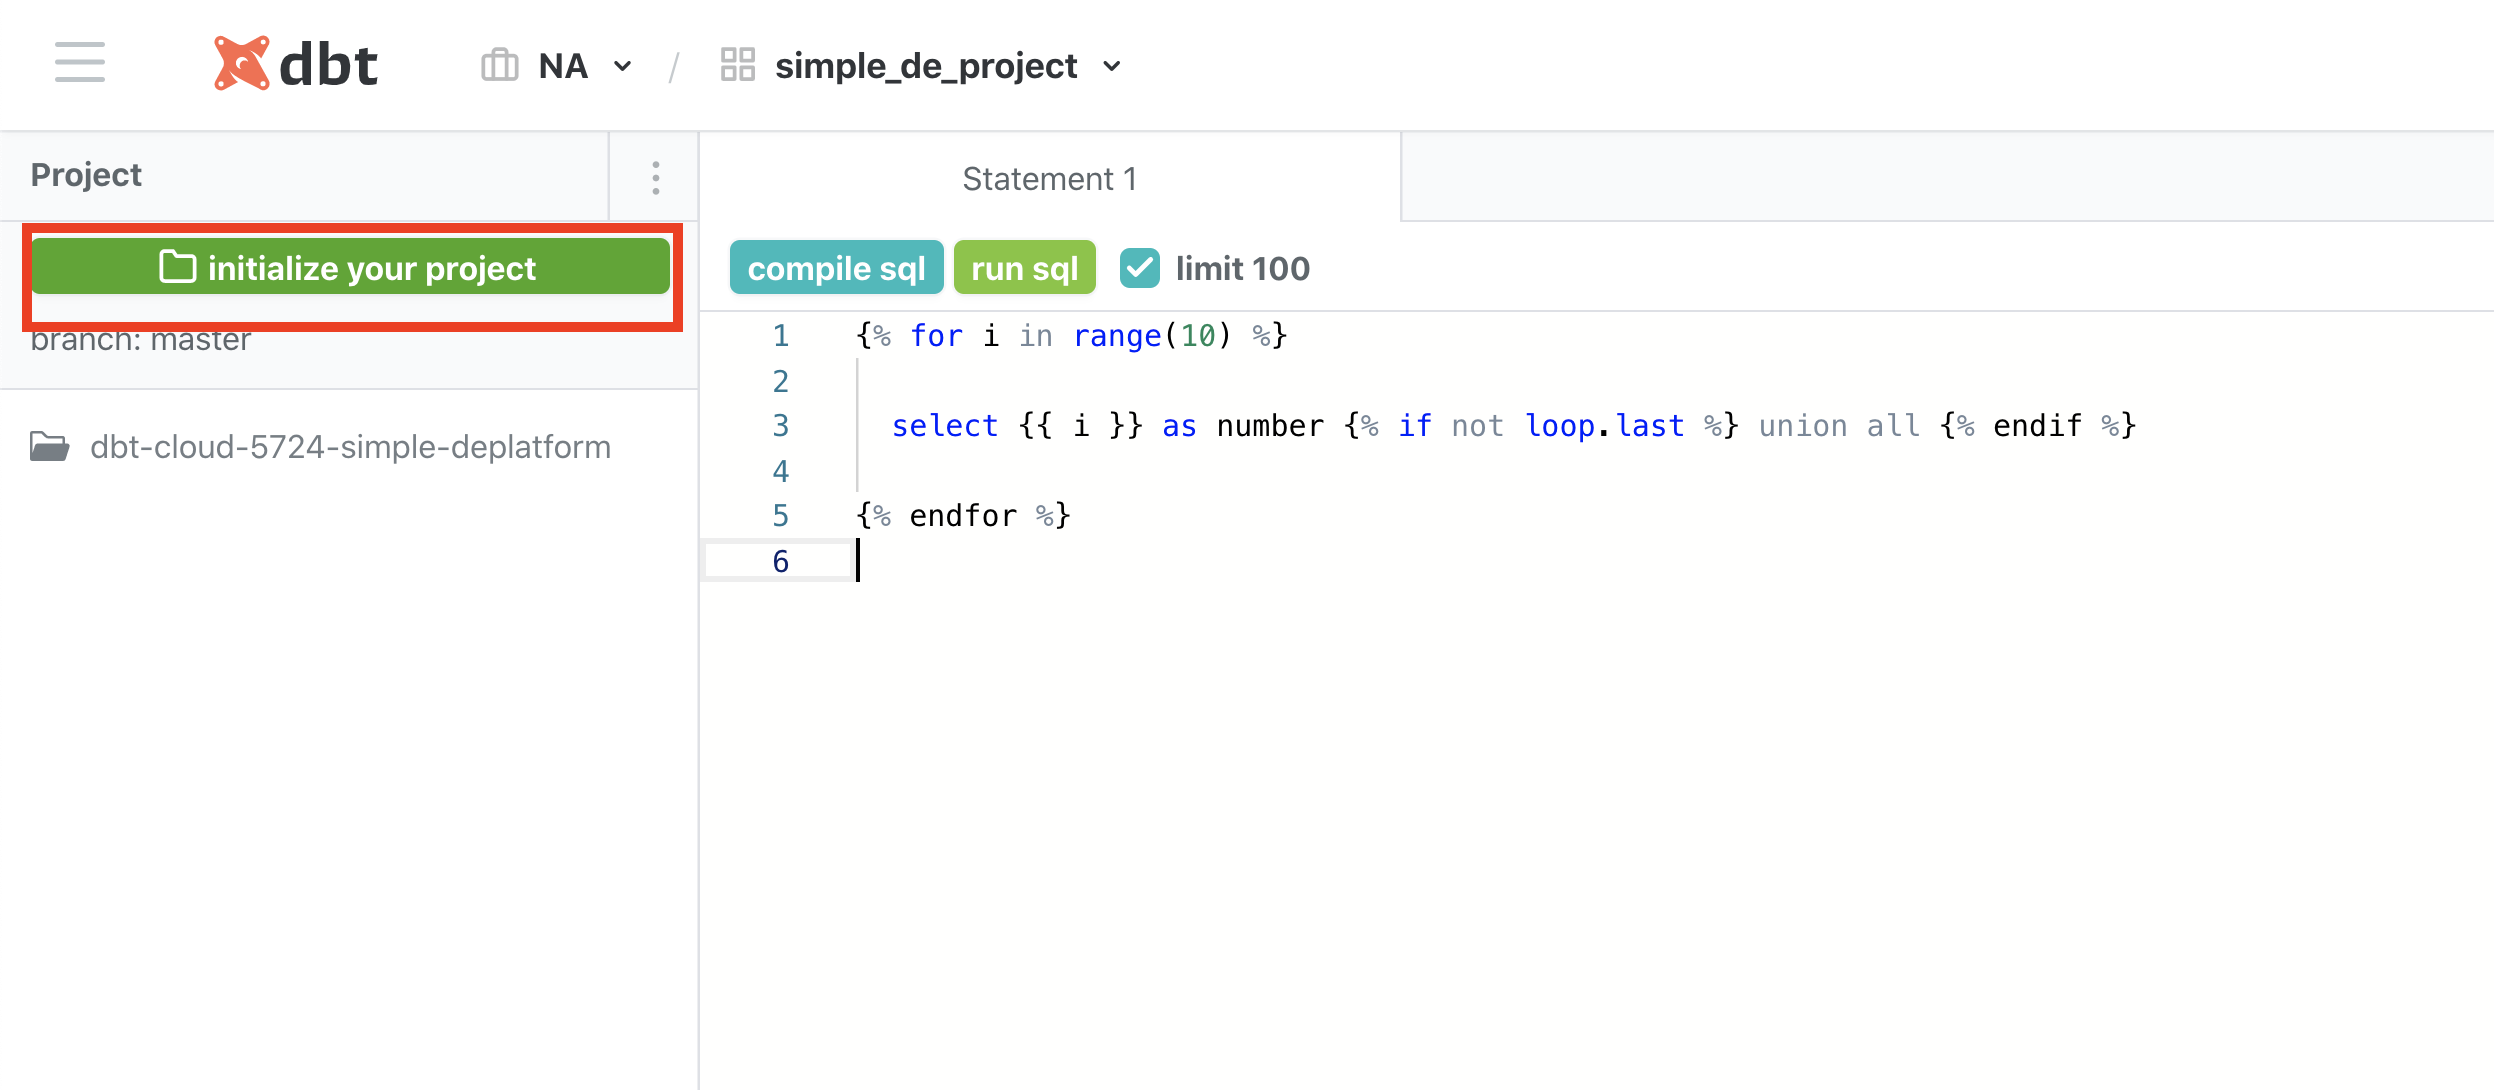
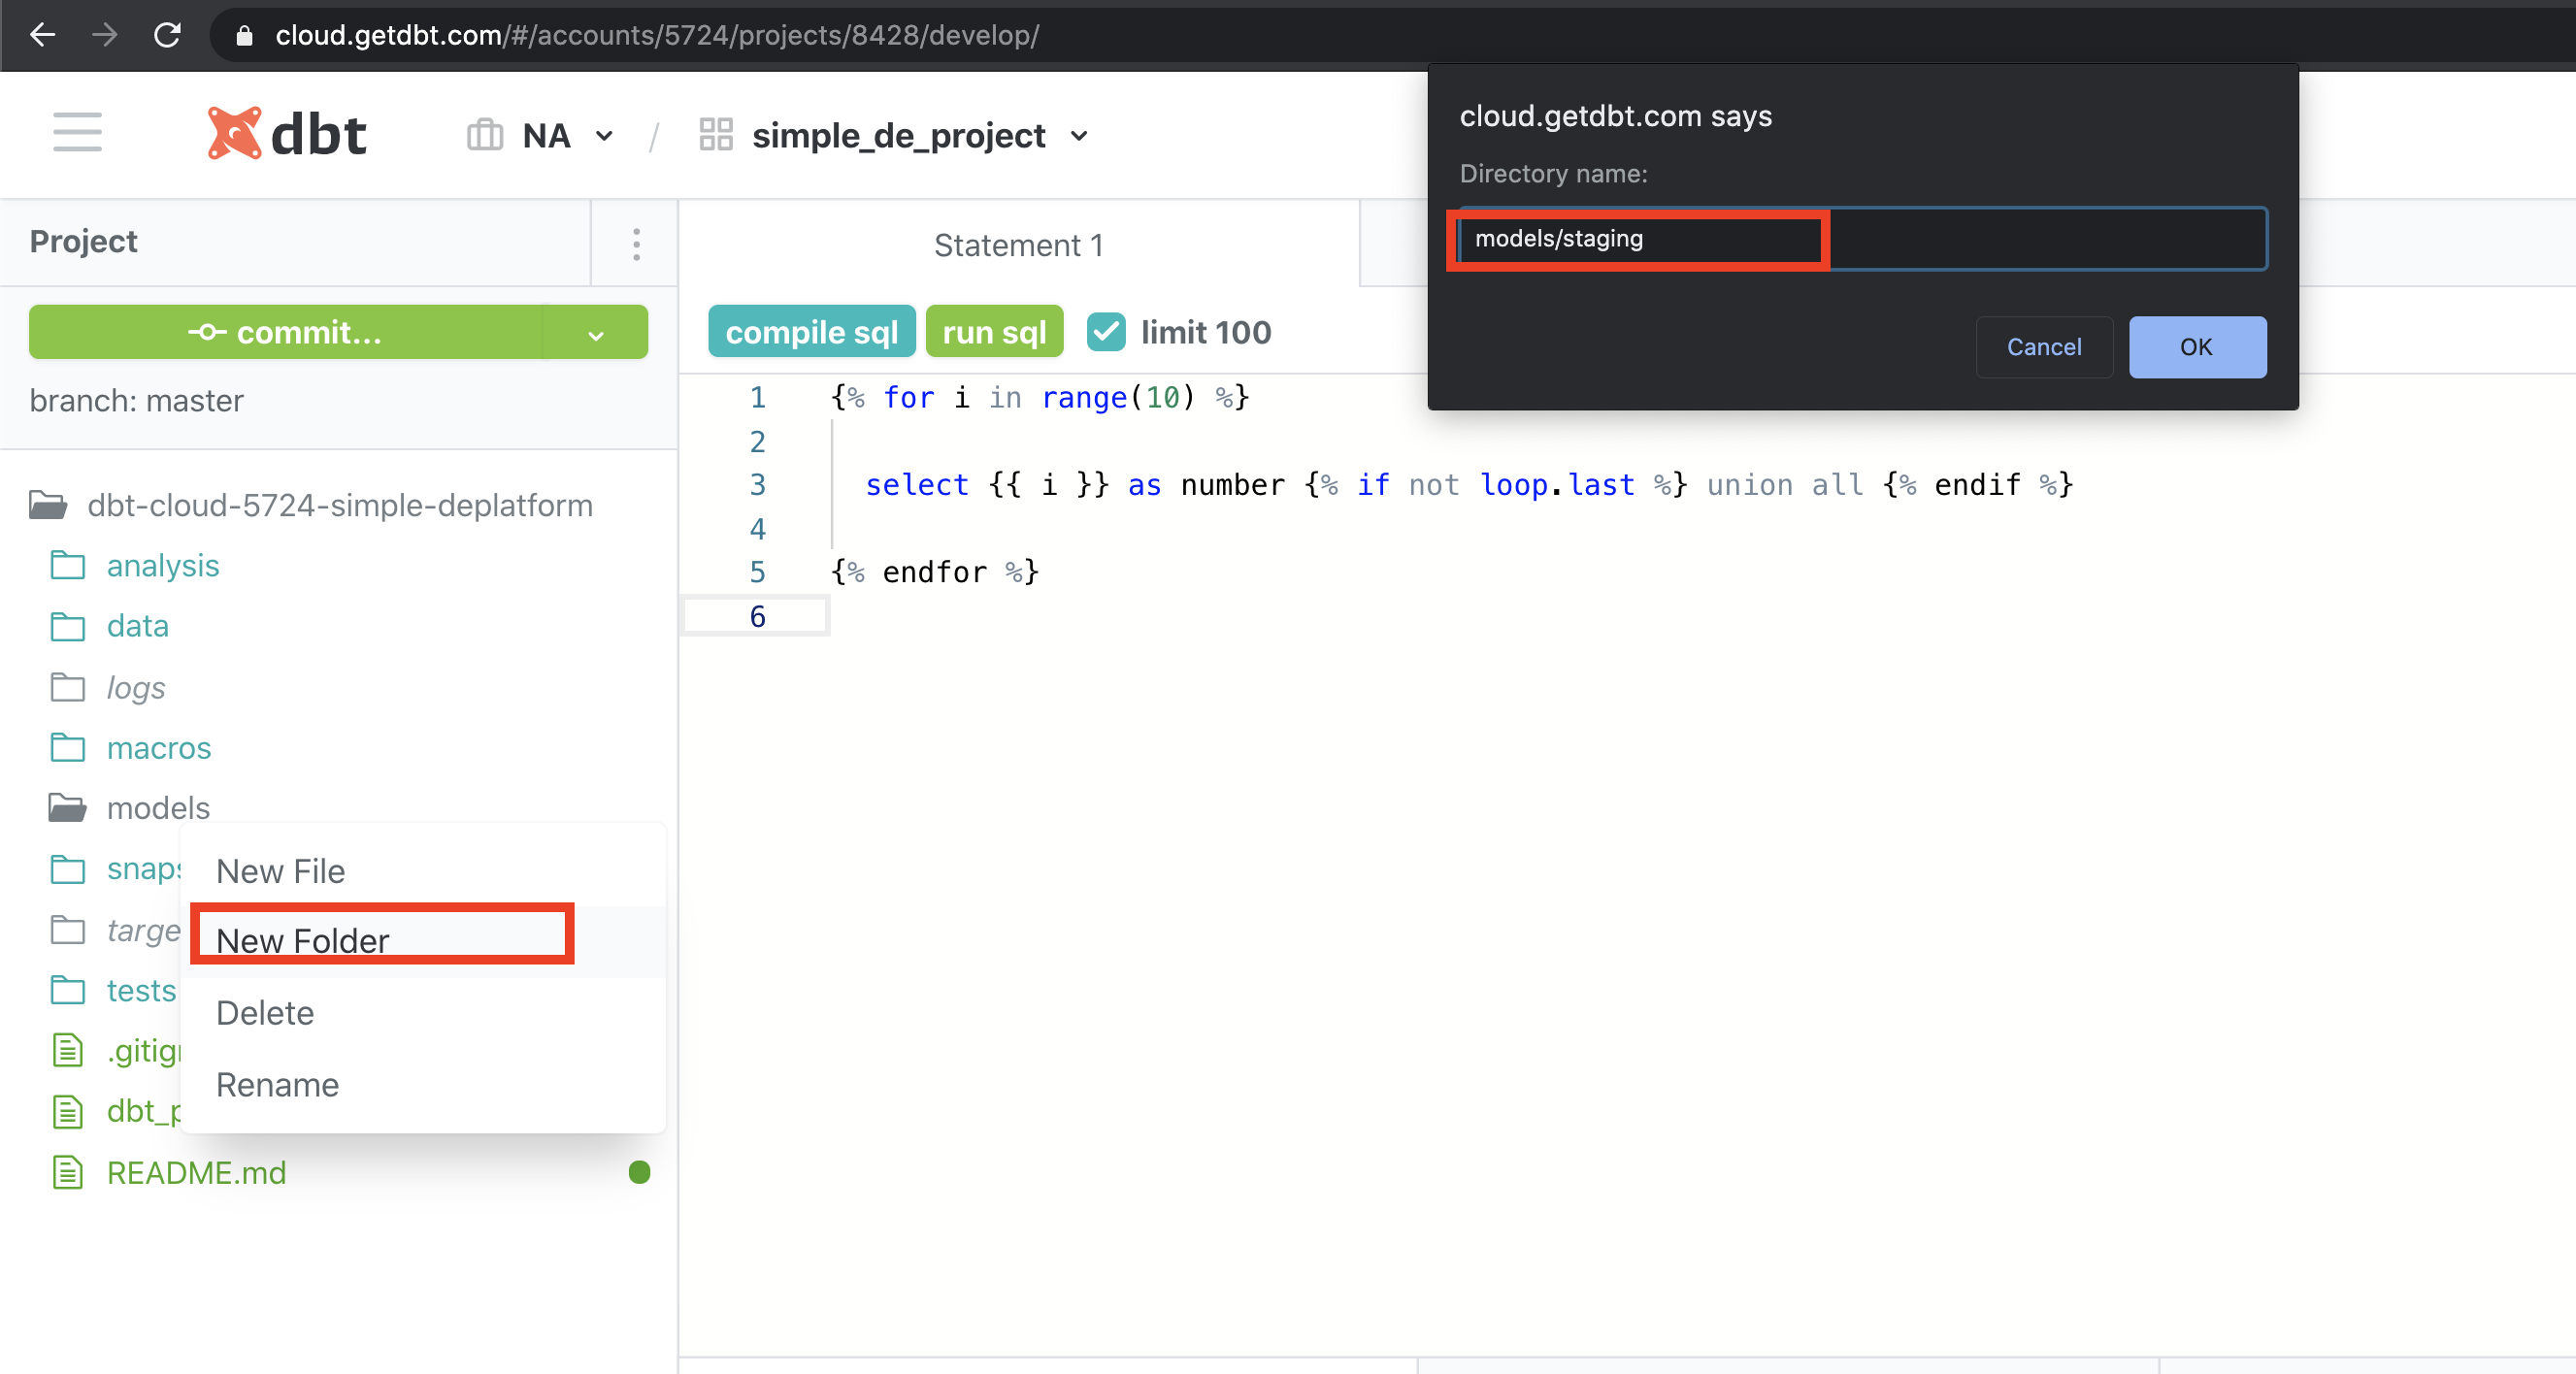
This will create a new project with its code repo managed by dbt cloud. Now click on Start Developing to start coding your project. Follow the steps below to initialize your project and create staging folder.
2. create the models
dbt uses select queries to create models (models can be tables, views, ephemeral(CTE) depending on settings, for our use case we use default views).
Generally we keep the raw data as staging and we do transformations on these tables to get the final tables. We created the staging folder in the previous section, now create a final folder.
Let’s create a model for our customer data, create a file called stg_customer.sql in the location models/staging/stg_customer.sql with the following content
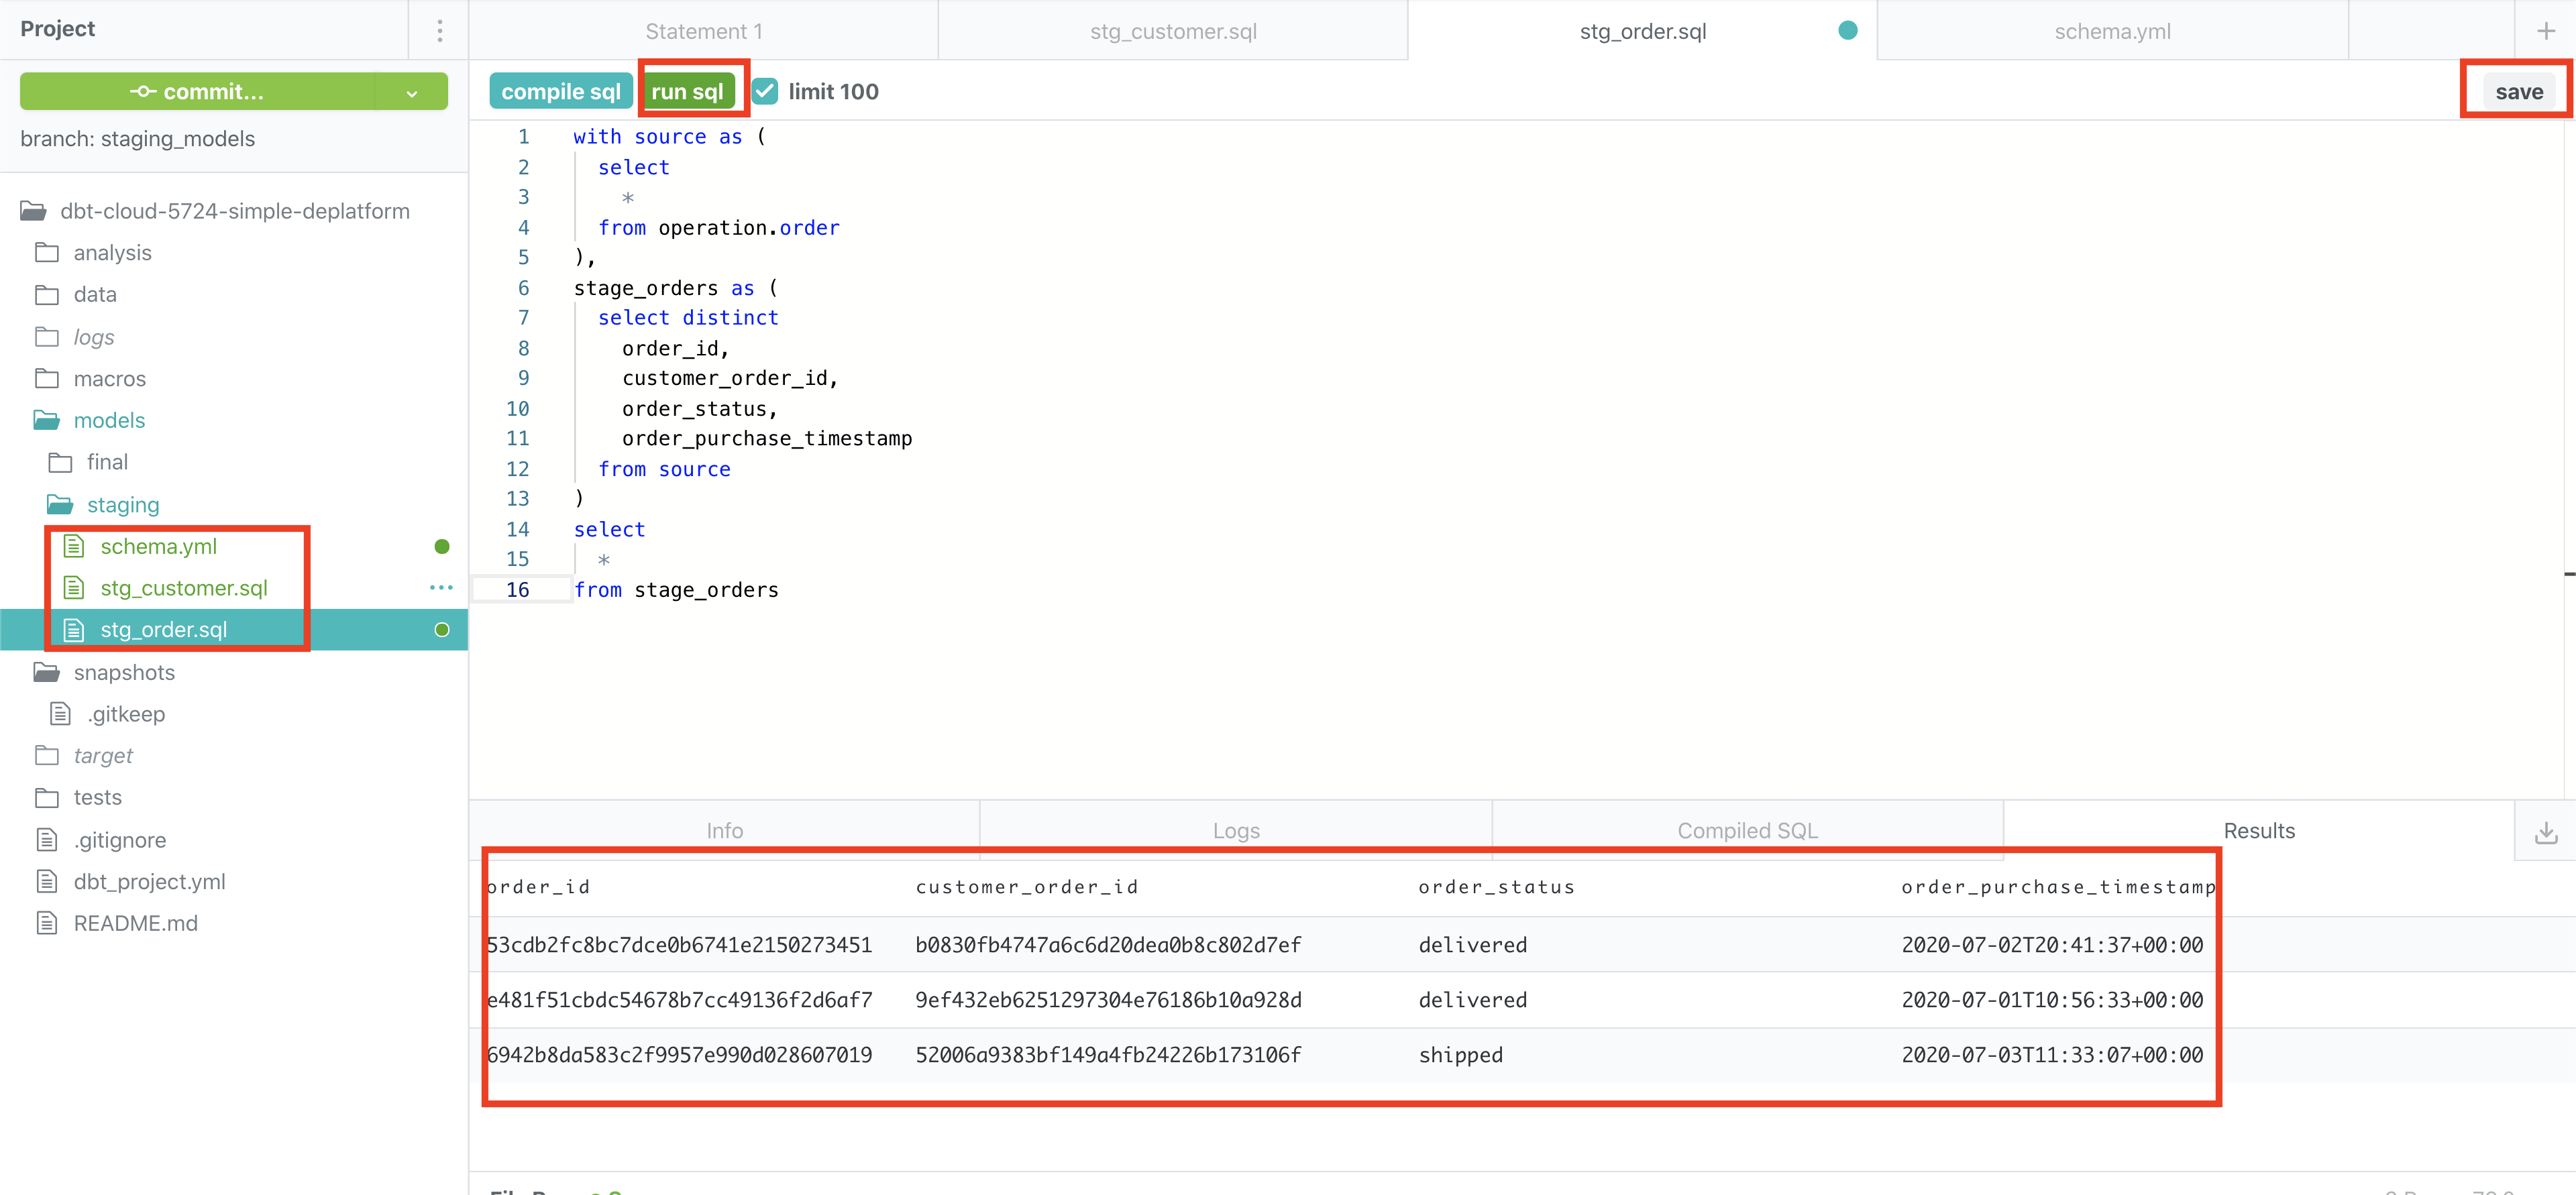
let’s create model for our order data, create a file called stg_order.sql in the location models/staging/stg_order.sql with the following content
Now that we have our staging models, lets write some code to perform quality checks on the staging models, before we create our final model. Create a file called schema.yml at models/staging/schema.yml with the following contents
The above yml file specifies testing
customer_unique_idofstg_customermodel should not have null valuesorder_idofstg_ordermodel should not have null values and should be uniquecustomer_order_idofstg_ordershould not have null values and should be uniqueorder_statusofstg_ordershould only have eitherdeliveredorshipped
If any of these test cases fail the pipeline will stop execution.
Now we can create our final model. Create a file customer_order.sql in the location models/final/customer_order.sql, with the following content
with customer as (
  select
    *
  from {{ ref('stg_customer') }}
),
orders as (
  select
    *
  from {{ ref('stg_order') }}
),
final as (
  select
    customer.customer_unique_id,
    orders.order_id,
    case
      orders.order_status
      when 'delivered' then 1
      else 0
    end
      as order_delivered
      from orders
      inner join customer on orders.customer_order_id = customer.customer_order_id
    )
  select
    *
  from final
In the above sql script, we use the ref function which recognizes the dependency using file names stg_customer and stg_order. We build a simple customer_order model which provide the order status as a flag. We can add some quality checks for this as well. Let’s create a simple test case, by creating file schema.yml at models/final/schema.yml with the following content
The final project structure should look like

You can try out the select commands using the run button, as shown below.
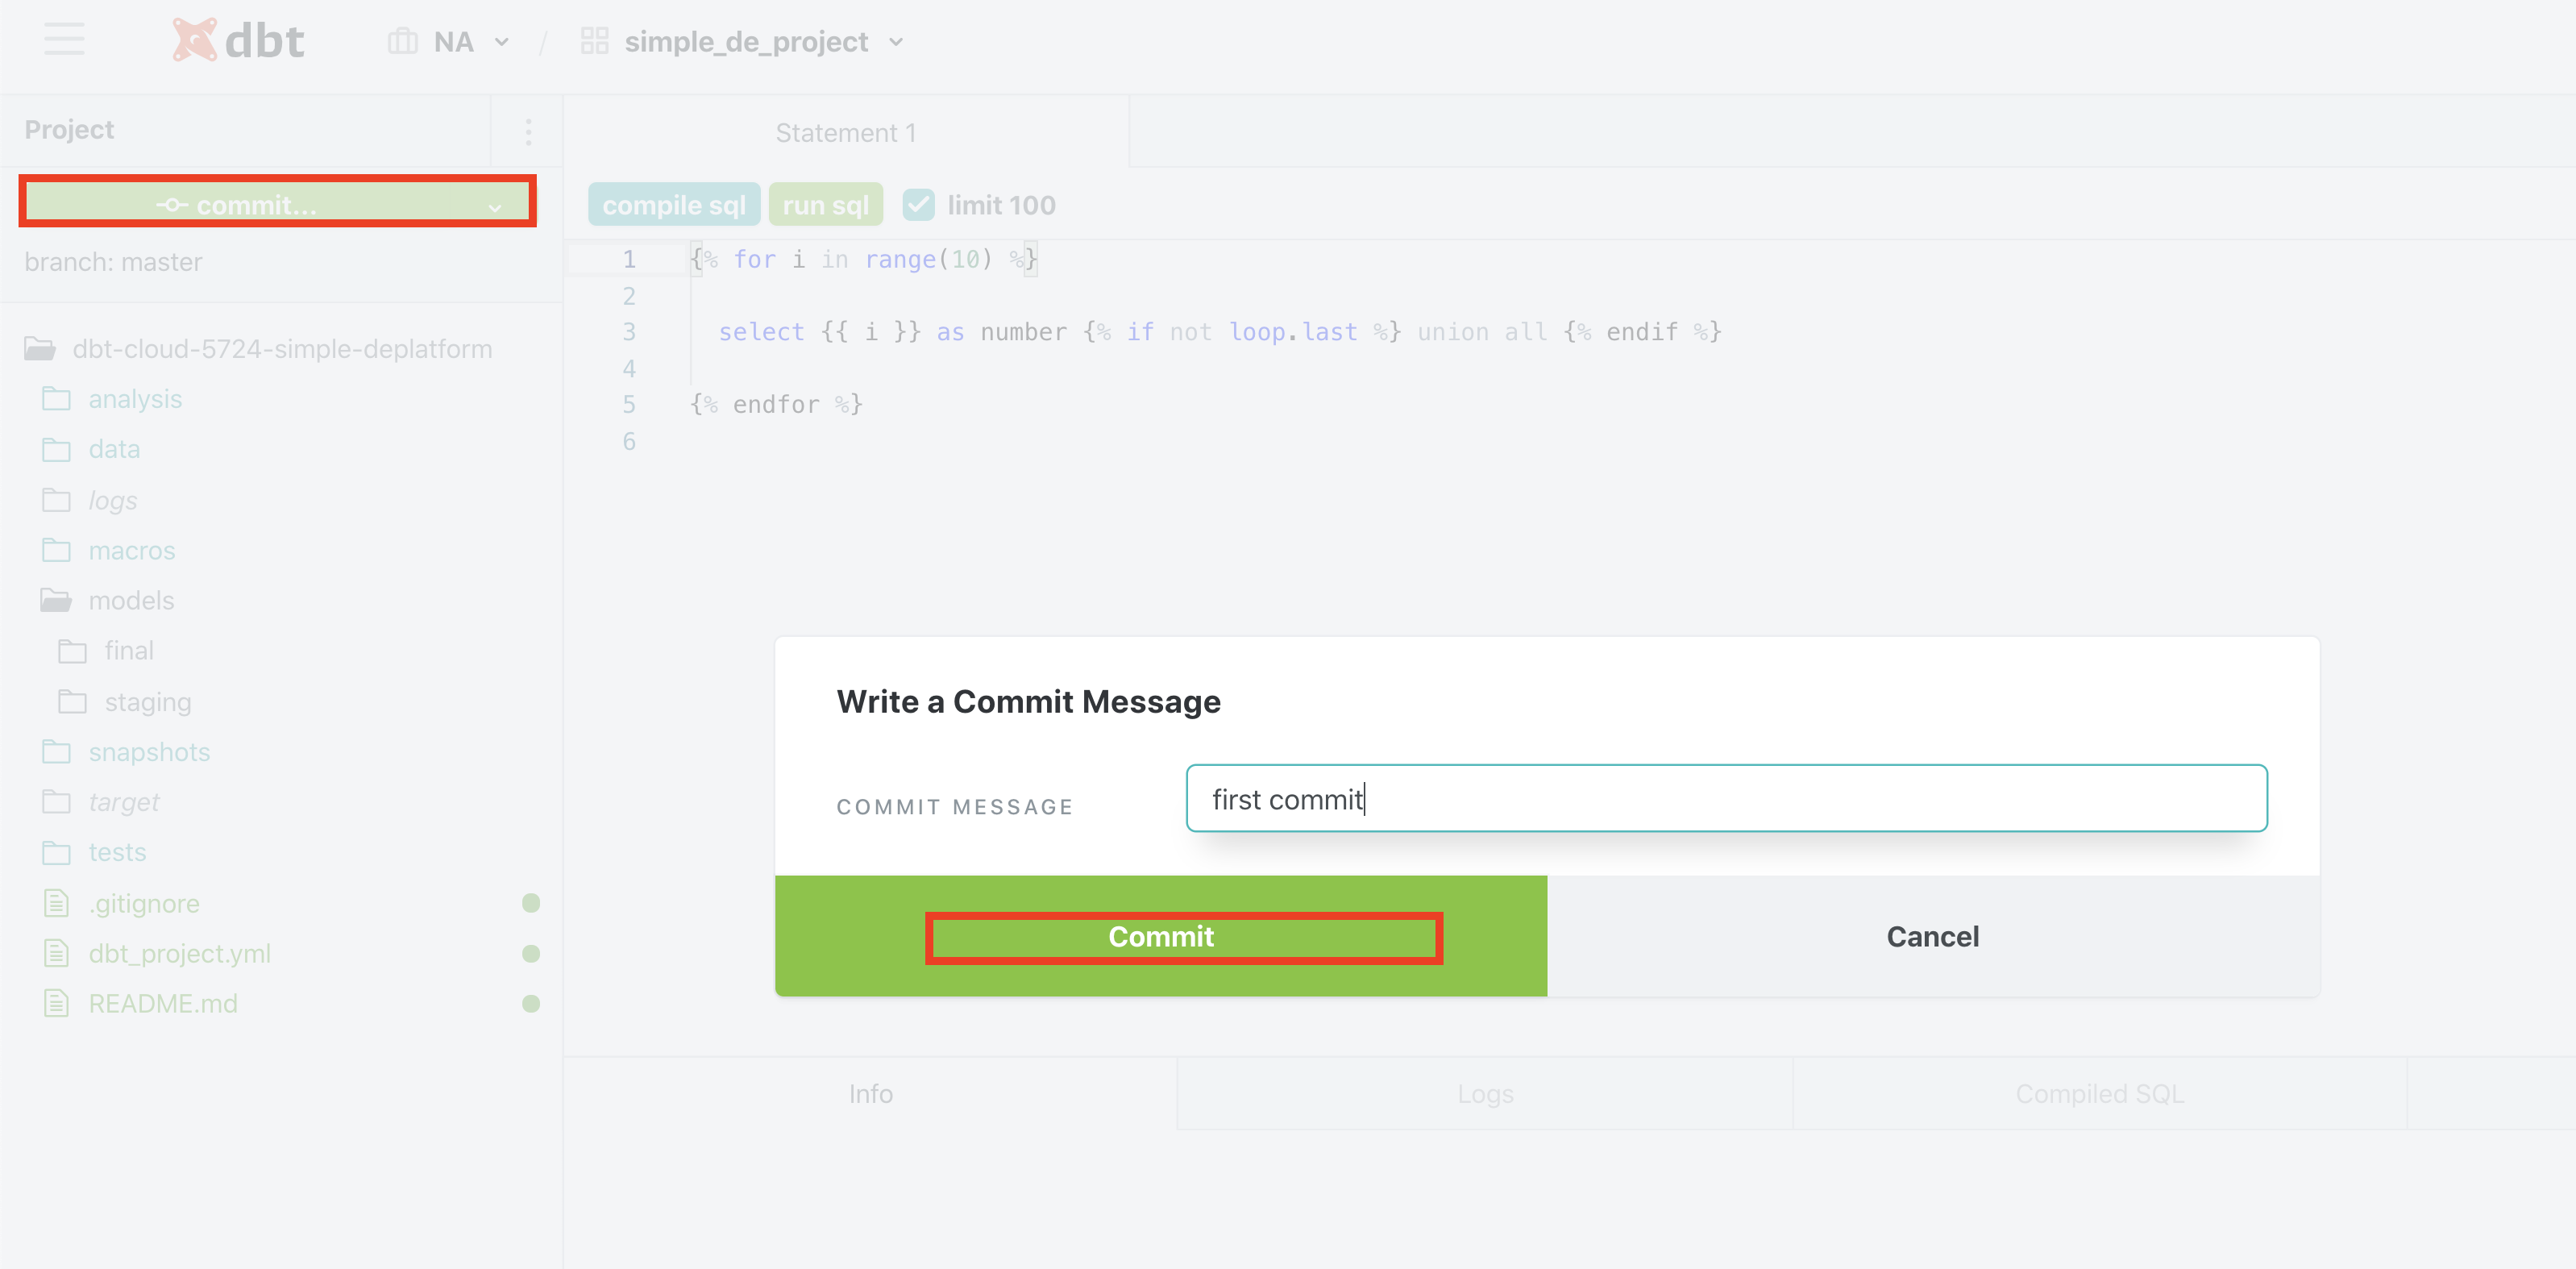
Make sure to save and then commit.
Schedule, monitor and alerting setup
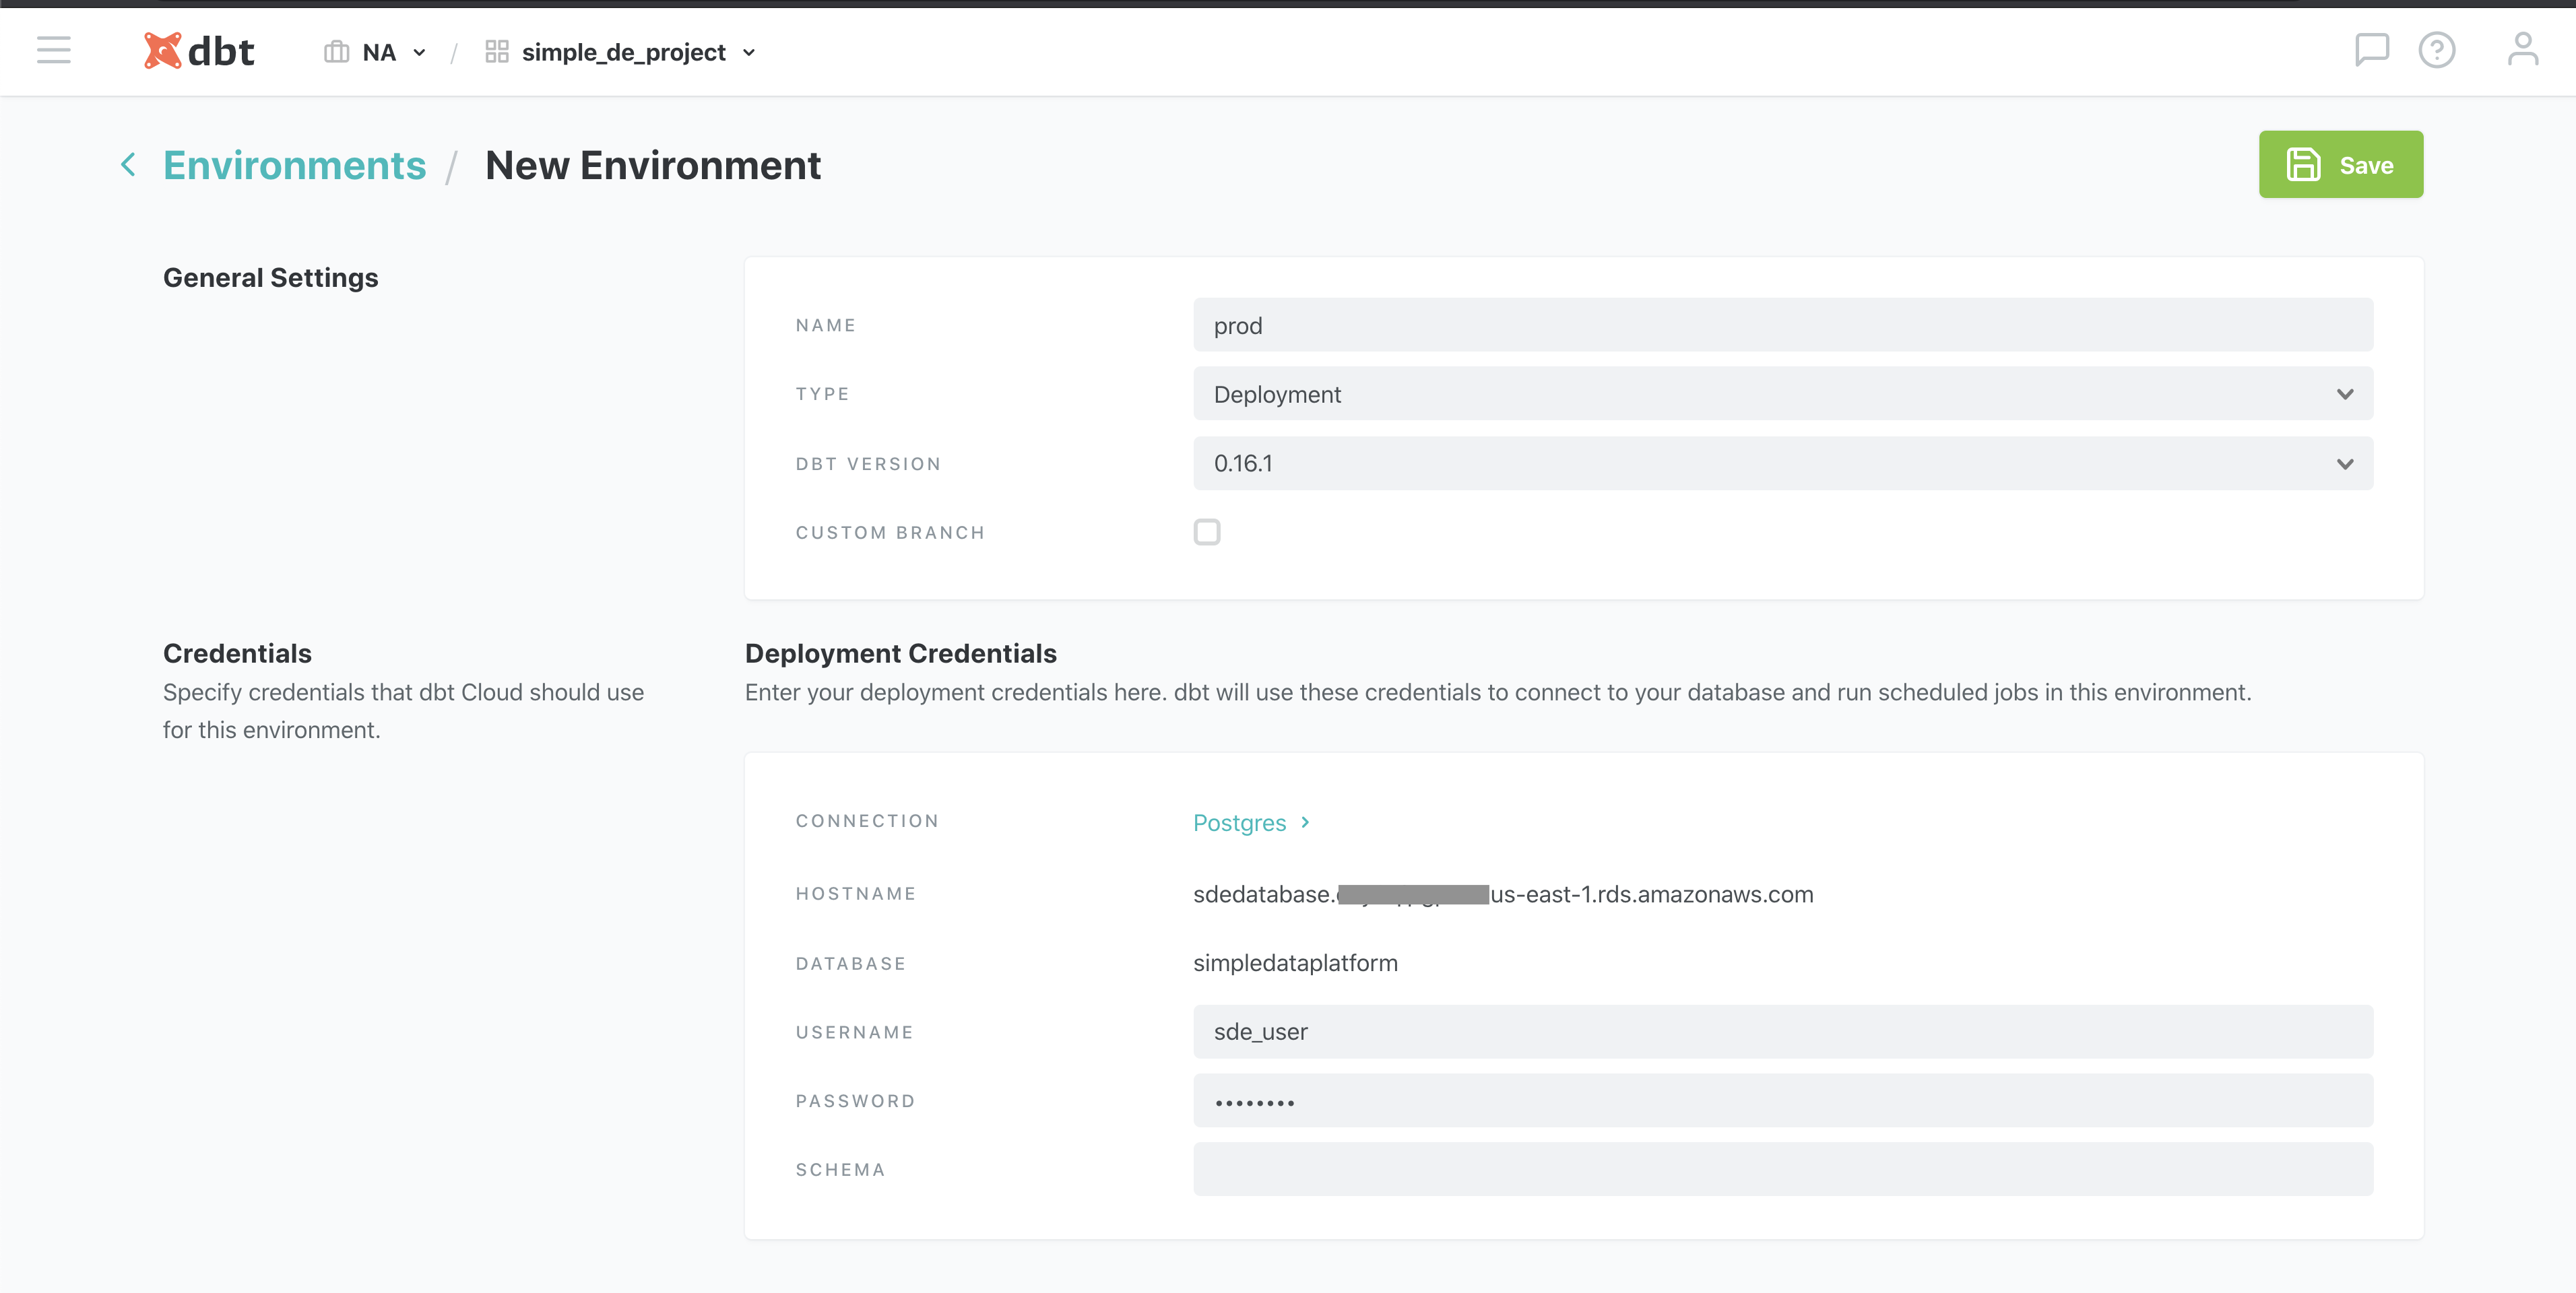
Now that we have our ELT process defined, and have the EL parts running with a frequency of 10min, its time to schedule the T part. But first we have to define a production(aka deployment) environment to run this in. Click on the hamburger icon -> Environments -> New Environment
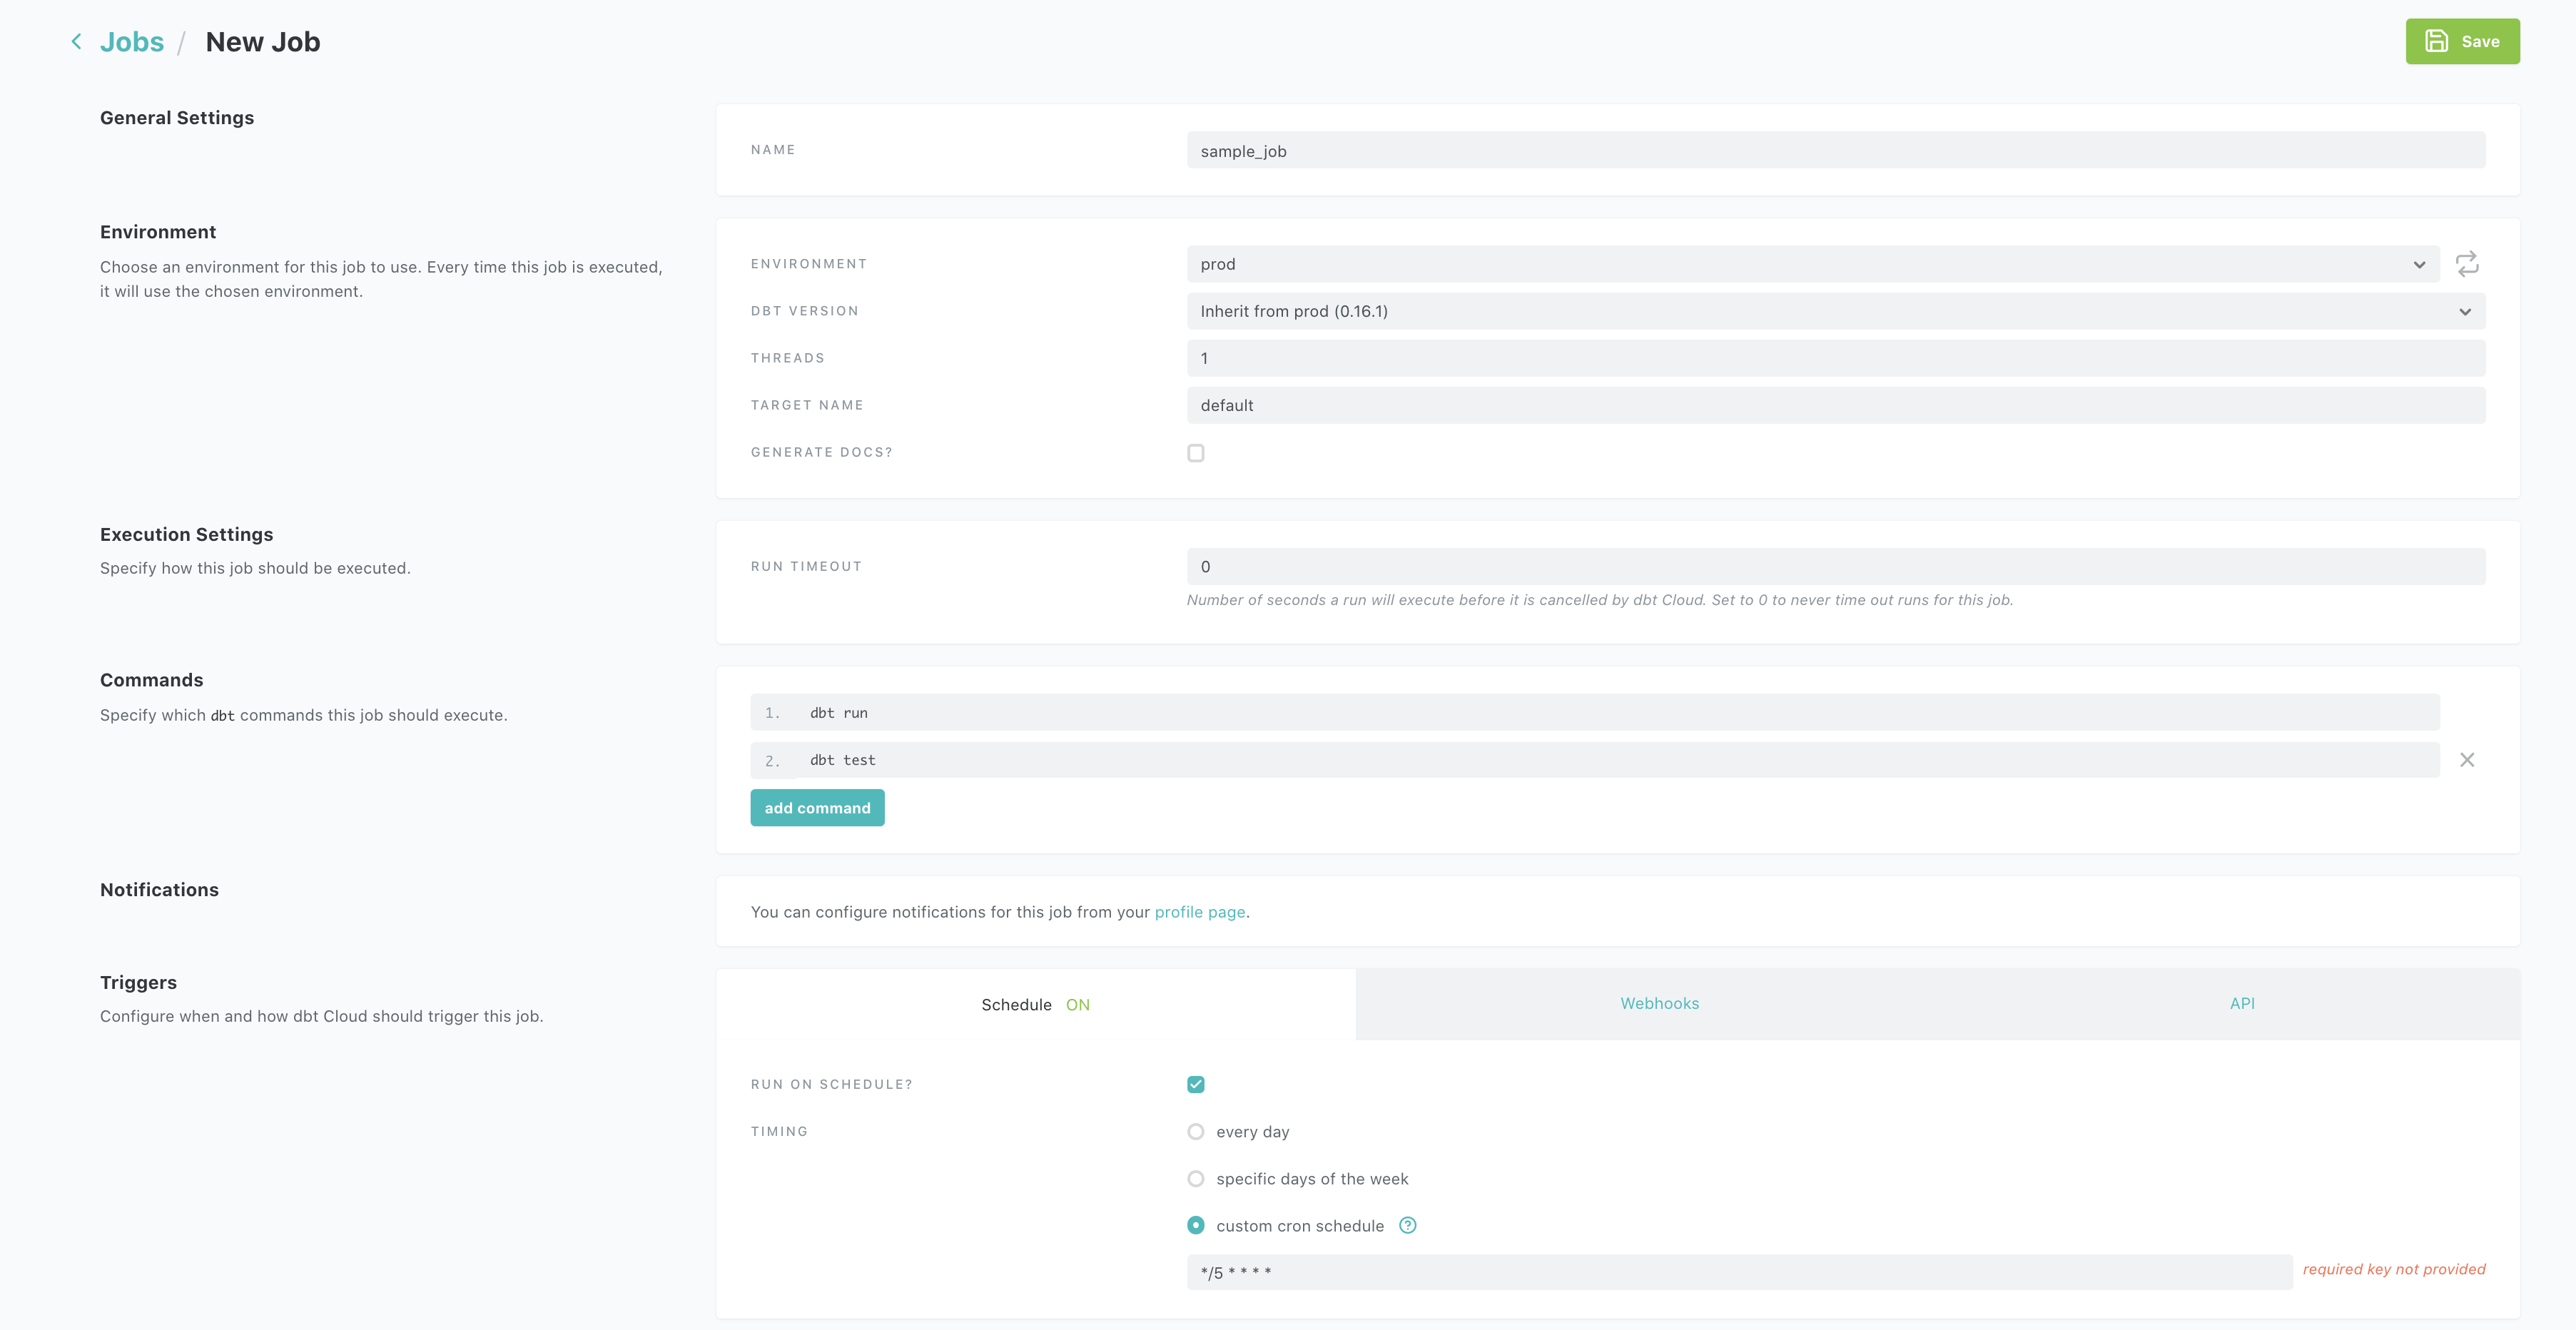
Let’s create a job called sample_job, set it to run every 15min using the UI, with cron scheduler as such */5 * * * * which denotes every 15 min. Click on the hamburger icon -> Jobs -> New Job. Make sure to add the command dbt test to your commands section and then save it.
we can monitor our runs in the UI as well

Check the data warehouse after a run is complete, log in using
check presence of report using
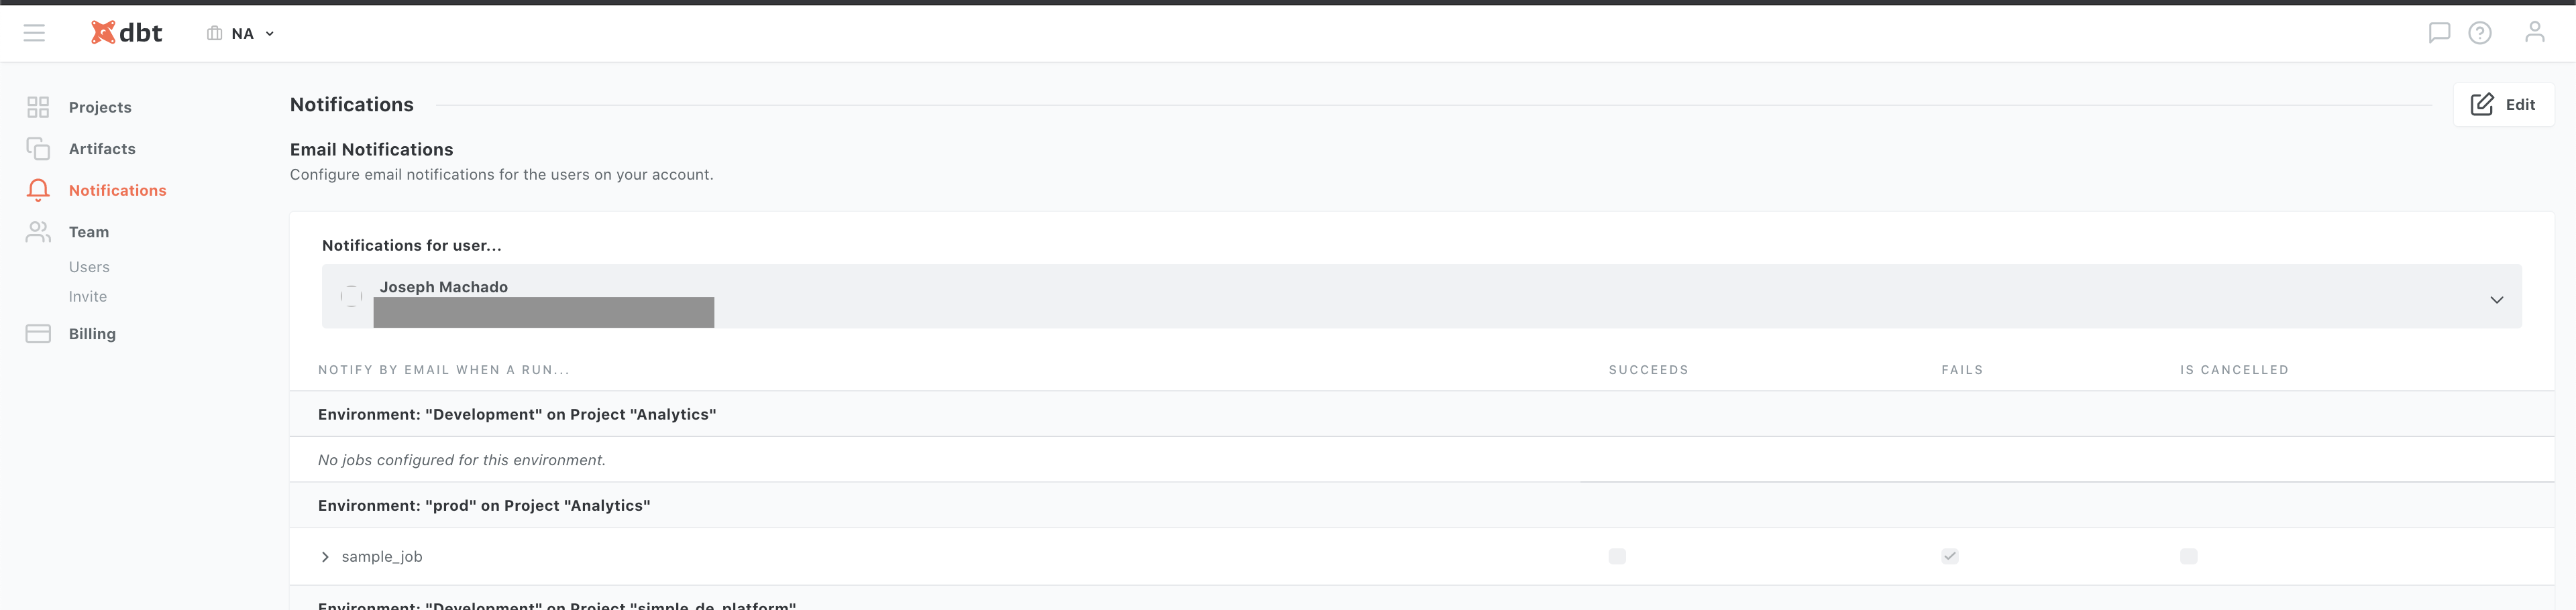
we can also set alerts, in case our tests fail by specifying an email or slack integration. Set notifications using Hamburger Icon -> Account settings -> Notifications. Here you can specify what types of notifications you would like for your projects.
Let’s try out the notification features by creating a test failure. Log into your app database as
wait for the data to get loaded into operations schema and then the dbt run to start, you will see that it fails because the value of blah is not permitted for order_status and sends you an email(or slack if you had that setup) alert.
Design review
The purpose of this project was to show you how easy it is to setup a ELT pipeline using managed services. There are many optimizations you can do to improve this ELT pipeline, which you may want to consider when using this for real projects.
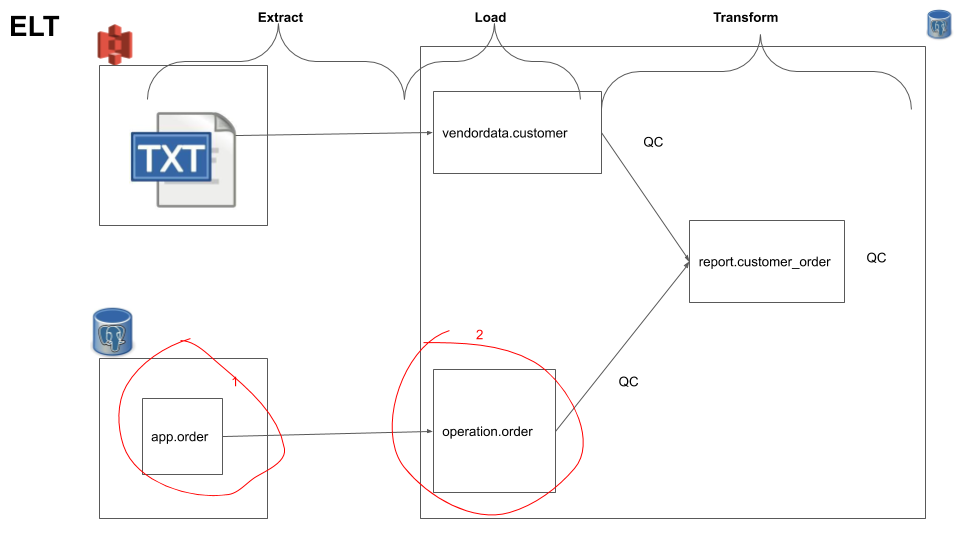
Log Replication: In thedatabase -> data warehousestitch integration we are using normal replication which basically does aselect * from source_table where some_dt_col > latest_dt_val_in_destinationquery to get the unloaded data. This is not a good pattern since this affects the source table performance by reading directly from the table, this can be crucial when used on an application table. In order to circumvent this we have to uselog based replicationwhich read from the database logs. This setup is a bit more involved and it is explained at here.Snapshot: If we look closely at our order table we can realize that it is a dimension that changes, i.eshipped->deliveredin such cases its better to use a SCD2 pattern. This can be done usingdbt’s snapshot feature.code repo: In outdbtexample we directly used the UI to create models and write test cases, this is not ideal. It is better to have a code repository ingithub, etc and follow standard feature release process, before merging it to the master branch which controls the production data pipelines. You can learn more about setting up adbtrepo here.dbt best practices: When usingdbtthere are certain best practices, you can check them hereYou will notice that the data is duplicated in
operation.order, this is due to key based replication constraint with Stitch, check this Key-Based Incremental Replication. This can be avoided by usinglog based replication. Read this Replication methods before deciding.
Conclusion
Hope this article gives you some ideas on how to design and automate your data engineering platform using open source management service providers.
Ultimately it depends on your cost vs benefit analysis of using managed open source services vs managing them yourself. In my experience most open source ETL orchestration tools require a huge amount of admin and management work, is tough for new engineers to adapt the mental model and error prone. Your engineering hours are probably much more expensive as compared to managed open source service costs. You will have to check the cost of managed services vs backend/data engineering hours(note that not all engineers will know how to do this) for your use case.
Remember functionality is an asset, but code is a liability. Let me know if you have any questions or comments in the comment section below.