Introduction
With companies realizing the importance of having correct data, there has been a lot of attention on the data-ops side of things. Data-ops refers to managing different environments and ensuring software engineering best practices(eg CI/CD) for your data pipelines. If you are using dbt and wondering
How do I test my transformation logic locally ?
How do I ensure my data transformation logic works as expected on production data ?
How to automate data CI on pull requests ?
How do I grant appropriate permissions to dbt in snowflake ?
Then this post is for you. In this post we go over the entire process of setting up dbt cloud with snowflake as the data warehouse and code repository hosted on github.
Pre-requisites
- Snowflake account
- dbt account
- github account
- docker
- Basic understanding of git branch, PR and merge
- dbt basics
PR refers to a pull request. ## Setting up the data-ops pipeline
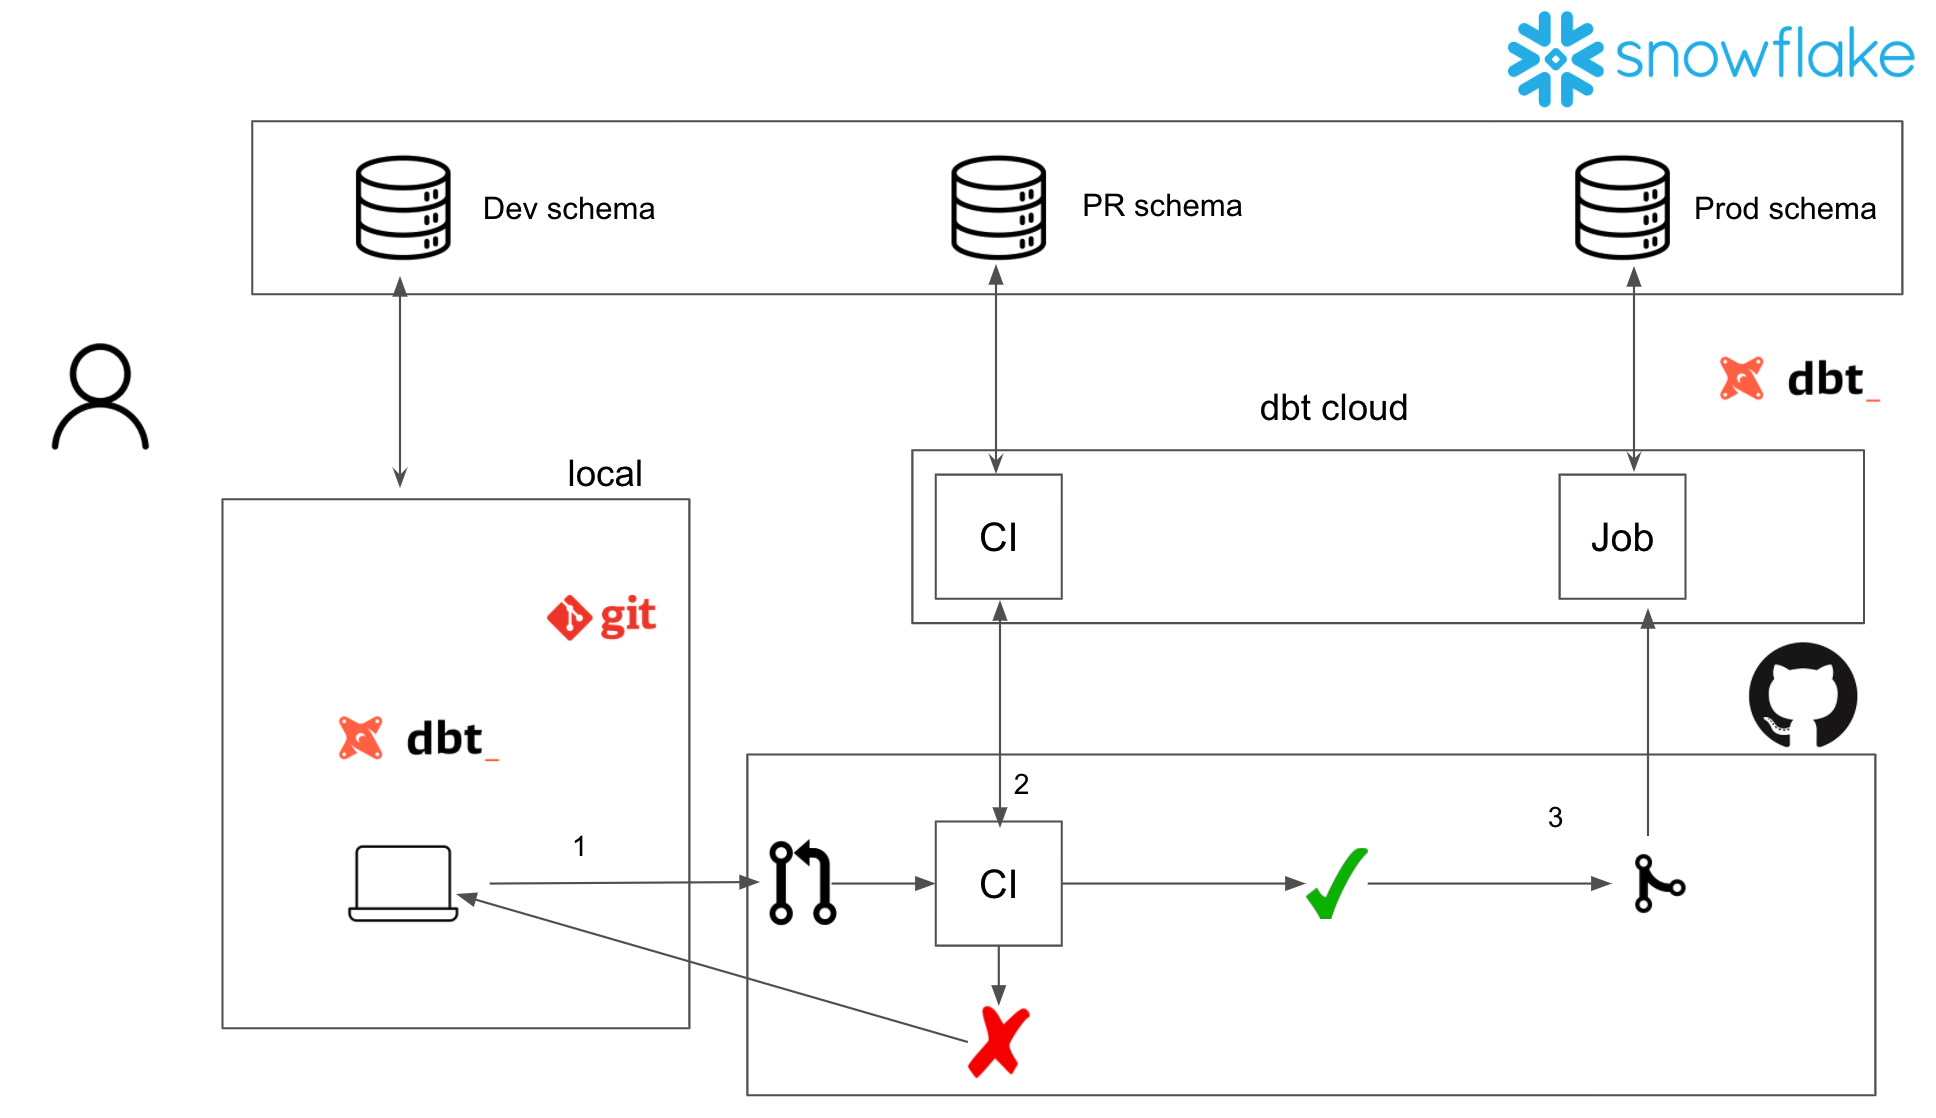
At a high level, this is what our data-ops setup will look like.
Snowflake
Snowflake offers extremely granular access controls. We will follow the patterns mentioned in this post to setup our snowflake permissions.
We will create the following entities
WAREHOUSE: TRANSFORMING, in snowflake a warehouse is the machine in which the execution happens.DATABASE: PROD, denotes where the data is stored.SCHEMA: RAW, ANALYTICS, schemas within a database. The raw incoming data will land in theRAWschema. End users should only be provided access to theANALYTICSschema.ROLE: TRANSFORMER. In snowflake a role can be assigned permissions. Then users are allocated roles as necessary.USER: DBT_CLOUD. A user account for dbt cloud.
We also do the same for a development environment, with the text _DEV appended to it.
| User | Role | Schema | Database | Warehouse |
|---|---|---|---|---|
| DBT_CLOUD | TRANSFORMER | RAW (R), ANALYTICS (RW) | PROD | TRANSFORMING |
| DBT_CLOUD_DEV | TRANSFORMER_DEV | RAW (R), ANALYTICS (RW) | DEV | TRANSFORMING_DEV |
Log into your snowflake UI, open a worksheet and run the following commands as ACCOUNTADMIN role to create the entities specified above.
USE ROLE ACCOUNTADMIN; -- you need accountadmin for user creation, future grants

DROP USER IF EXISTS DBT_CLOUD;
DROP USER IF EXISTS DBT_CLOUD_DEV;
DROP ROLE IF EXISTS TRANSFORMER;
DROP ROLE IF EXISTS TRANSFORMER_DEV;
DROP DATABASE IF EXISTS PROD CASCADE;
DROP DATABASE IF EXISTS DEV CASCADE;
DROP WAREHOUSE IF EXISTS TRANSFORMING;
DROP WAREHOUSE IF EXISTS TRANSFORMING_DEV;

-- creating a warehouse
CREATE WAREHOUSE TRANSFORMING WITH WAREHOUSE_SIZE = 'XSMALL' WAREHOUSE_TYPE = 'STANDARD' AUTO_SUSPEND = 300 AUTO_RESUME = TRUE COMMENT = 'Warehouse to transform data';

-- creating database
CREATE DATABASE PROD COMMENT = 'production data base';

-- creating schemas
CREATE SCHEMA "PROD"."RAW" COMMENT = 'landing zone for raw data';
CREATE SCHEMA "PROD"."ANALYTICS" COMMENT = 'data layer for end user';

-- creating an access role
CREATE ROLE TRANSFORMER COMMENT = 'Role for dbt';

-- granting role permissions
GRANT USAGE,OPERATE ON WAREHOUSE TRANSFORMING TO ROLE TRANSFORMER;
GRANT USAGE,CREATE SCHEMA ON DATABASE PROD TO ROLE TRANSFORMER;
GRANT USAGE ON SCHEMA "PROD"."RAW" TO ROLE TRANSFORMER;
GRANT ALL ON SCHEMA "PROD"."ANALYTICS" TO ROLE TRANSFORMER;
GRANT SELECT ON ALL TABLES IN SCHEMA "PROD"."RAW" TO ROLE TRANSFORMER;
GRANT SELECT ON FUTURE TABLES IN SCHEMA "PROD"."RAW" TO ROLE TRANSFORMER;

-- creating user and associating with role
CREATE USER DBT_CLOUD PASSWORD='abc123' DEFAULT_ROLE = TRANSFORMER MUST_CHANGE_PASSWORD = true;
GRANT ROLE TRANSFORMER TO USER DBT_CLOUD;

-----------------------------------------------------------------------------------------------
-- DEV
-- creating a warehouse
CREATE WAREHOUSE TRANSFORMING_DEV WITH WAREHOUSE_SIZE = 'XSMALL' WAREHOUSE_TYPE = 'STANDARD' AUTO_SUSPEND = 300 AUTO_RESUME = TRUE COMMENT = 'Dev warehouse to transform data';

-- cloning prod database (this clones schemas and tables as well)
CREATE DATABASE DEV CLONE PROD;

-- creating an access role
CREATE ROLE TRANSFORMER_DEV COMMENT = 'Dev role for dbt';

-- granting role permissions
GRANT USAGE,OPERATE ON WAREHOUSE TRANSFORMING_DEV TO ROLE TRANSFORMER_DEV;
GRANT USAGE,CREATE SCHEMA ON DATABASE DEV TO ROLE TRANSFORMER_DEV;
GRANT USAGE ON SCHEMA "DEV"."RAW" TO ROLE TRANSFORMER_DEV;
GRANT ALL ON SCHEMA "DEV"."ANALYTICS" TO ROLE TRANSFORMER_DEV;
GRANT SELECT ON ALL TABLES IN SCHEMA "DEV"."RAW" TO ROLE TRANSFORMER_DEV;
GRANT SELECT ON FUTURE TABLES IN SCHEMA "DEV"."RAW" TO ROLE TRANSFORMER_DEV;

-- creating user and associating with role
CREATE USER DBT_CLOUD_DEV PASSWORD='abc123' DEFAULT_ROLE = TRANSFORMER_DEV MUST_CHANGE_PASSWORD = true;
GRANT ROLE TRANSFORMER_DEV TO USER DBT_CLOUD_DEV;
With this setup, adding a new developer to your team would just be creating a user and granting them TRANSFORMER_DEV role permissions in snowflake. Now that we have our snowflake access setup, we can use this for development and deployment of dbt. Log in to snowflake console with
You will be prompted for a password change. Do the same for DBT_CLOUD_DEV. You should have 2 logins now, in addition to your original account. Note that DBT_CLOUD and DBT_CLOUD_DEV has access to only PROD and DEV databases respectively.
Local development environment
Create a new repository called dbt_development in your github account. After that, in your terminal clone the repository at https://github.com/josephmachado/dbt_development.git . Initialize your own repository and link it to the github repository that you created.
git clone https://github.com/josephmachado/dbt_development.git
cd dbt_development
rm -rf .git # remove git information
git init
# You need a `dbt_development` repository in your github account.
git remote add origin https://github.com/your-github-username/dbt_development.git
git branch -M main
git add .
git commit -m 'first commit'
git push -u origin main
or fork it to make a contribution.
In the dbt_development directory, fill in profiles.yml file with the DBT_CLOUD_DEV password. For the account use your snowflake account. Use this to figure out your account.
config:
  send_anonymous_usage_stats: False

default:
  outputs:

    dev: # User-Password config
      type: snowflake
      account: your-snowflake-account-id-here
      user: DBT_CLOUD_DEV
      password: your-password-here
      role: TRANSFORMER_DEV
      database: DEV
      warehouse: TRANSFORMING
      schema: dbt_your-username-here
      threads: 1
      client_session_keep_alive: False

  target: dev
Now that you have the credentials setup, you can run dbt locally. We will use the official docker image from Fishtown Analytics to run the dbt commands.
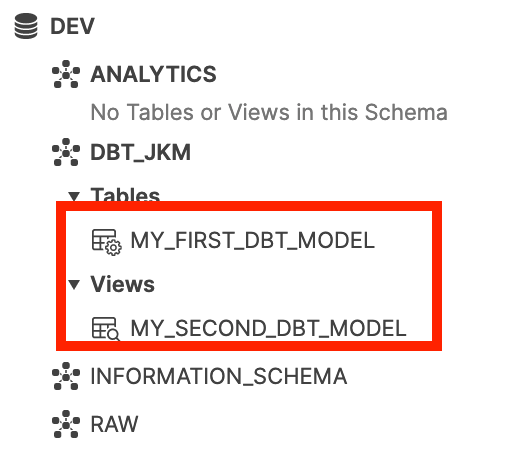
If you log in to your snowflake console as DBT_CLOUD_DEV, you will be able to see a schema called dbt_your-username-here(which you setup in profiles.yml). This schema will contain a table my_first_dbt_model and a view my_second_dbt_model. These are sample models that are generated by dbt as examples.
You can also run tests, generate documentation and serve documentation locally as shown below.
docker run --rm -v $(pwd):/usr/app -v $(pwd):/root/.dbt fishtownanalytics/dbt:0.19.0 test
docker run --rm -v $(pwd):/usr/app -v $(pwd):/root/.dbt fishtownanalytics/dbt:0.19.0 docs generate
docker run --rm -ip 8080:8080 -v $(pwd):/usr/app -v $(pwd)/:/root/.dbt fishtownanalytics/dbt:0.19.0 docs serve
# Ctrl+C to exit
docker run --rm -ip 8080:8080 -v $(pwd):/usr/app -v $(pwd)/:/root/.dbt fishtownanalytics/dbt:0.19.0 clean
When using dbt locally, it will create the schema you specified in the profiles.yml file. Assuming each developer has a unique name, this will create a unique schema per developer in the DEV database. This way, multiple engineers can develop simultaneously, have access to the same data and create their data models in their custom schema without affecting others’.
dbt cloud
Now that we have a local development environment set up, we can set up our dbt cloud account. The first time you log in, you will be taken through the setup process. #### Connect to Snowflake
Choose Snowflake as your data warehouse and in the connection settings, use your DBT_CLOUD_DEV username and password for the development environment.
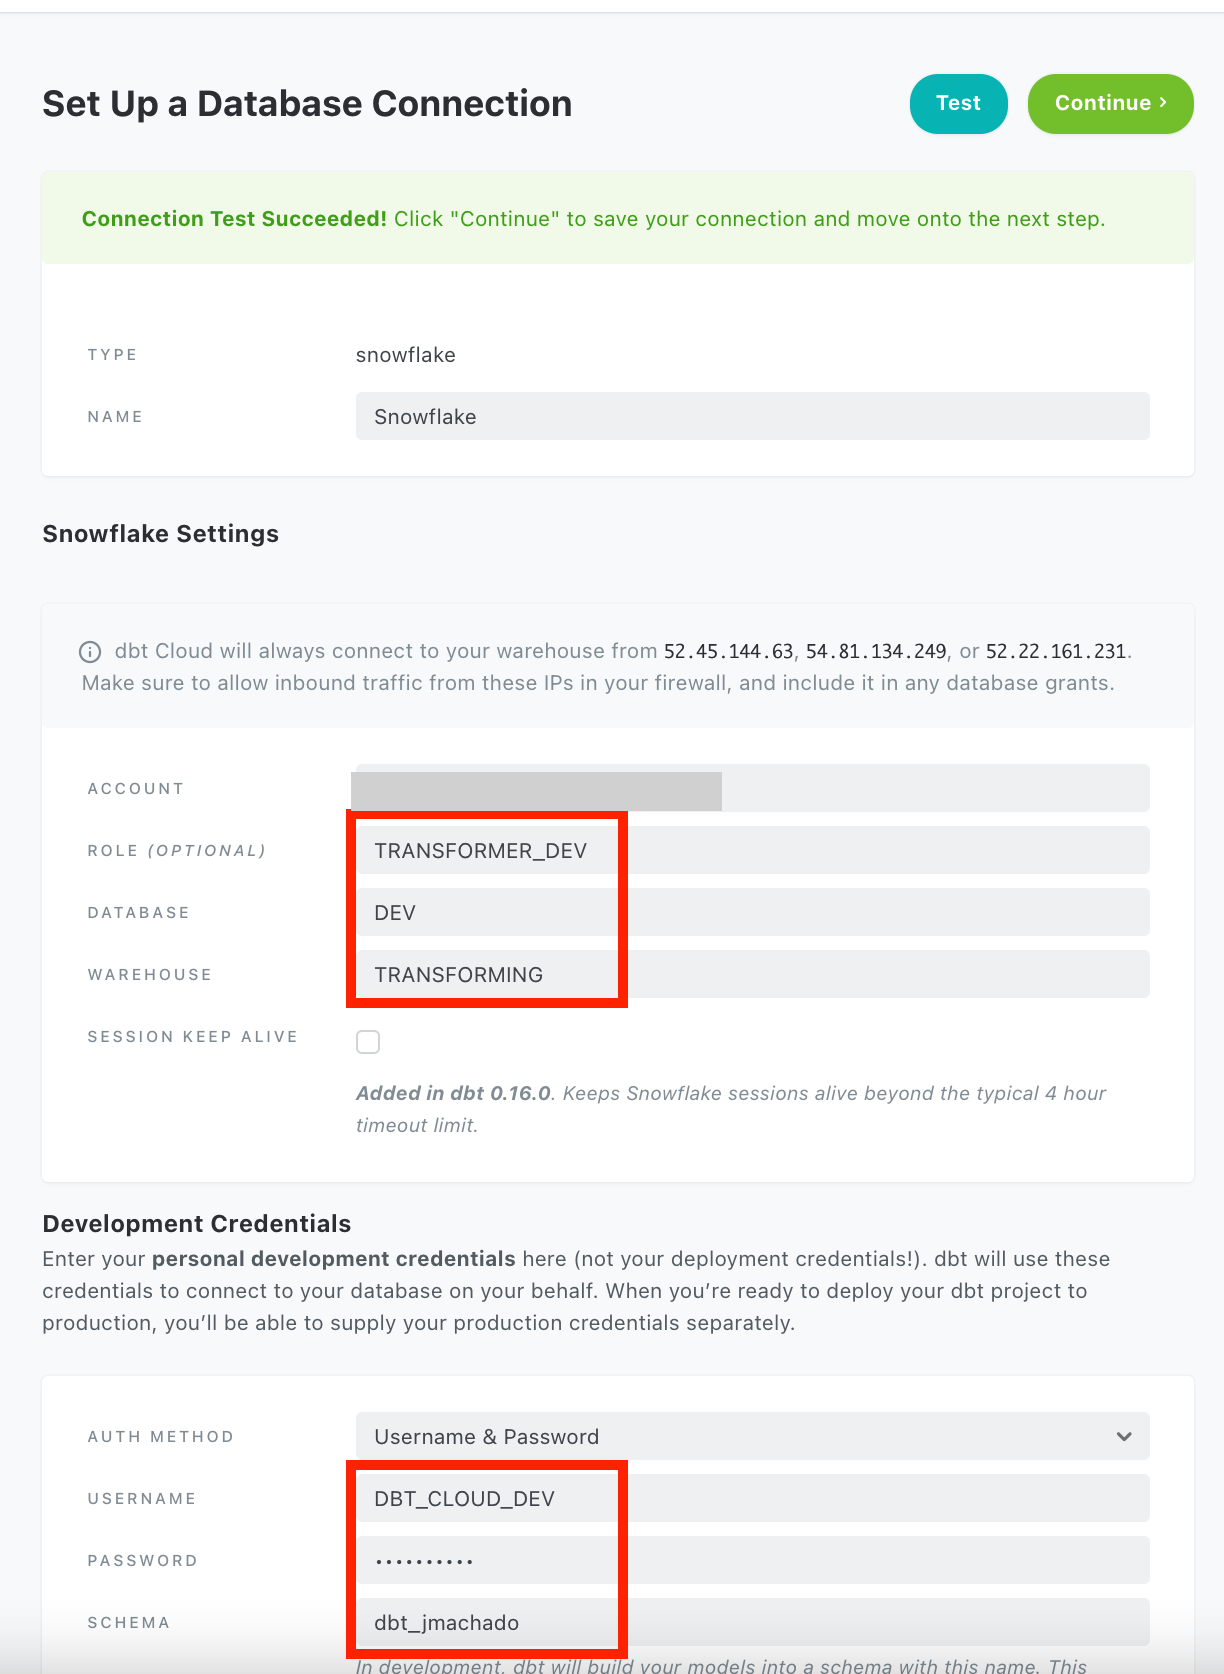
This enables you to develop in dbt cloud’s IDE.
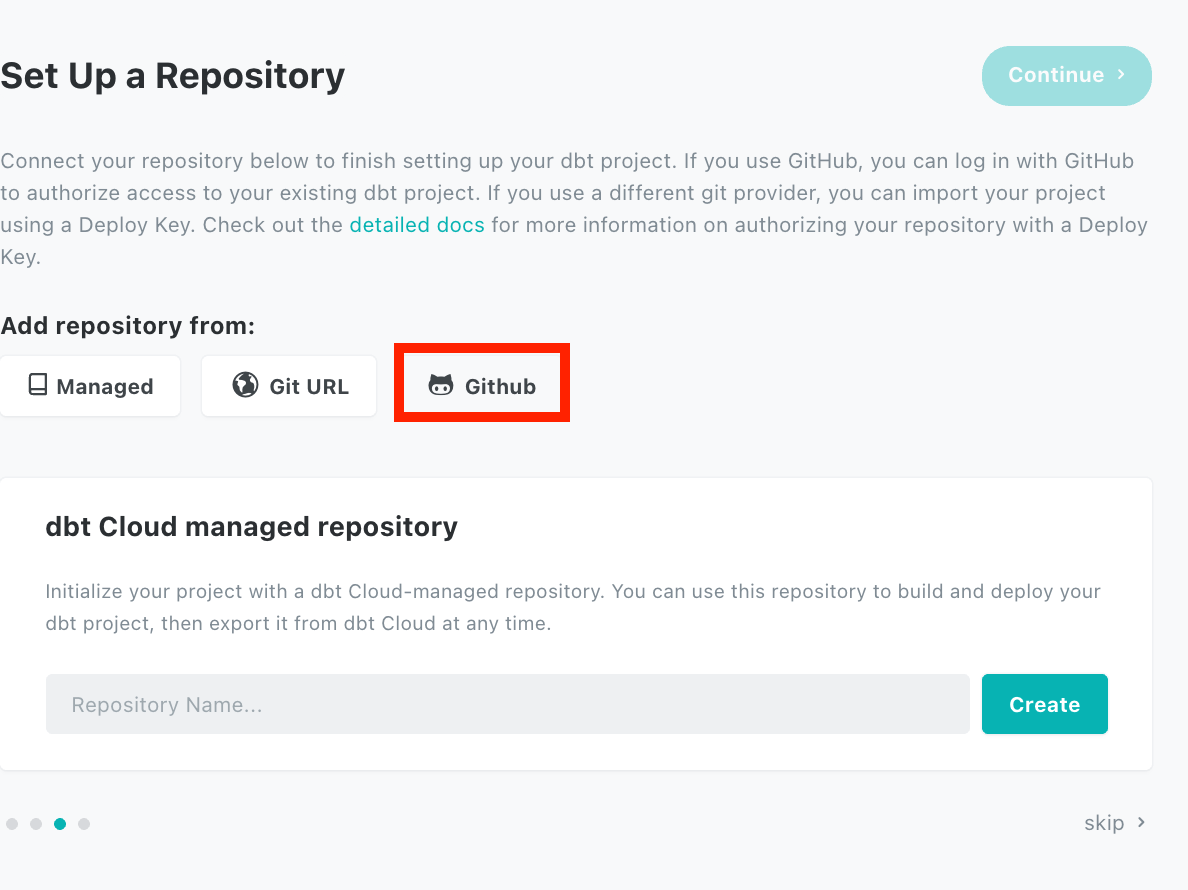
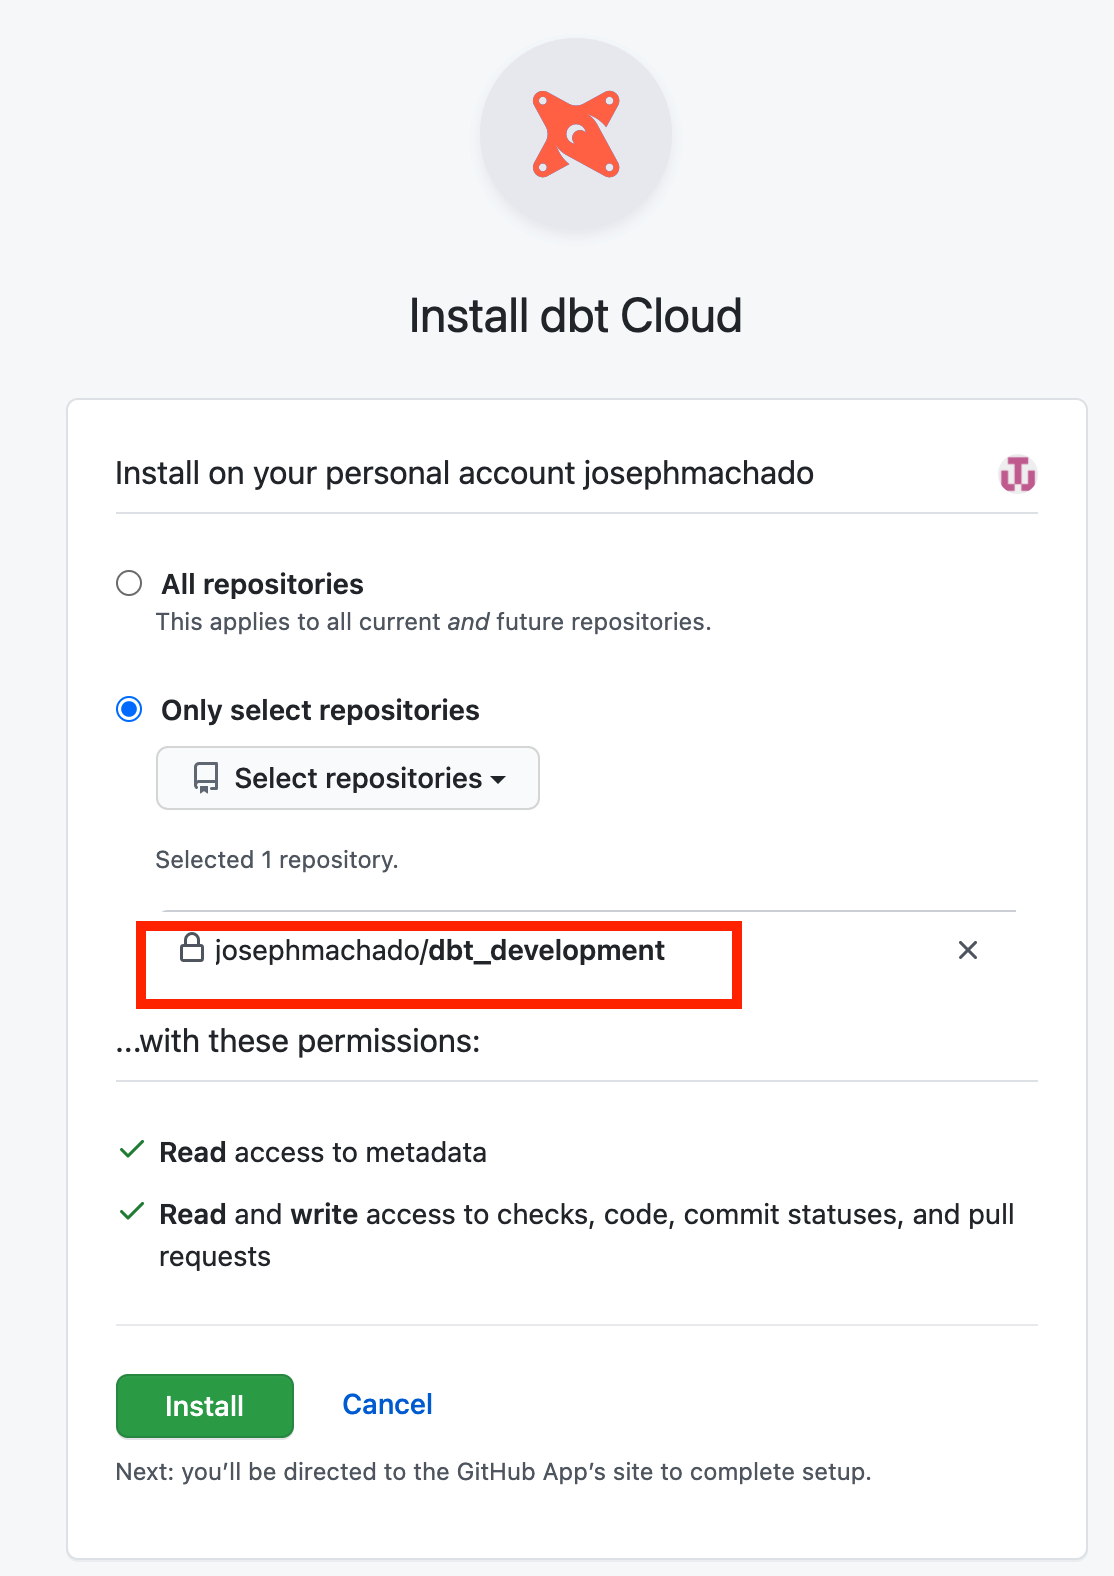
Link to github repository
The next step will be connecting to a repository. When connecting to your github account, make sure to connect using the Github button and not the git url. This will enable us to do CI on pull requests on that repository. As a rule of thumb, only provide dbt app with access to your dbt repository.
| Click github icon | grant dbt github repo access |
|---|---|
 |
 |
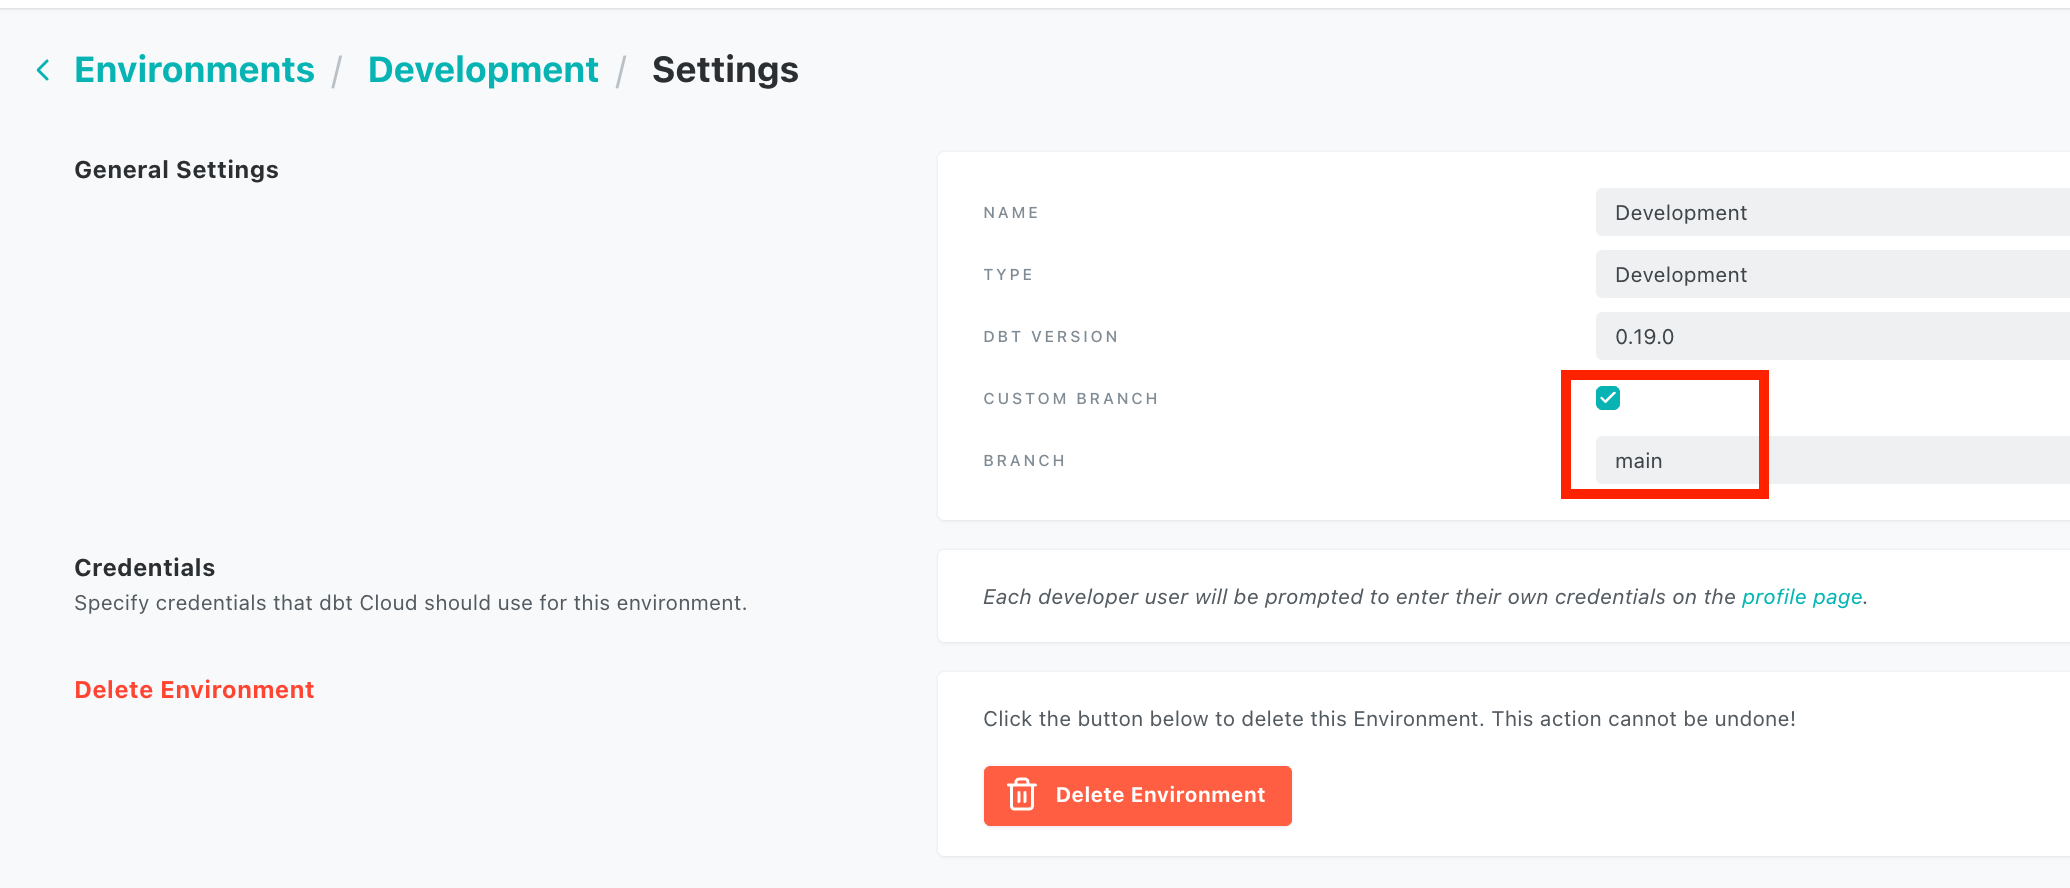
After linking, make sure to go to Hmaburger icon -> Environments and choose Development and select the custom branch checkbox and set it to main. This will ensure that dbt cloud uses the main branch and not the default setting of master branch.
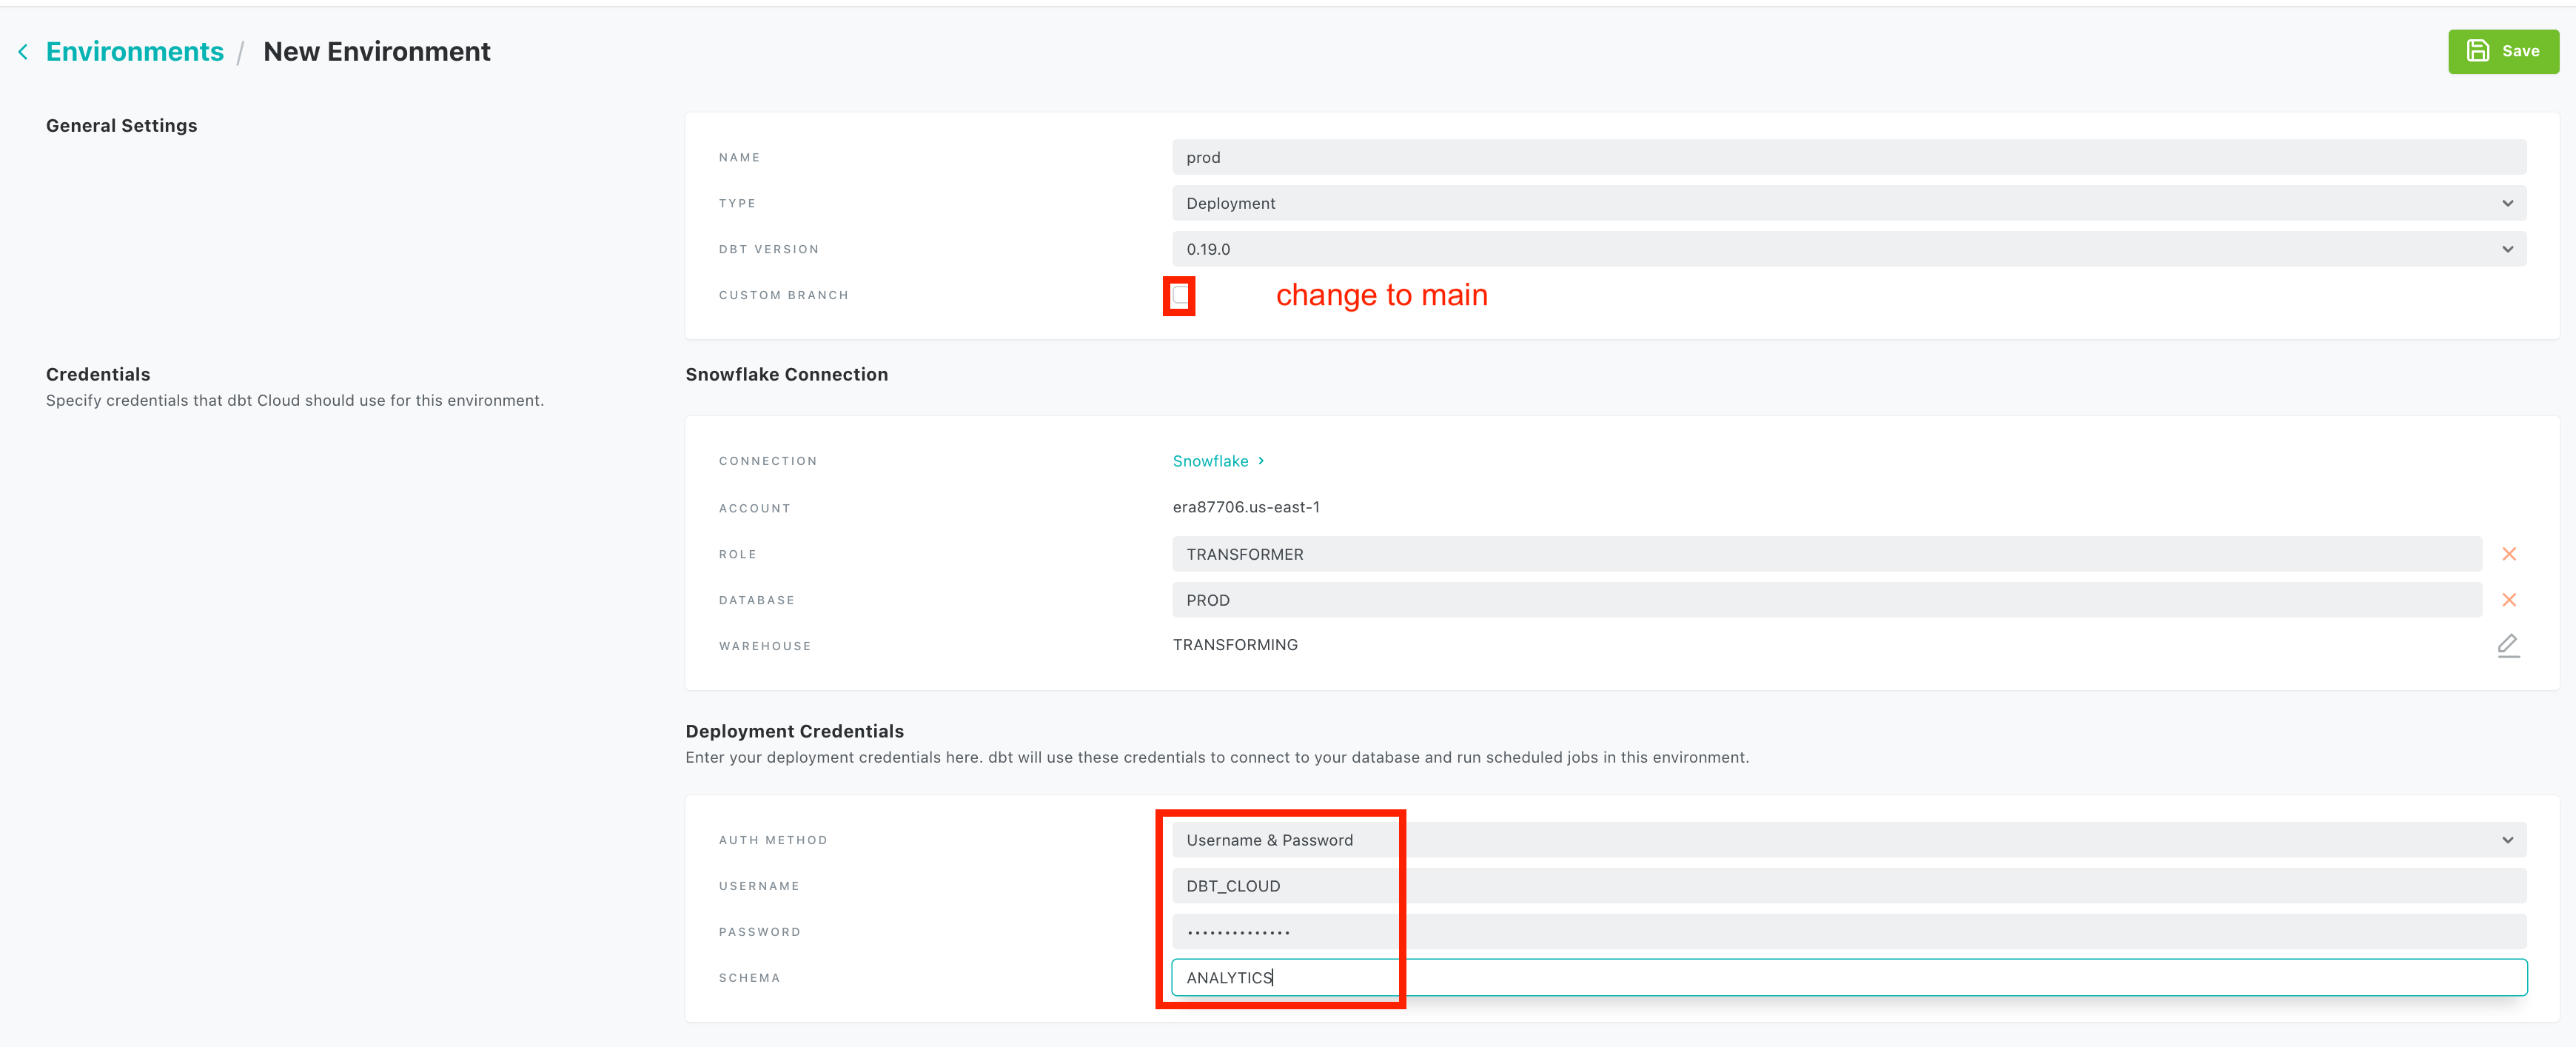
 #### Setup deployment(release/prod) environment
In the above section you have set up a dbt development environment. In order to use dbt in production, you will need to configure a deployment environment. This corresponds to your production(aka release, prod) environment. Go to your project by clicking on Hamburger icon -> project and then select the Deployment Environment link. In the next page, enter your deployment credentials and make sure to choose the custom branch checkbox and set it to main.
| Click deployment | use production details |
|---|---|
 |
 |
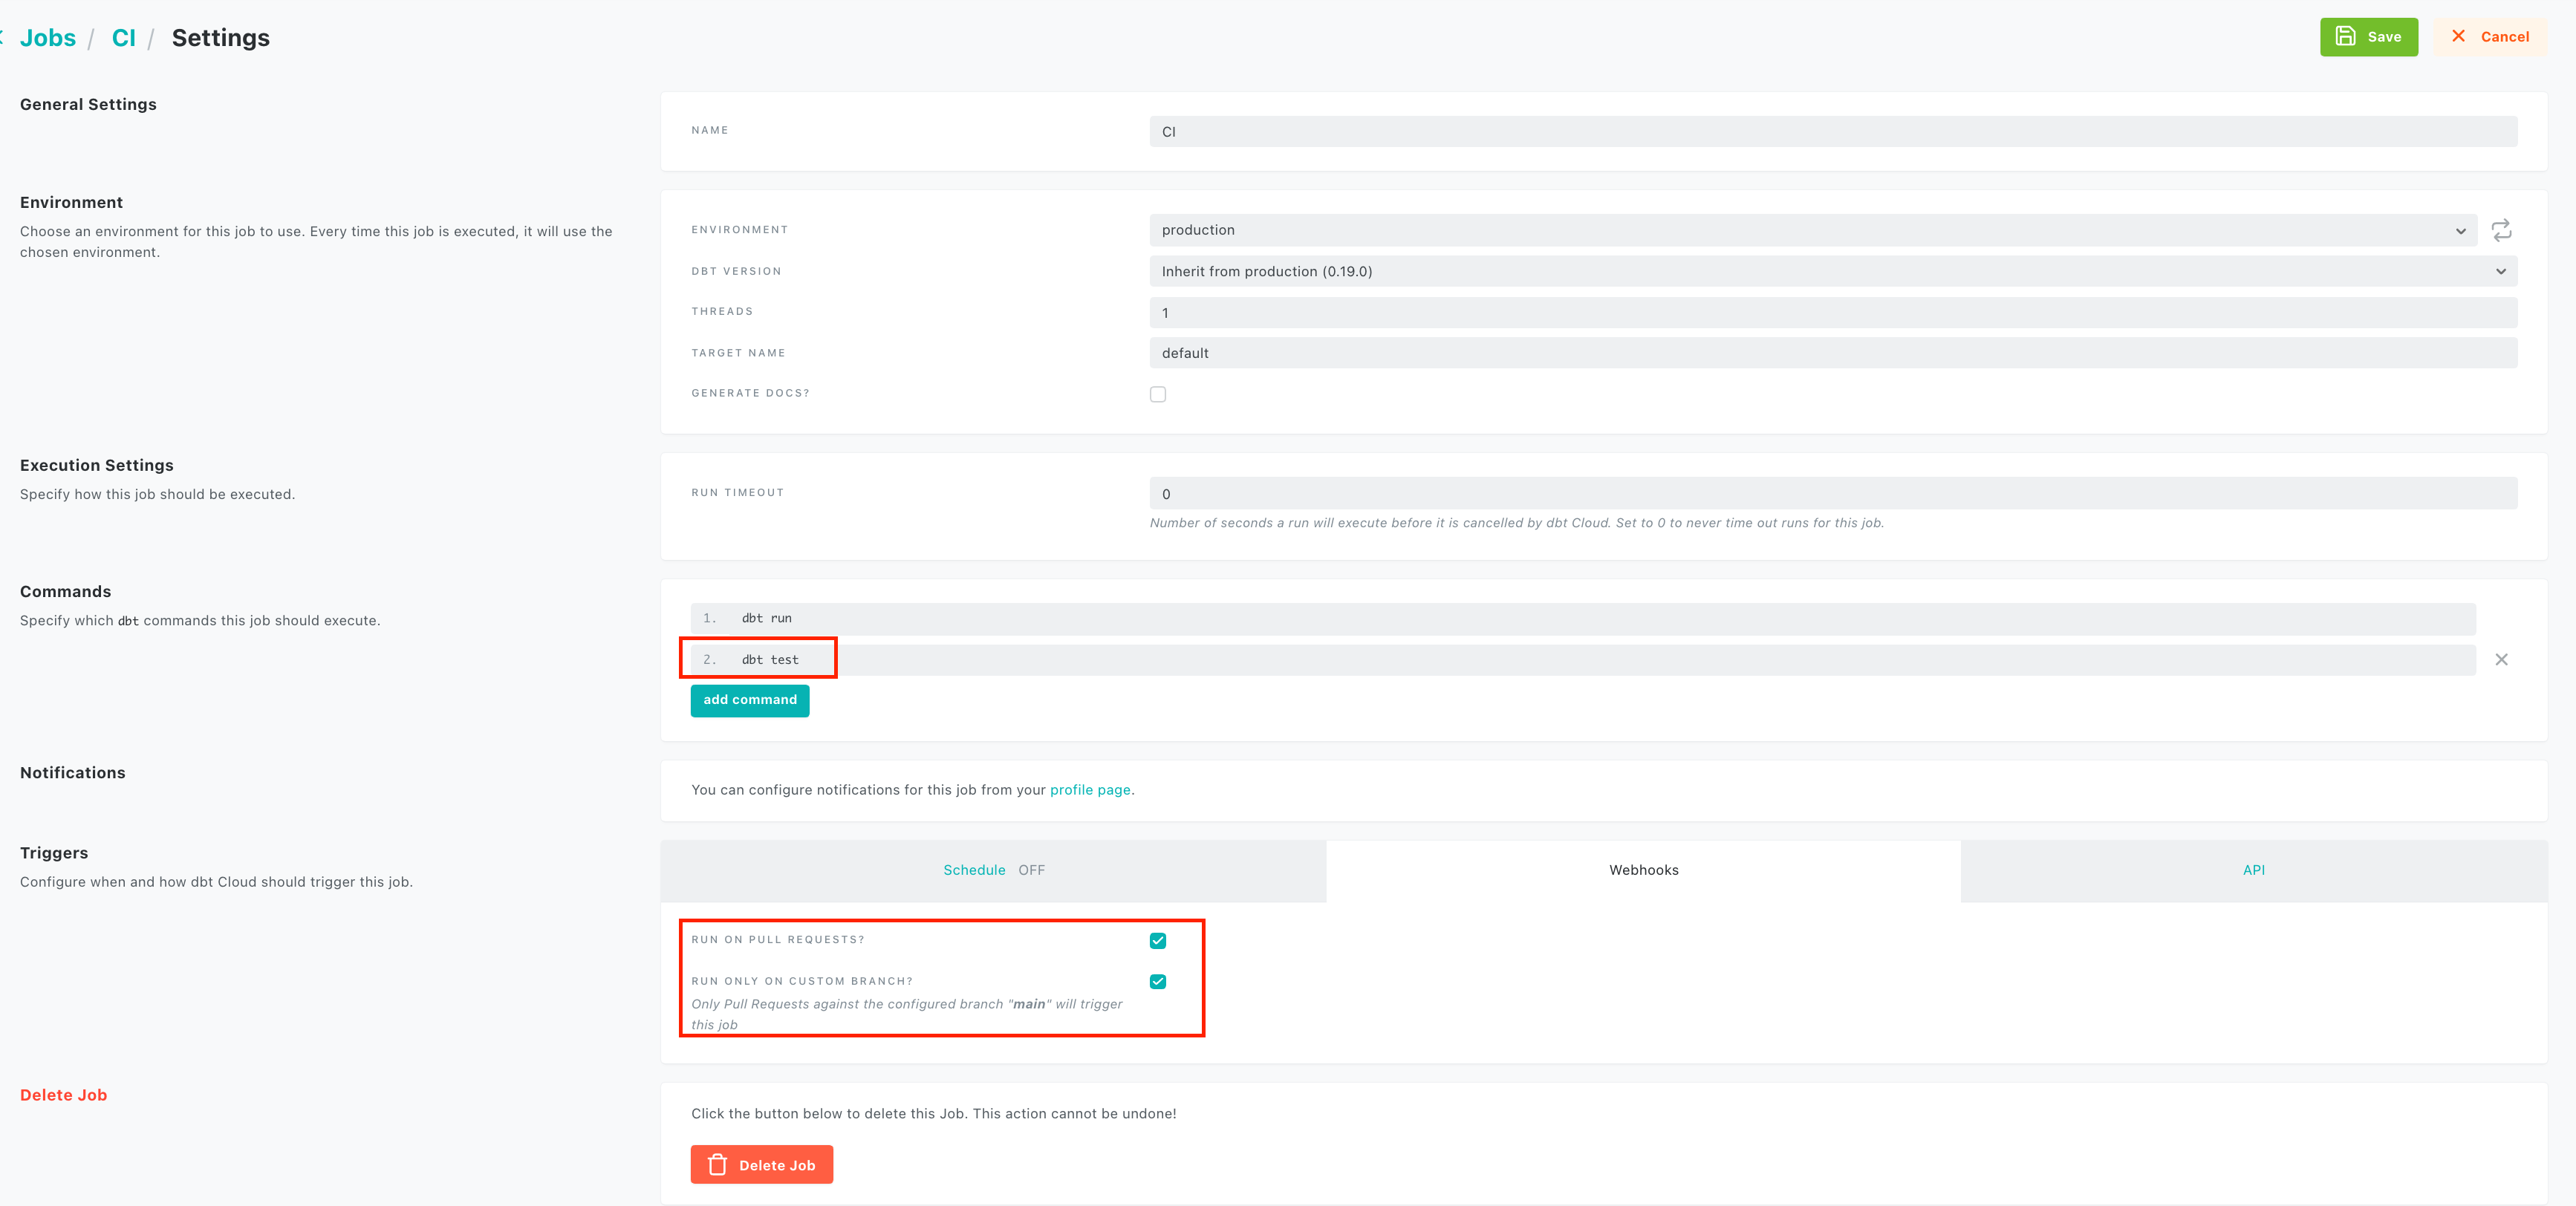
Setup CI
You can setup dbt cloud to run a CI job on every pull request into your main branch. After this, on every PR, dbt cloud will do the following
- Create a unique schema in your chosen environment. Schema name is determined by the PR id and prefixed with
dbt_cloud_pr_*. - Create the models in the unique schema and run the defined tests.
- After the run, add ✅ or ❌ indicator to the PR.
This CI feature allows us to test against the production data without actually creating production data assets. In order to leverage this feature, we need to create a job in the dbt cloud UI. Click on the hamburger icon -> Jobs, in the job creation UI make sure to
- add
dbt testas an additional command. - switch off the
schedulecheckbox. - check
Run on Pull Requestscheckbox.
PR -> CI -> merge cycle
Now that you have a CI job setup, lets see how this works. Make a git branch for your project.
Make a simple change to models/example/my_first_dbt_model.sql file by adding the following two lines.
my_first_dbt_model.sql
Now commit and push to remote repository that you setup in the Github section, as shown below.
In the dbt_development repository in your github UI click on the create pull request prompt. When you create a PR, a CI job is run and its status is added to your PR.
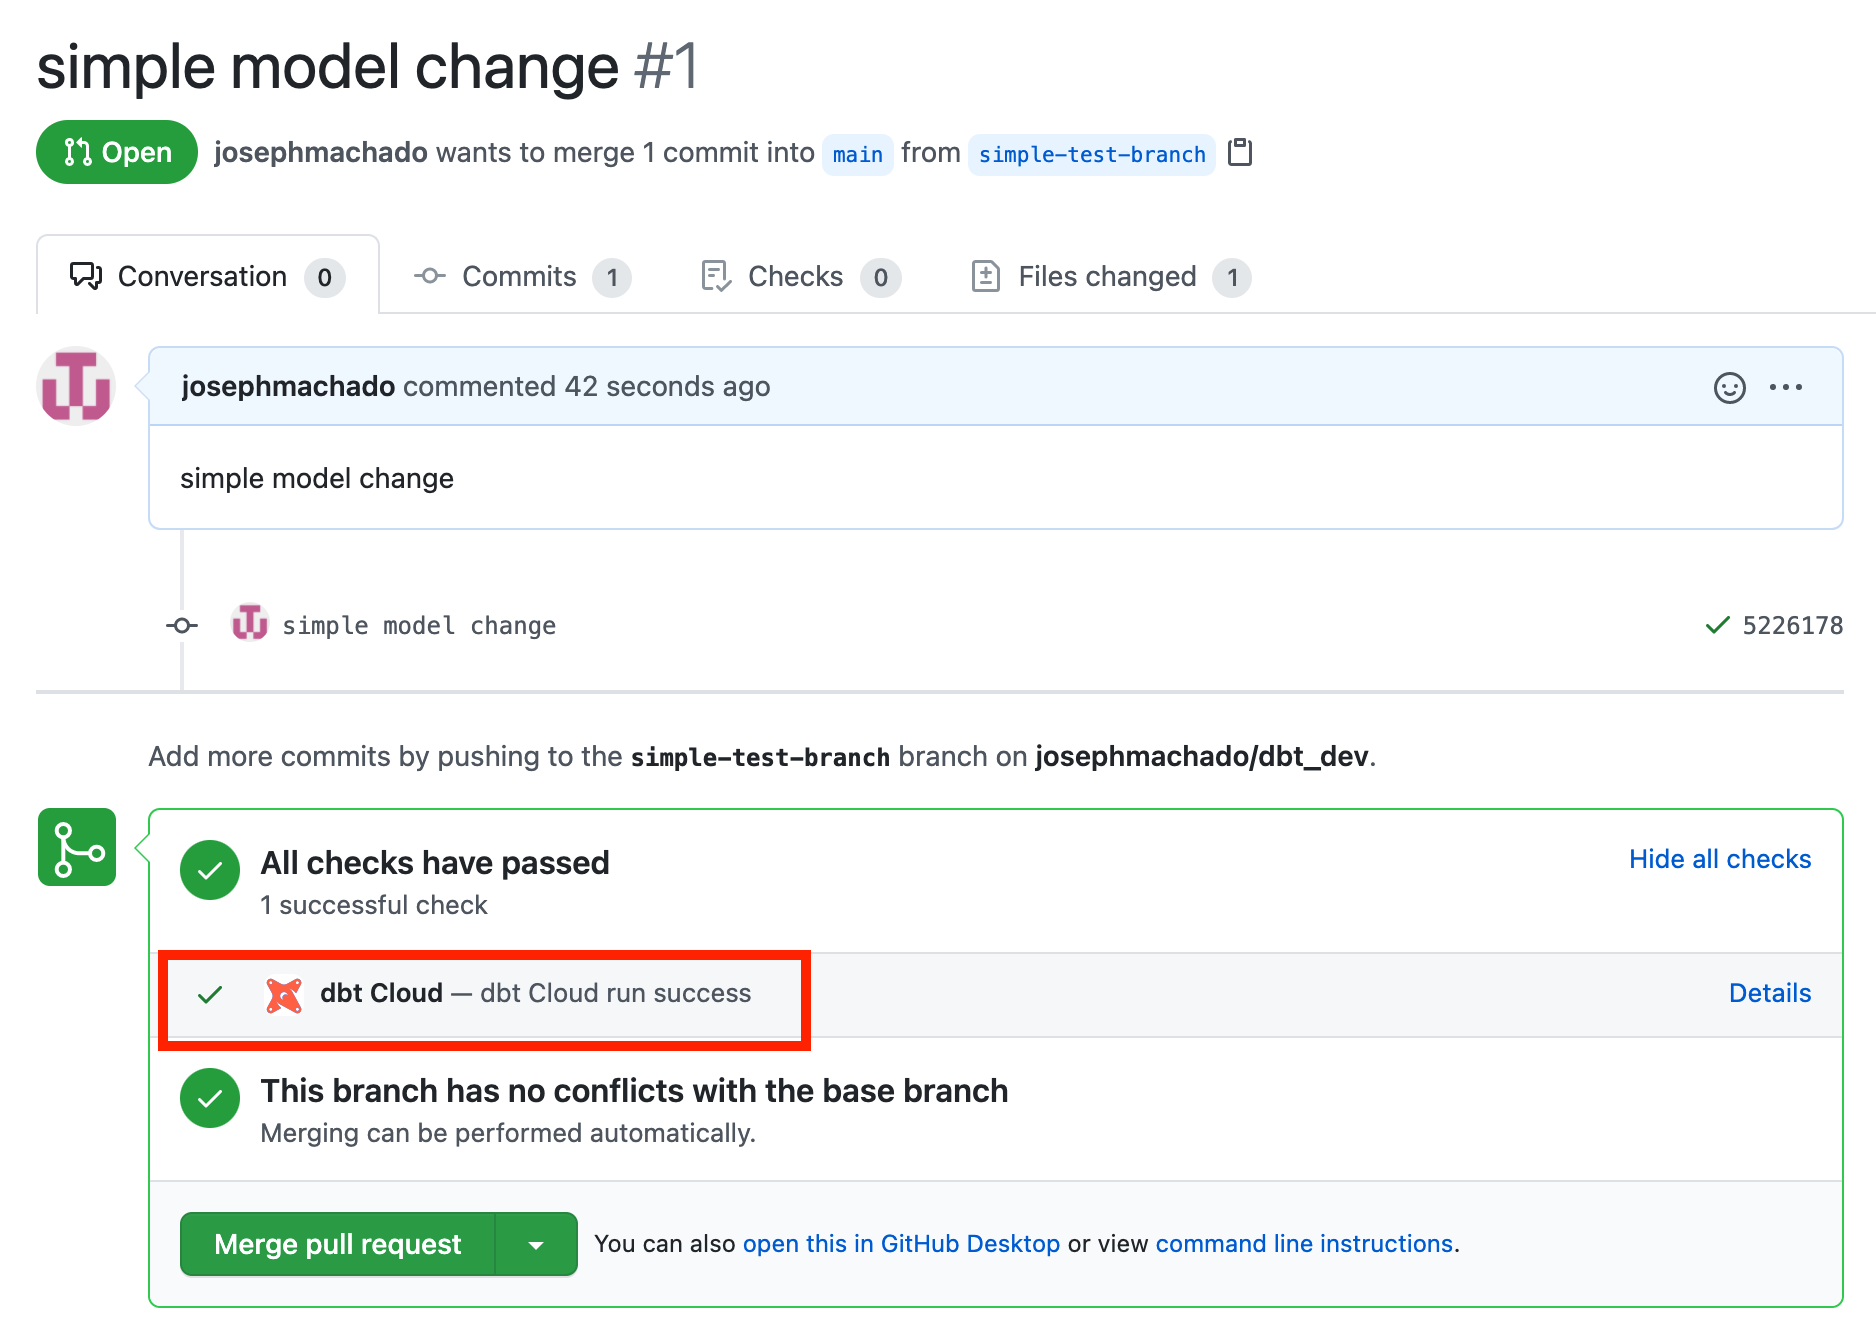
You can see the list of runs in the dbt UI under the respective job. In our case, it’s the CI job that we created in the previous section.

Note that this creates a temporary schema in your production database. The data models are created in this schema. Dbt cloud runs tests on the data in this PR specific schema. From the above image, you can see that the temporary schema created for that PR was named dbt_cloud_pr_19119_1.
NOTE: This pr specific schema should be removed by dbt cloud after your PR is merged, but there have been cases where it is not removed. This is a known issue.
After the CI jobs pass, you can be confident that your code will work as expected on your current production data. You can merge your pull request.
Schedule jobs
Now that our code is in production, we can start scheduling jobs. Dbt is a compiler and runner, but not a scheduler. This is where dbt cloud helps, by letting us schedule jobs with the required frequency.
Let’s schedule a job to run all the models every day. You can go to the Job section and create a job as shown below.
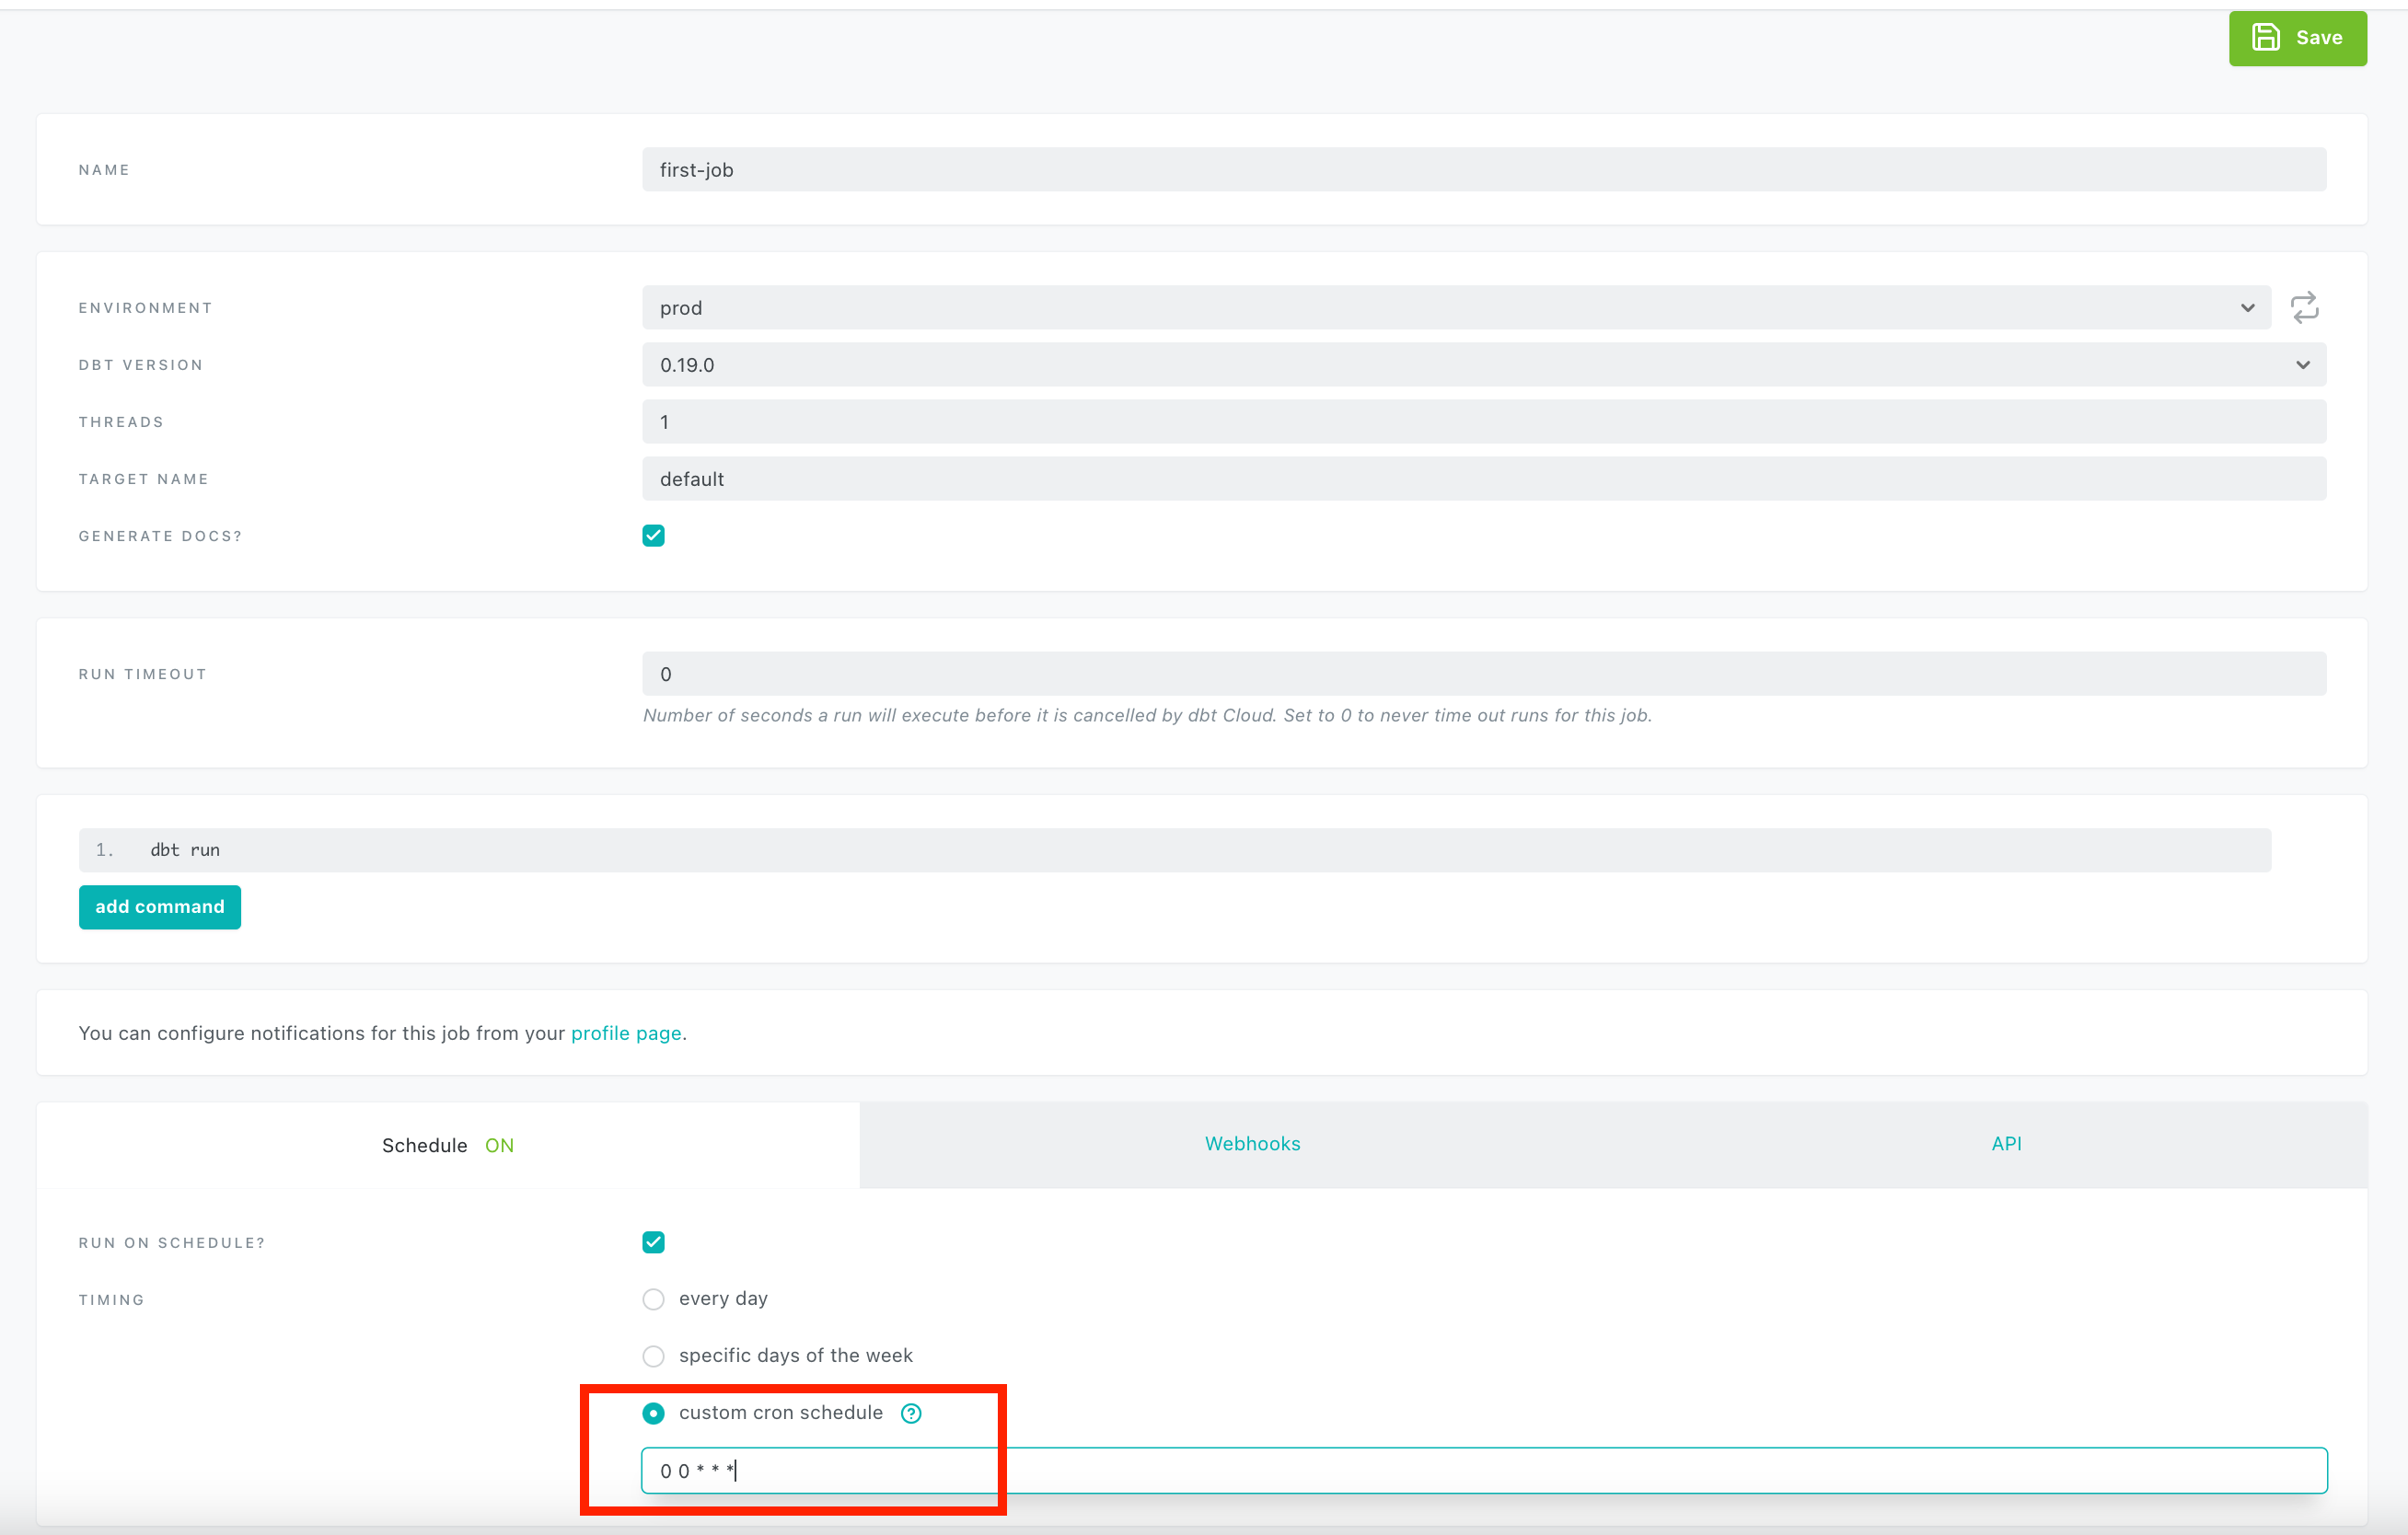
Now dbt cloud will take care of running this job every day as 12 AM for you. Note that we also check the GENERATE DOCS checkbox.
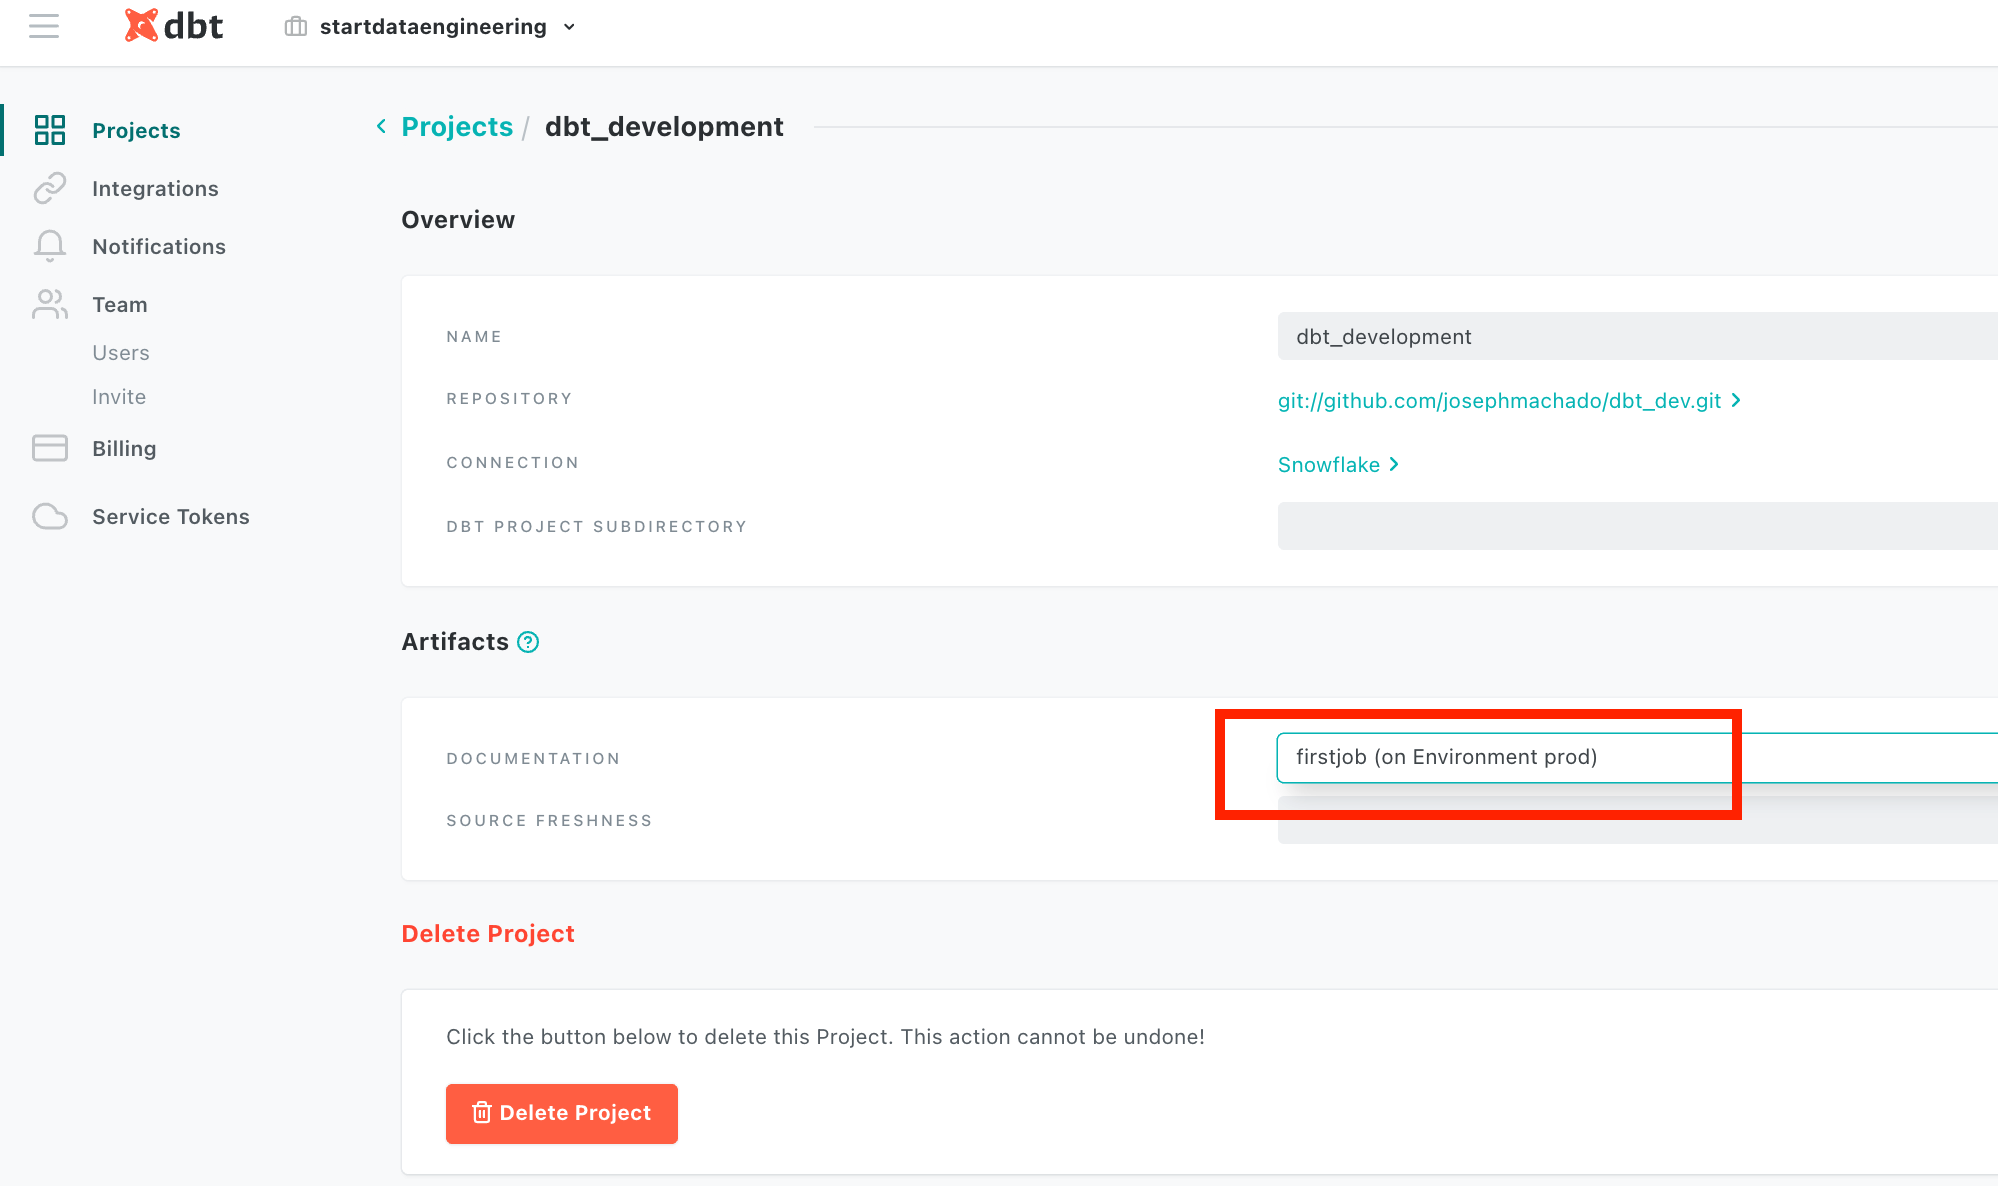
Host data documentation
One of the most powerful features of dbt is its hosted documentation. Dbt allows us to specify column and table descriptions as part of your schema files. This documentation can be viewed by anyone with access to dbt cloud. We can generate documentation for any job from the project settings page. Click on hamburger icon -> Account Settings -> Project. On this page, select the job whose data documentation you want hosted by dbt cloud. Dbt cloud will show the documentation from the latest run of the selected job.
You can view the docs by clicking on hamburger icon -> Documentation. ## Conclusion and next steps
Hope this article gave you a good understanding of how to setup an ELT data-ops workflow using dbt cloud and snowflake. There are more advanced features such as using custom schema names based on environments, using variables, hooks for permission grants, etc. These can be used when required by your project.
To recap, we saw
- How to setup Snowflake permissions for dbt cloud
- How to setup dbt cloud + github integration
- How to enable CI jobs on github PRs(Pull requests)
- How to schedule jobs from dbt cloud
- How to host documentation in dbt cloud
The next time you are building an ELT data stack, consider using dbt cloud and Snowflake. These tools make managing data pipelines seamless and easy. As always, please feel free to leave any questions or comments in the comments section below.