1. Introduction
Data systems usually involve multiple systems, which makes local development challenging. If you have struggled with
Setting up a local development environment for your data projects
Trying to avoid the “this works on my computer” issue
Then this post is for you. In this post, we go over setting up a local development environment using Docker. By the end of this post, you will have the skills to design and set up a local development environment for your data projects.
2. Set up
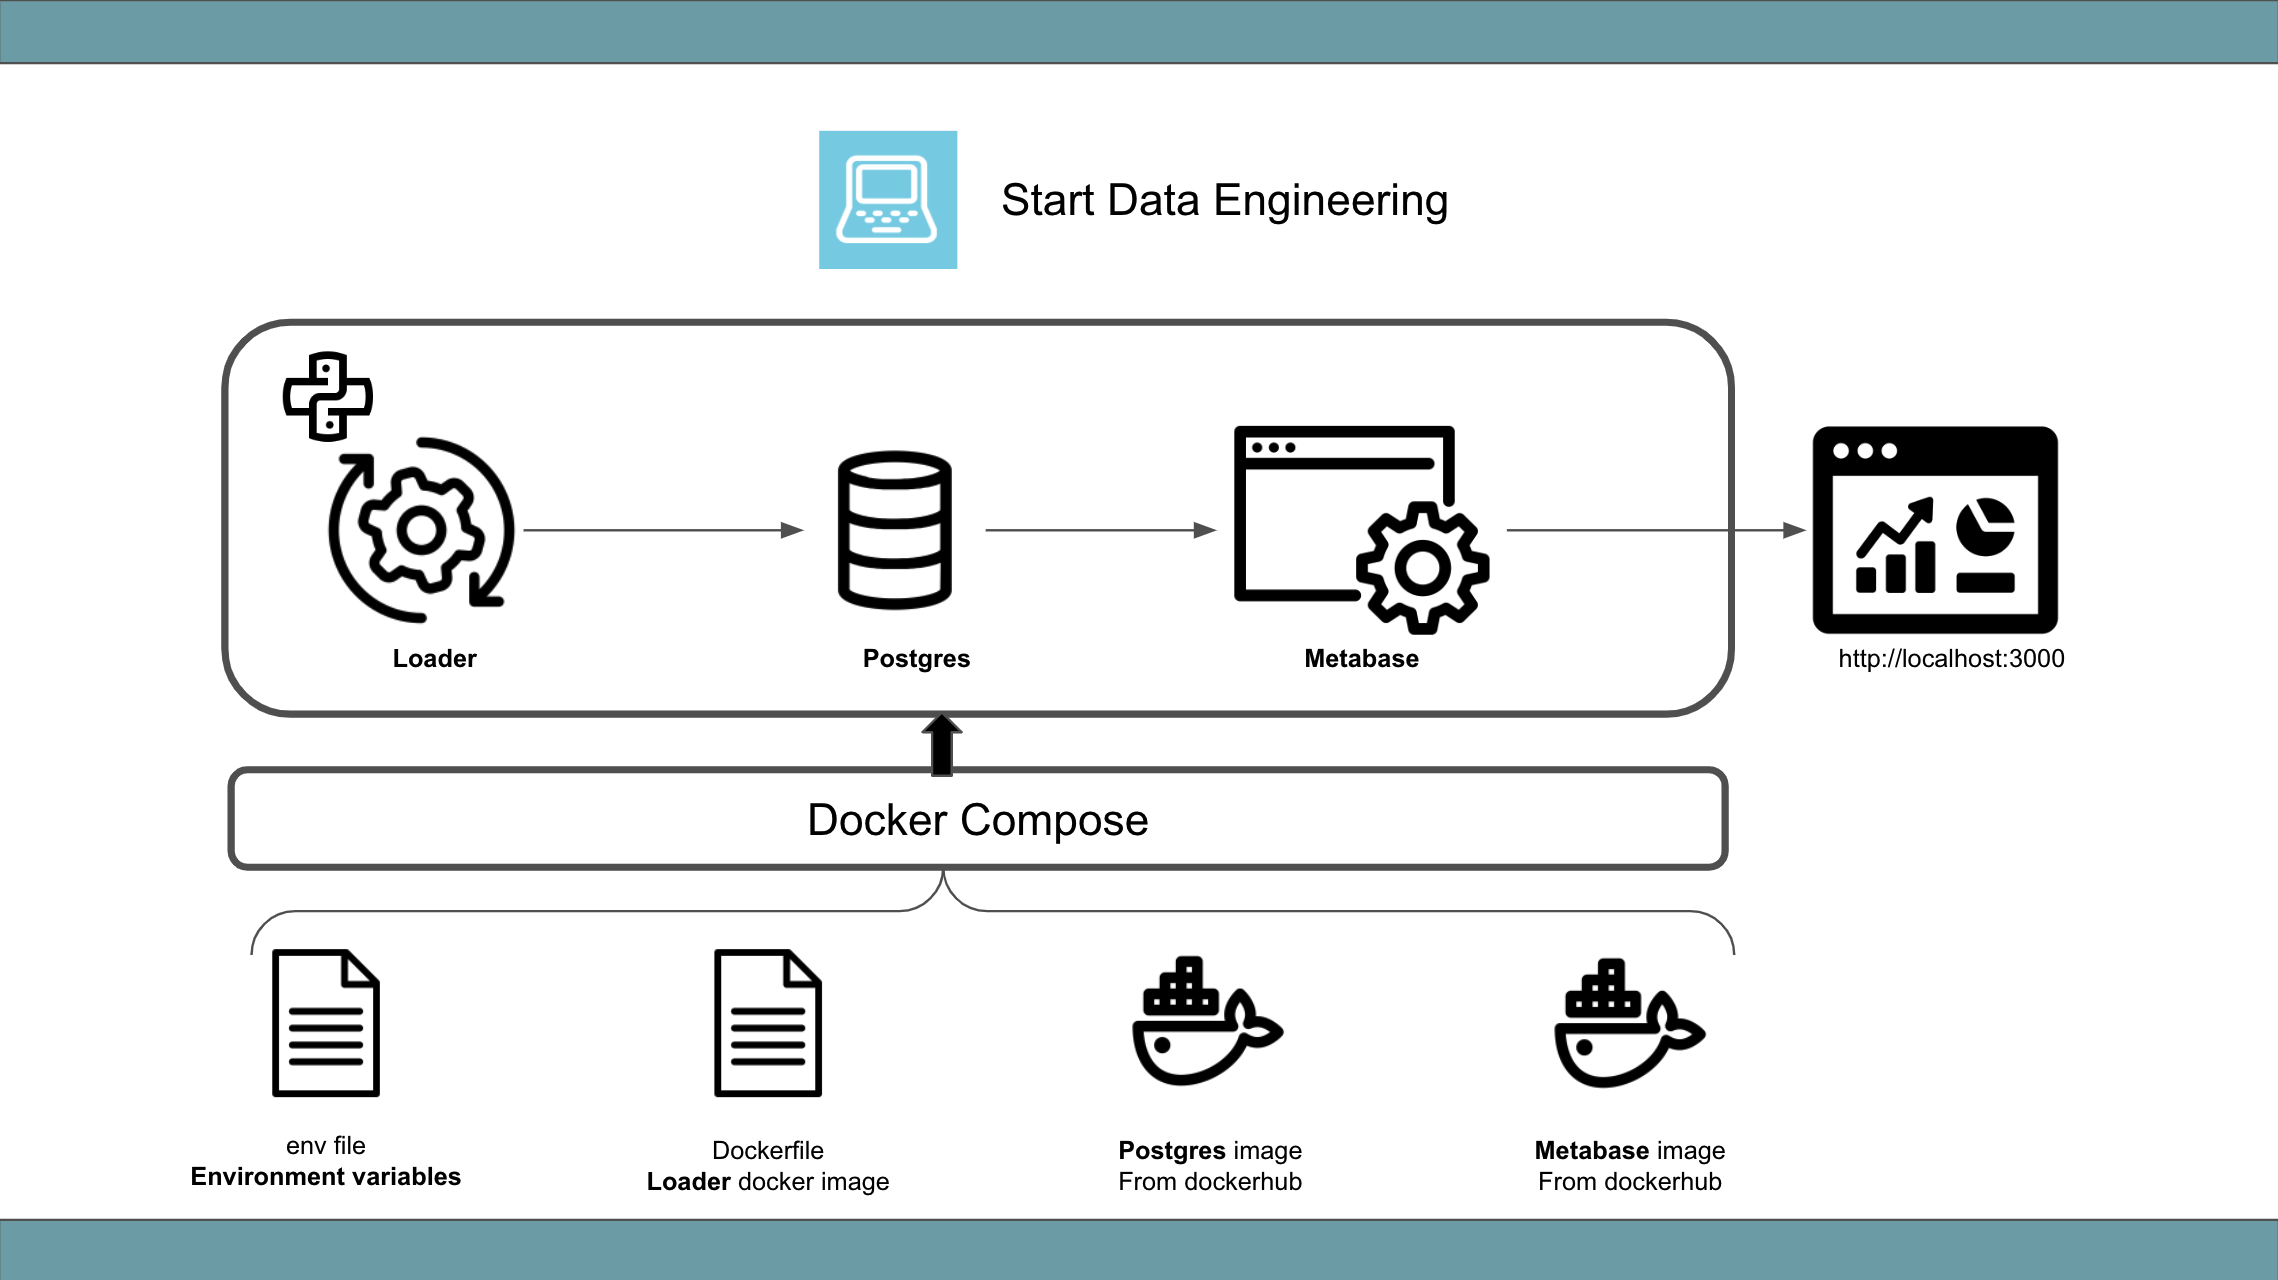
Our project involves a python process loading data into a warehouse as shown below.
To run the code, you will need
- Docker and Docker Compose
- git
Clone the git repo and run the ETL as shown below.
Now you can log into the warehouse DB using make warehouse and see the results of the ETL run, as shown below.
You can log into the Metabase dashboard by going to localhost:3000. You can stop the Docker containers using the make down command.
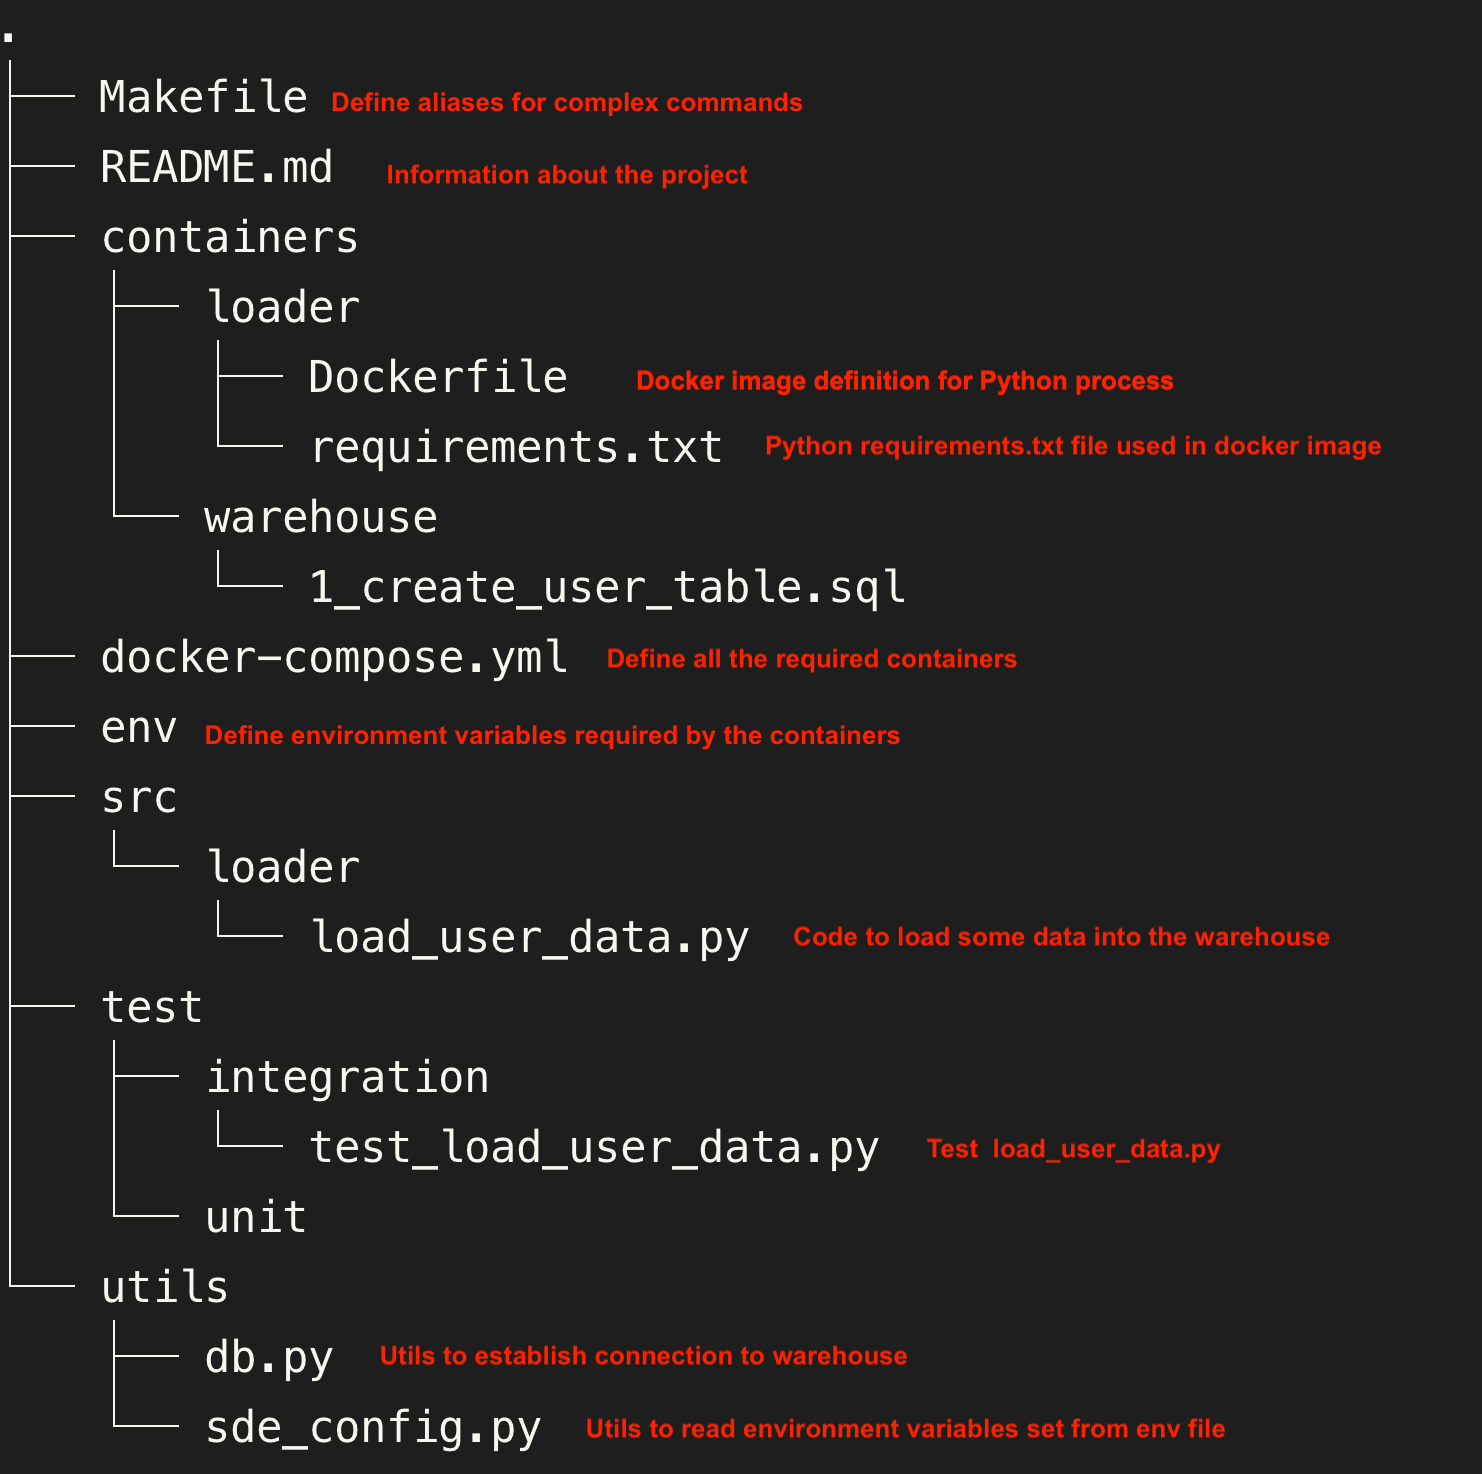
The project structure is as shown below.
3. Reproducibility
3.1. Docker
Docker provides a way to have a similar development environment between local and production systems.
Docker’s main concepts are
Image: An OS template with your desired settings.Container: The images run within containers.
There are two types of images.
Prebuilt image: These are the images at dockerhub. Most software has its official image. Note that anyone can create and upload an image to the Docker hub.Custom image: One can also build an image to fit their specific requirements. These images can be built from scratch or built on top of existing images.
Our project uses the official images for Postgres and Metabase and a custom image to run python and load data into Postgres.
We defined our custom image at ./local_dev/containers/loader/Dockerfile. We can build images and run them on containers as shown below.
docker build ./containers/loader/ -t loader # build image from file named Dockerfile in path /containers/loader/
docker run  --name local_loader -d loader # run our image on a container
docker ps # check the running container
docker run -d loader sleep 100 # Run
docker ps # you'll see 2 running container
# one will stop running in 100 seconds
docker exec -ti local_loader echo 'Running on local_loader container' # Exec, will run command on an existing container
# stop container
docker stop local_loader
docker rm local_loader
Command definitions
build: Used to build an image from a docker file.run: Used to run the image within a container. By default, the command defined within the CMD in the Dockerfile will be used. You can override this by specifying any command (e.g.sleep 100).exec: Used to execute a command on an already running container.stop & rm: Used to stop a container and remove a container.
The steps used to build the docker image are in the Dockerfile. They are executed in the order that they are specified. The main commands are shown below.
FROM: Used to specify the base image. We are using python image, version 3.9.5.WORKDIR: Used to specify the directory from which commands will be run/executed.ENV: Used to set the environment variables for our docker image.COPY: Used to copy data from our local file system into the docker image. We copy our pythonrequirements.txtinto our docker image.RUN: Used to execute commands when building the docker image.CMD: Used to specify the default command to be run, when this image is used in a container.ENTRYPOINT: Used to specify a shell script to be executed each time a container is created using this image. The default entry point is/bin/sh.EXPOSE: Used to specify a port to expose to your local machine. By default, no ports are exposed.
ENTRYPOINT and CMD may seem very similar, but they are different. The ENTRYPOINT script is always executed when starting a new container, but CMD can be overridden when needed.
3.2. Docker Compose
Docker-compose provides a way to spin up different containers using a single YAML file.
Let’s look at the different parts of the docker-compose file.
networks: Networks allow Docker containers to communicate amongst themselves. All the containers started using a docker-compose file will have a default network.services: Specifies all the containers to be started using the docker-compose.yml file.image: Used to specify image name from docker hub or in combination with thebuildsection to define our image definition (Dockerfile).build: Used to specify the location of a custom image definition. Thecontextspecifies the directory where the image definition lives.container name: Used to specify a name for the container.environment: Used to specify environment variables when starting a container. We use${VAR_NAME}as the value as theVAR_NAMEwill be pulled from env file specified with--env-file env.volumes: Used to sync files between our local file system and the docker container. Any change made is reflected in our local filesystem and the files within the docker container.ports: Used to specify which ports to open to our local machine. The5432:5432port mapping in the Postgres container mapshostPort:containerPort. We can now reach the Postgres container via the host port, 5432.
4. Developer ergonomics
4.1. Formatting and testing
Having consistent formatting and linting helps with keeping the code base clean. We use the following modules.
We also use pytest to run all the tests inside the ./test folder. See Makefile for the commands to run these.
4.2. Makefile
Makefile allows us to use shortcuts instead of typing out long commands and makes working with the tools simpler. One can define a command in the Makefile and invoke it using the make command syntax.
Take a look at our Makefile. We can spin up all the containers, run formatting, checks, and tests, and spin down the containers as shown below.
5. Conclusion
Hope this article gives you a good understanding of setting up your local development environment. To recap, we saw
- Creating docker images
- Using docker compose to spin up multiple docker containers
- Automating static type checks, formatting, lint checks, and testing
- Using Makefile to make running complex commands simpler
The next time you are setting up a data project or want to improve your team’s development velocity, set up reproducible environments while focussing on developer ergonomics using the techniques shown above.
If you have any questions or comments, please leave them in the comment section below.
6. Further reading
- Choosing the image for your data components
- Adding tests to data pipelines
- Adding CI test
- Curious how the postgres user table gets created?, see the Initializaion script section in this page