What is backfilling ?
Backfilling refers to any process that involves modifying or adding new data to existing records in a dataset. This is a common use case in data engineering. Some examples can be
- a change in some business logic may need to be applied to an already processed dataset.
- you might realize that there is an error with your processing logic and want to reprocess already processed data.
- you may want to add an additional column and fill it with a certain value in an existing dataset. Most ETL orchestration frameworks provide support for backfilling.
If you are wondering
How can I modify my SQL query to allow for Airflow backfills ?
How can I manipulate my execution_date using airflow macros ?
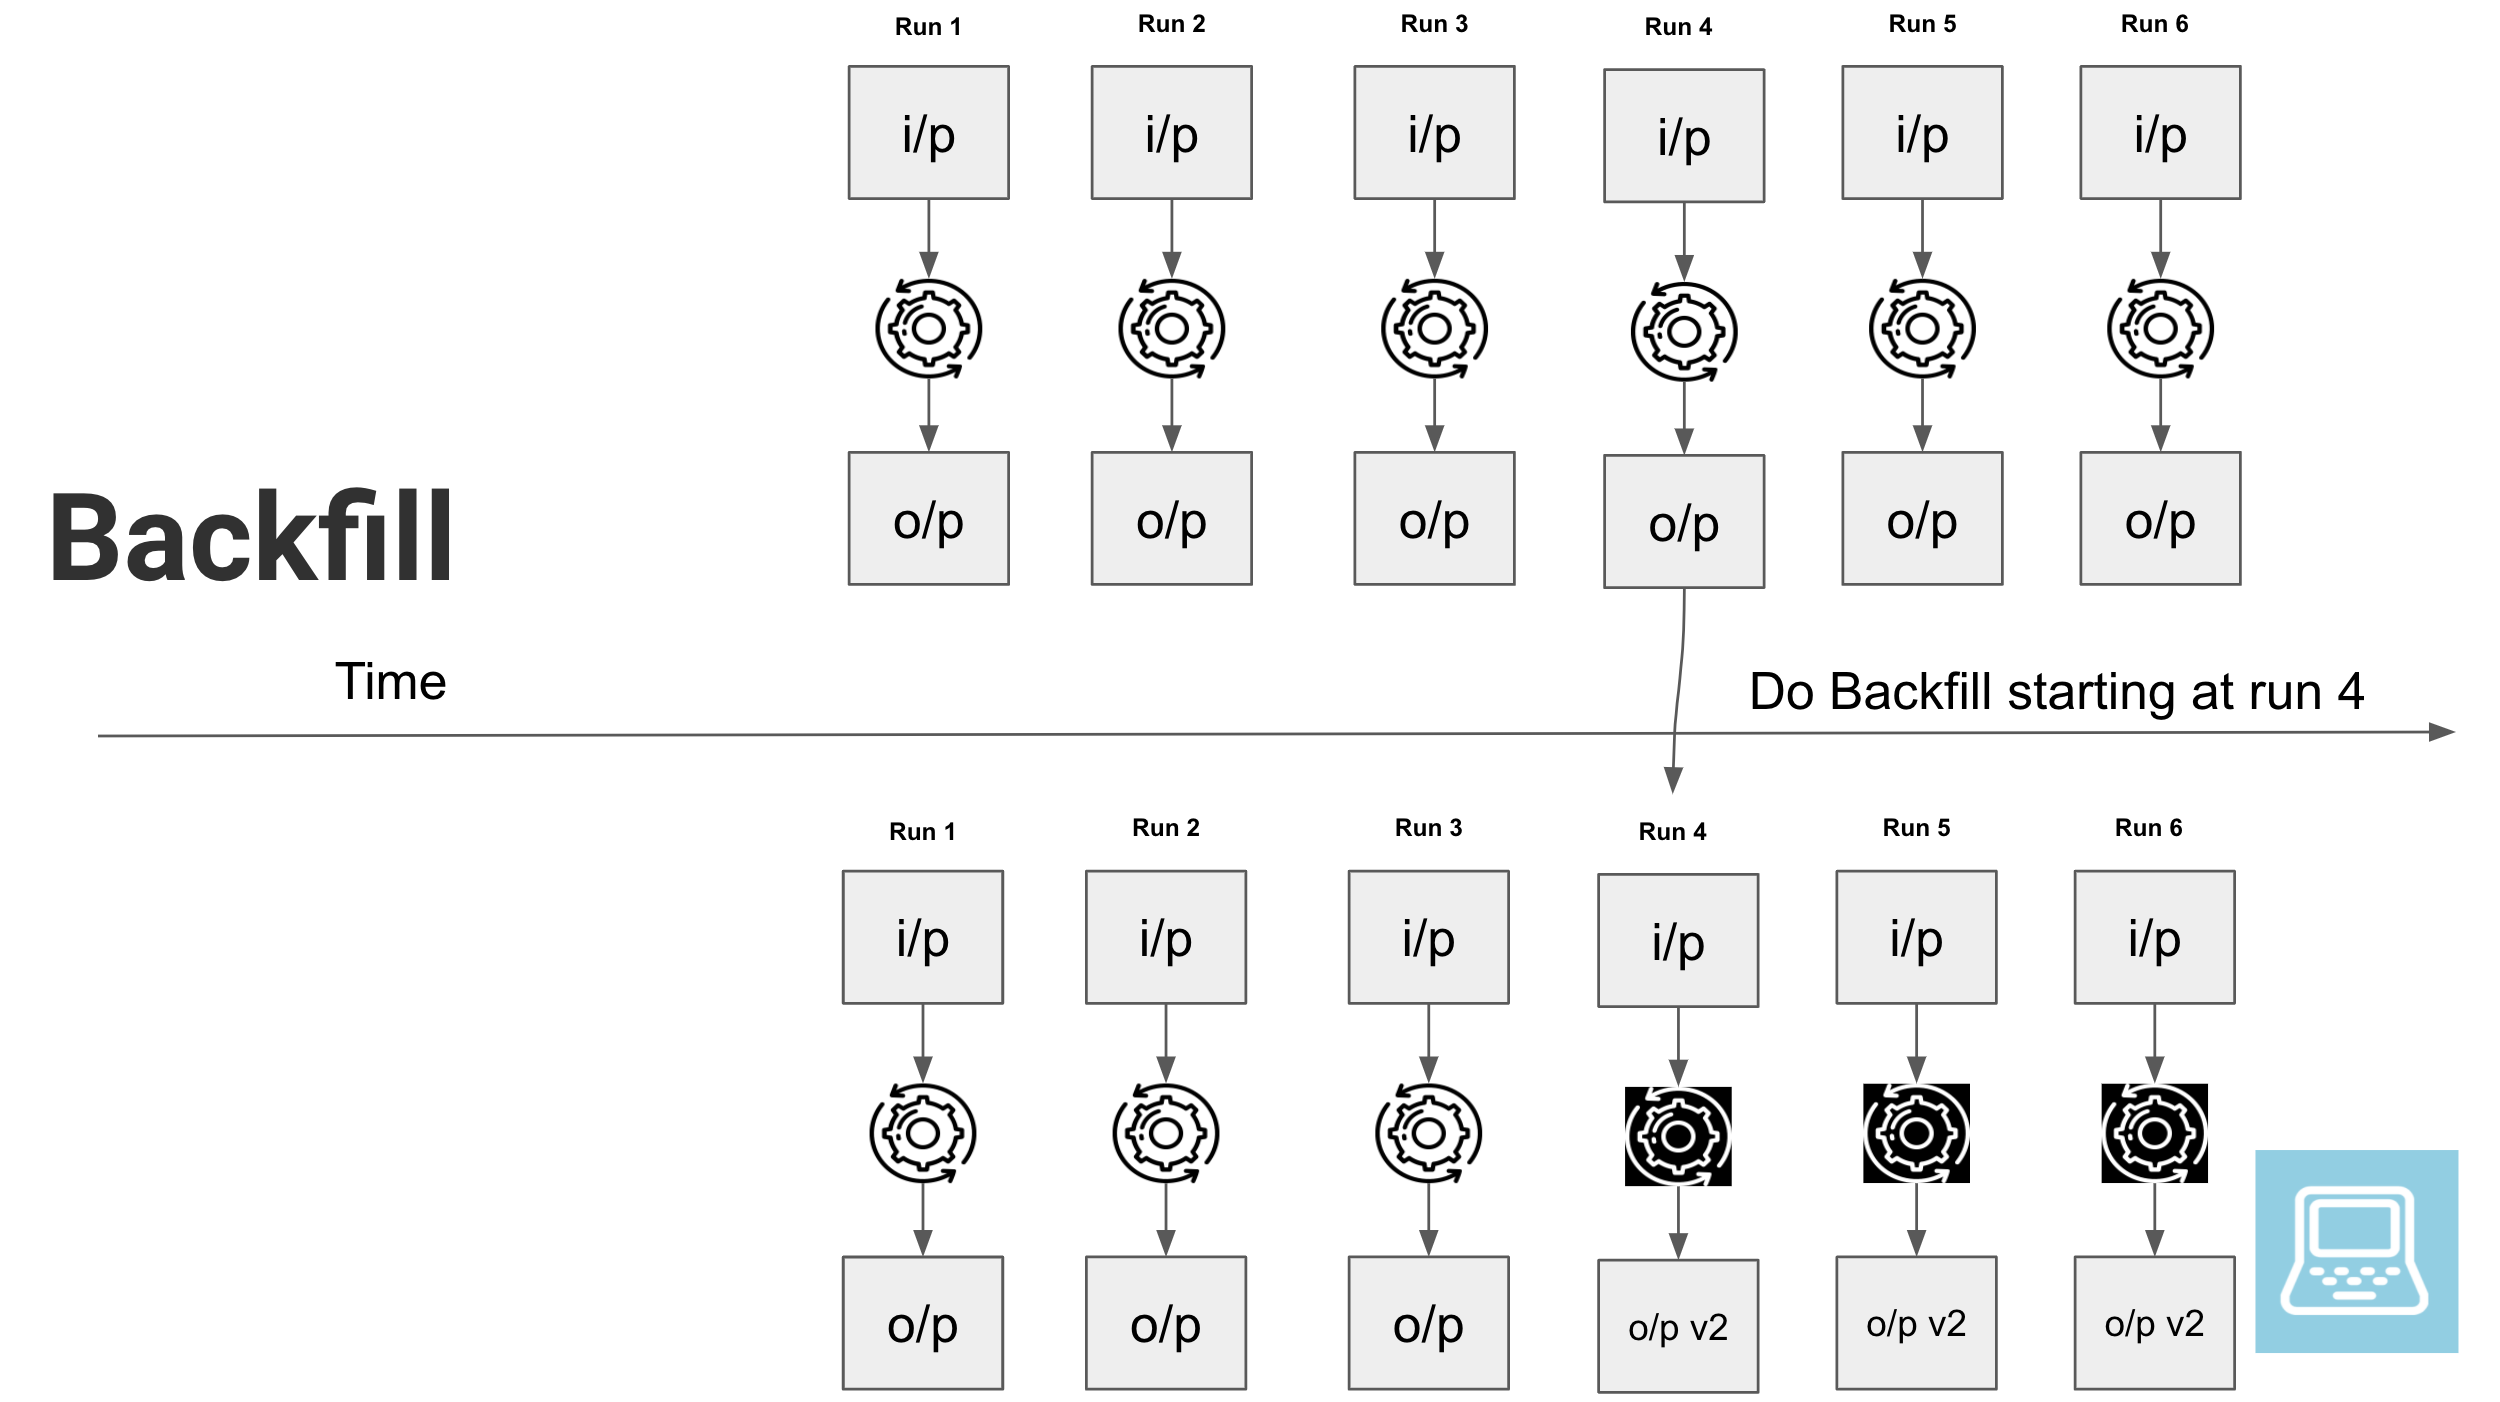
Then this post is for you. You can visualize the backfill process as shown below.
 # Setup
We will be running a simple example using Apache Airflow and see how we can run a backfill on an already processed dataset. You can follow along without setting up your own Airflow instance as well.
Prerequisites
Create a project folder and cd into it.
Create a file called docker-compose-LocalExecutor.yml with the following content from puckel airflow repo.
version: "3.7"
services:
  postgres:
    image: postgres:9.6
    environment:
      - POSTGRES_USER=airflow
      - POSTGRES_PASSWORD=airflow
      - POSTGRES_DB=airflow
    logging:
      options:
        max-size: 10m
        max-file: "3"
    ports:
      - "5432:5432"

  webserver:
    image: puckel/docker-airflow:1.10.9
    restart: always
    depends_on:
      - postgres
    environment:
      - LOAD_EX=n
      - EXECUTOR=Local
      - AIRFLOW_CONN_POSTGRES_DEFAULT=postgres://airflow:airflow@postgres:5432/airflow
    logging:
      options:
        max-size: 10m
        max-file: "3"
    volumes:
      - ./dags:/usr/local/airflow/dags
      # - ./plugins:/usr/local/airflow/plugins
    ports:
      - "8080:8080"
    command: webserver
    healthcheck:
      test: ["CMD-SHELL", "[ -f /usr/local/airflow/airflow-webserver.pid ]"]
      interval: 30s
      timeout: 30s
      retries: 3
Once you have this, you can start Airflow services locally as shown below.
Wait a few seconds and you will have an Airflow service running locally. Let’s use Airflow’s postgres DB to create a sample dataset.
Let’s create some sample tables and data.
CREATE SCHEMA sample;
DROP TABLE IF EXISTS sample.input_data;
CREATE TABLE sample.input_data (
    id SERIAL PRIMARY KEY,
    input_text VARCHAR(10),
    datetime_created TIMESTAMP
);
DROP TABLE IF EXISTS sample.output_data;
CREATE TABLE sample.output_data (
    id int UNIQUE,
    event_id VARCHAR(40),
    input_text VARCHAR(10),
    processed_text VARCHAR(50),
    datetime_created TIMESTAMP,
    datetime_inserted TIMESTAMP
);
INSERT INTO sample.input_data(input_text, datetime_created)
VALUES ('hello 00', '2021-01-01 00:00:00'),
    ('hello 00_2', '2021-01-01 00:10:00'),
    ('hello 01', '2021-01-01 01:00:00'),
    ('hello 01_2', '2021-01-01 01:10:00'),
    ('hello 02', '2021-01-01 02:00:00'),
    ('hello 02_2', '2021-01-01 02:10:00'),
    ('hello 03', '2021-01-01 03:00:00'),
    ('hello 03_2', '2021-01-01 03:10:00'),
    ('hello 04', '2021-01-01 04:00:00'),
    ('hello 04_2', '2021-01-01 04:10:00'),
    ('hello 05', '2021-01-01 05:00:00'),
    ('hello 05_2', '2021-01-01 05:10:00'),
    ('hello 06', '2021-01-01 06:00:00'),
    ('hello 06_2', '2021-01-01 06:10:00'),
    ('hello 07', '2021-01-01 07:00:00'),
    ('hello 07_2', '2021-01-01 07:10:00'),
    ('hello 08', '2021-01-01 08:00:00'),
    ('hello 08_2', '2021-01-01 08:10:00'),
    ('hello 09', '2021-01-01 09:00:00'),
    ('hello 09_2', '2021-01-01 09:10:00'),
    ('hello 10', '2021-01-01 10:00:00'),
    ('hello 10_2', '2021-01-01 10:10:00'),
    ('hello 11', '2021-01-01 11:00:00'),
    ('hello 11_2', '2021-01-01 11:10:00'),
    ('hello 12', '2021-01-01 12:00:00'),
    ('hello 12_2', '2021-01-01 12:10:00'),
    ('hello 13', '2021-01-01 13:00:00'),
    ('hello 13_2', '2021-01-01 13:10:00'),
    ('hello 14', '2021-01-01 14:00:00'),
    ('hello 14_2', '2021-01-01 14:10:00');
Apache Airflow - Execution Day
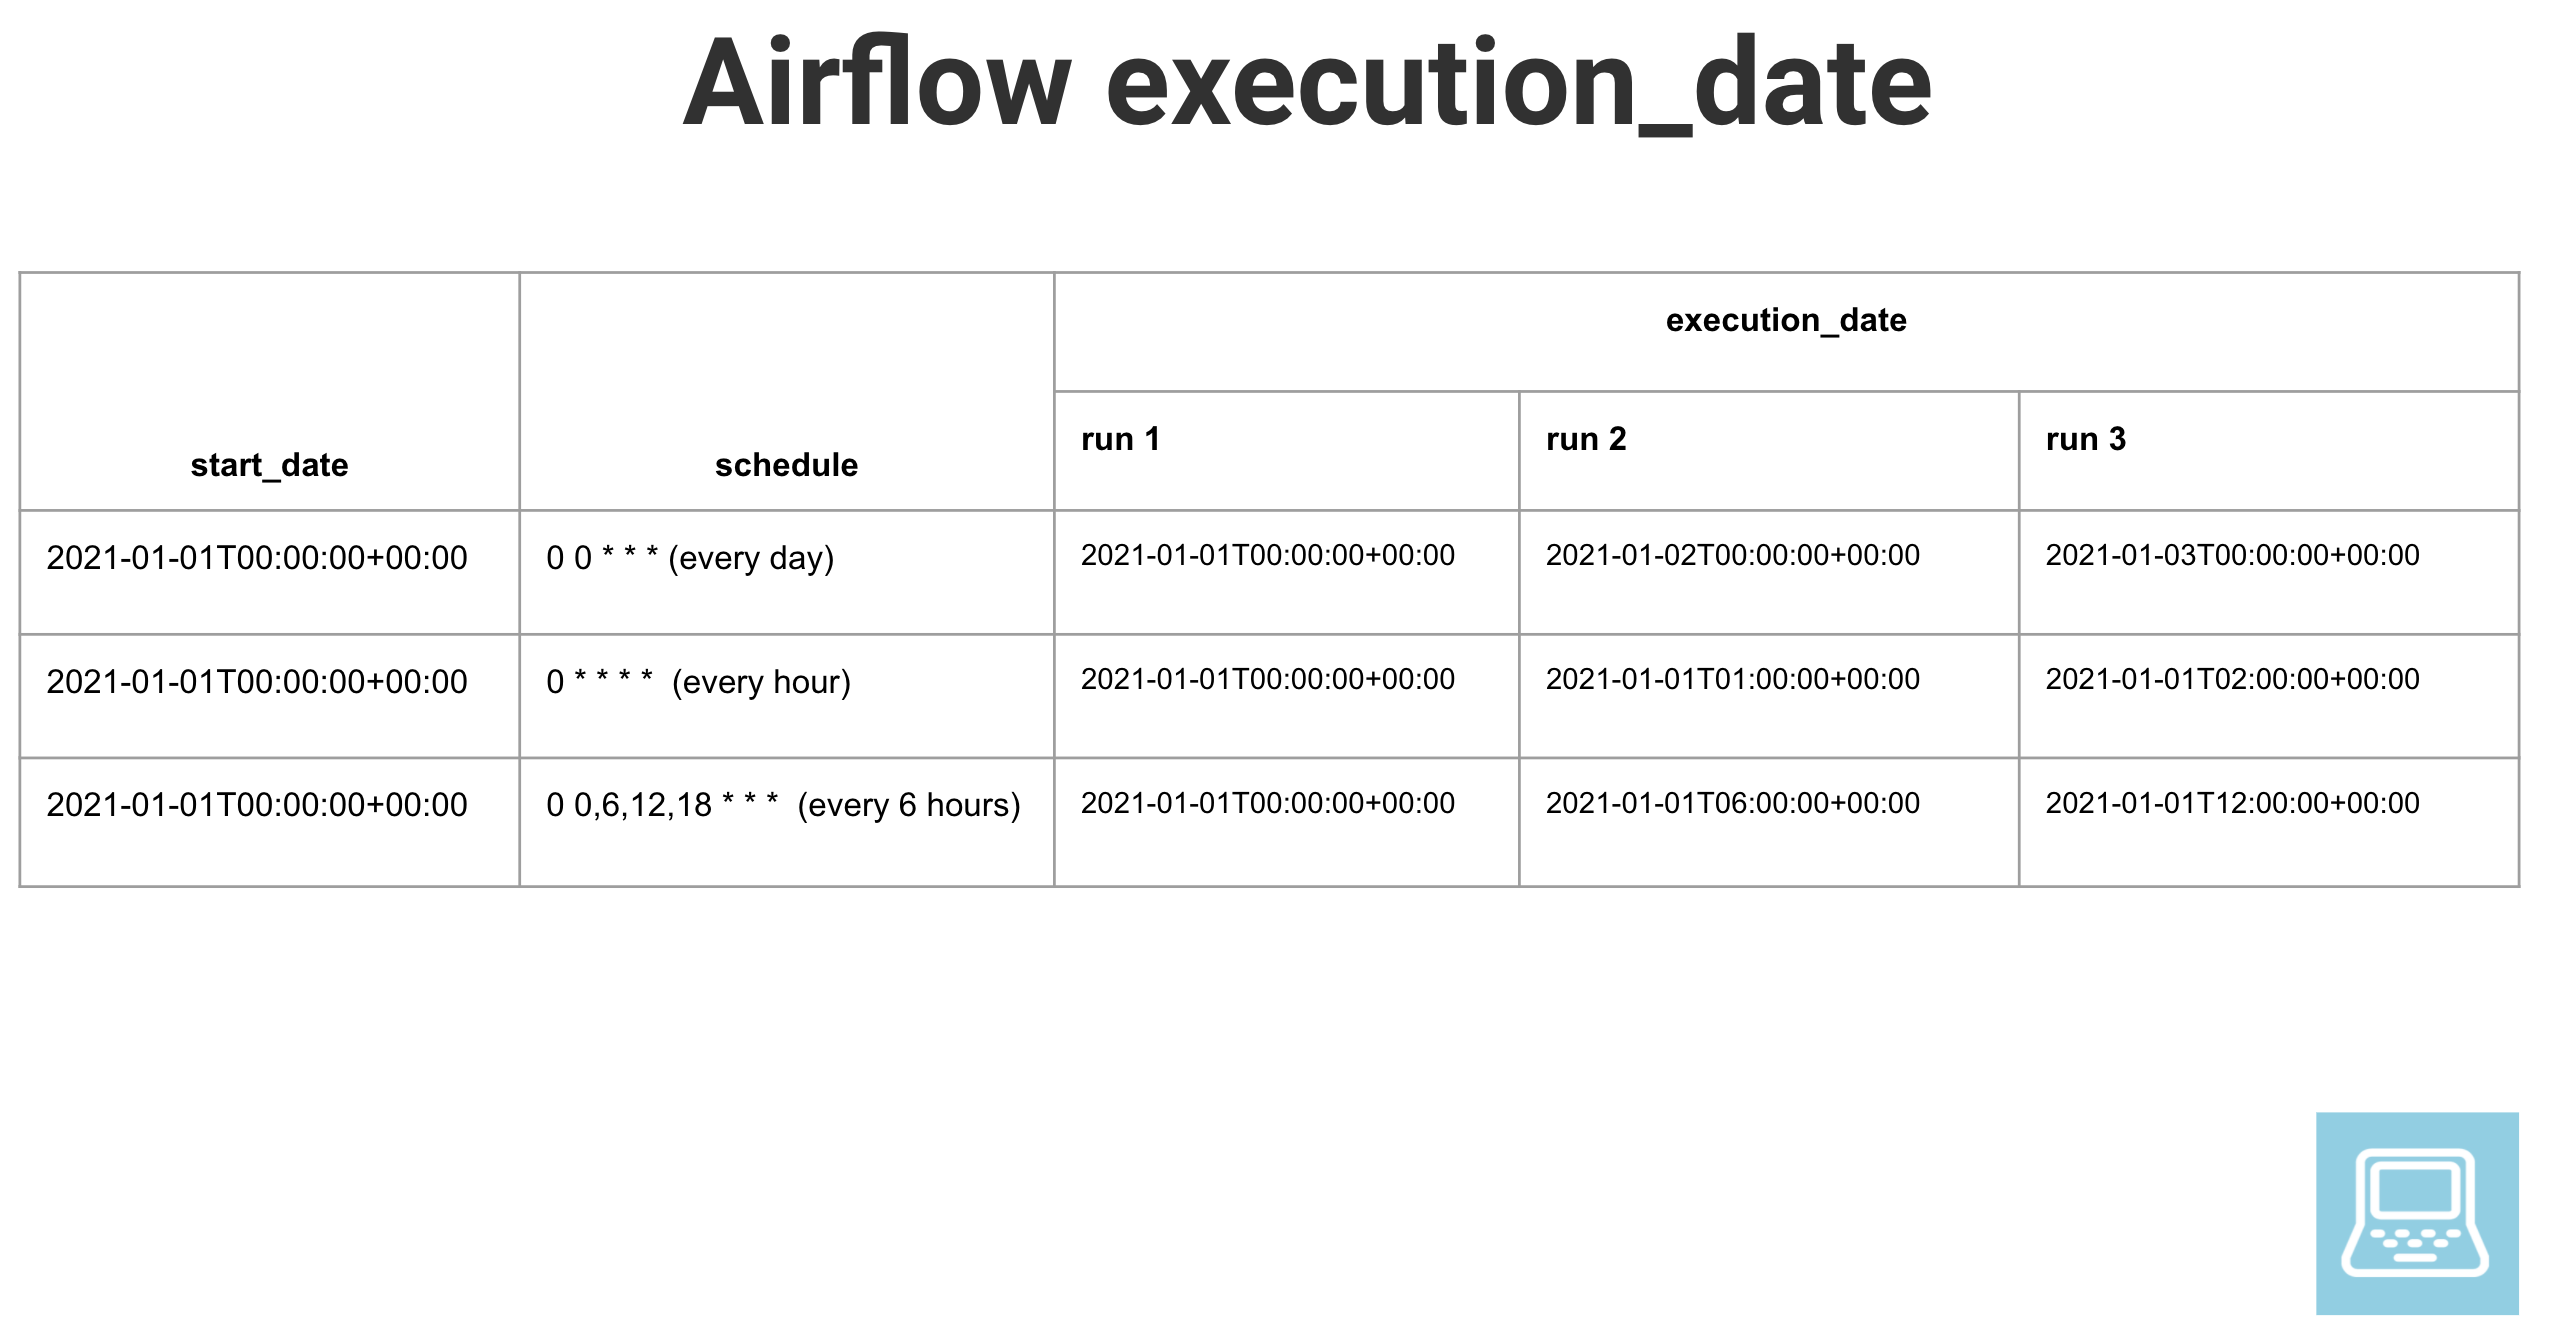
In Apache Airflow you can specify the starting day for a DAG and the schedule with which you want it to run. The run for a time interval (chosen based on schedule) will start after that time interval has passed. The main place of confusion is the execution_date variable. Execution_date is a Pendulum object, which is set to the scheduled starting time of the interval that the current run is meant to cover.
For example, in the image below, you can see that a DAG is set to run every hour, starting at 2021-01-01 00 and the first run would start at 2021-01-01 01 but its execution date will be 2021-01-01 00 which is the scheduled start time of the interval that it is meant to cover.
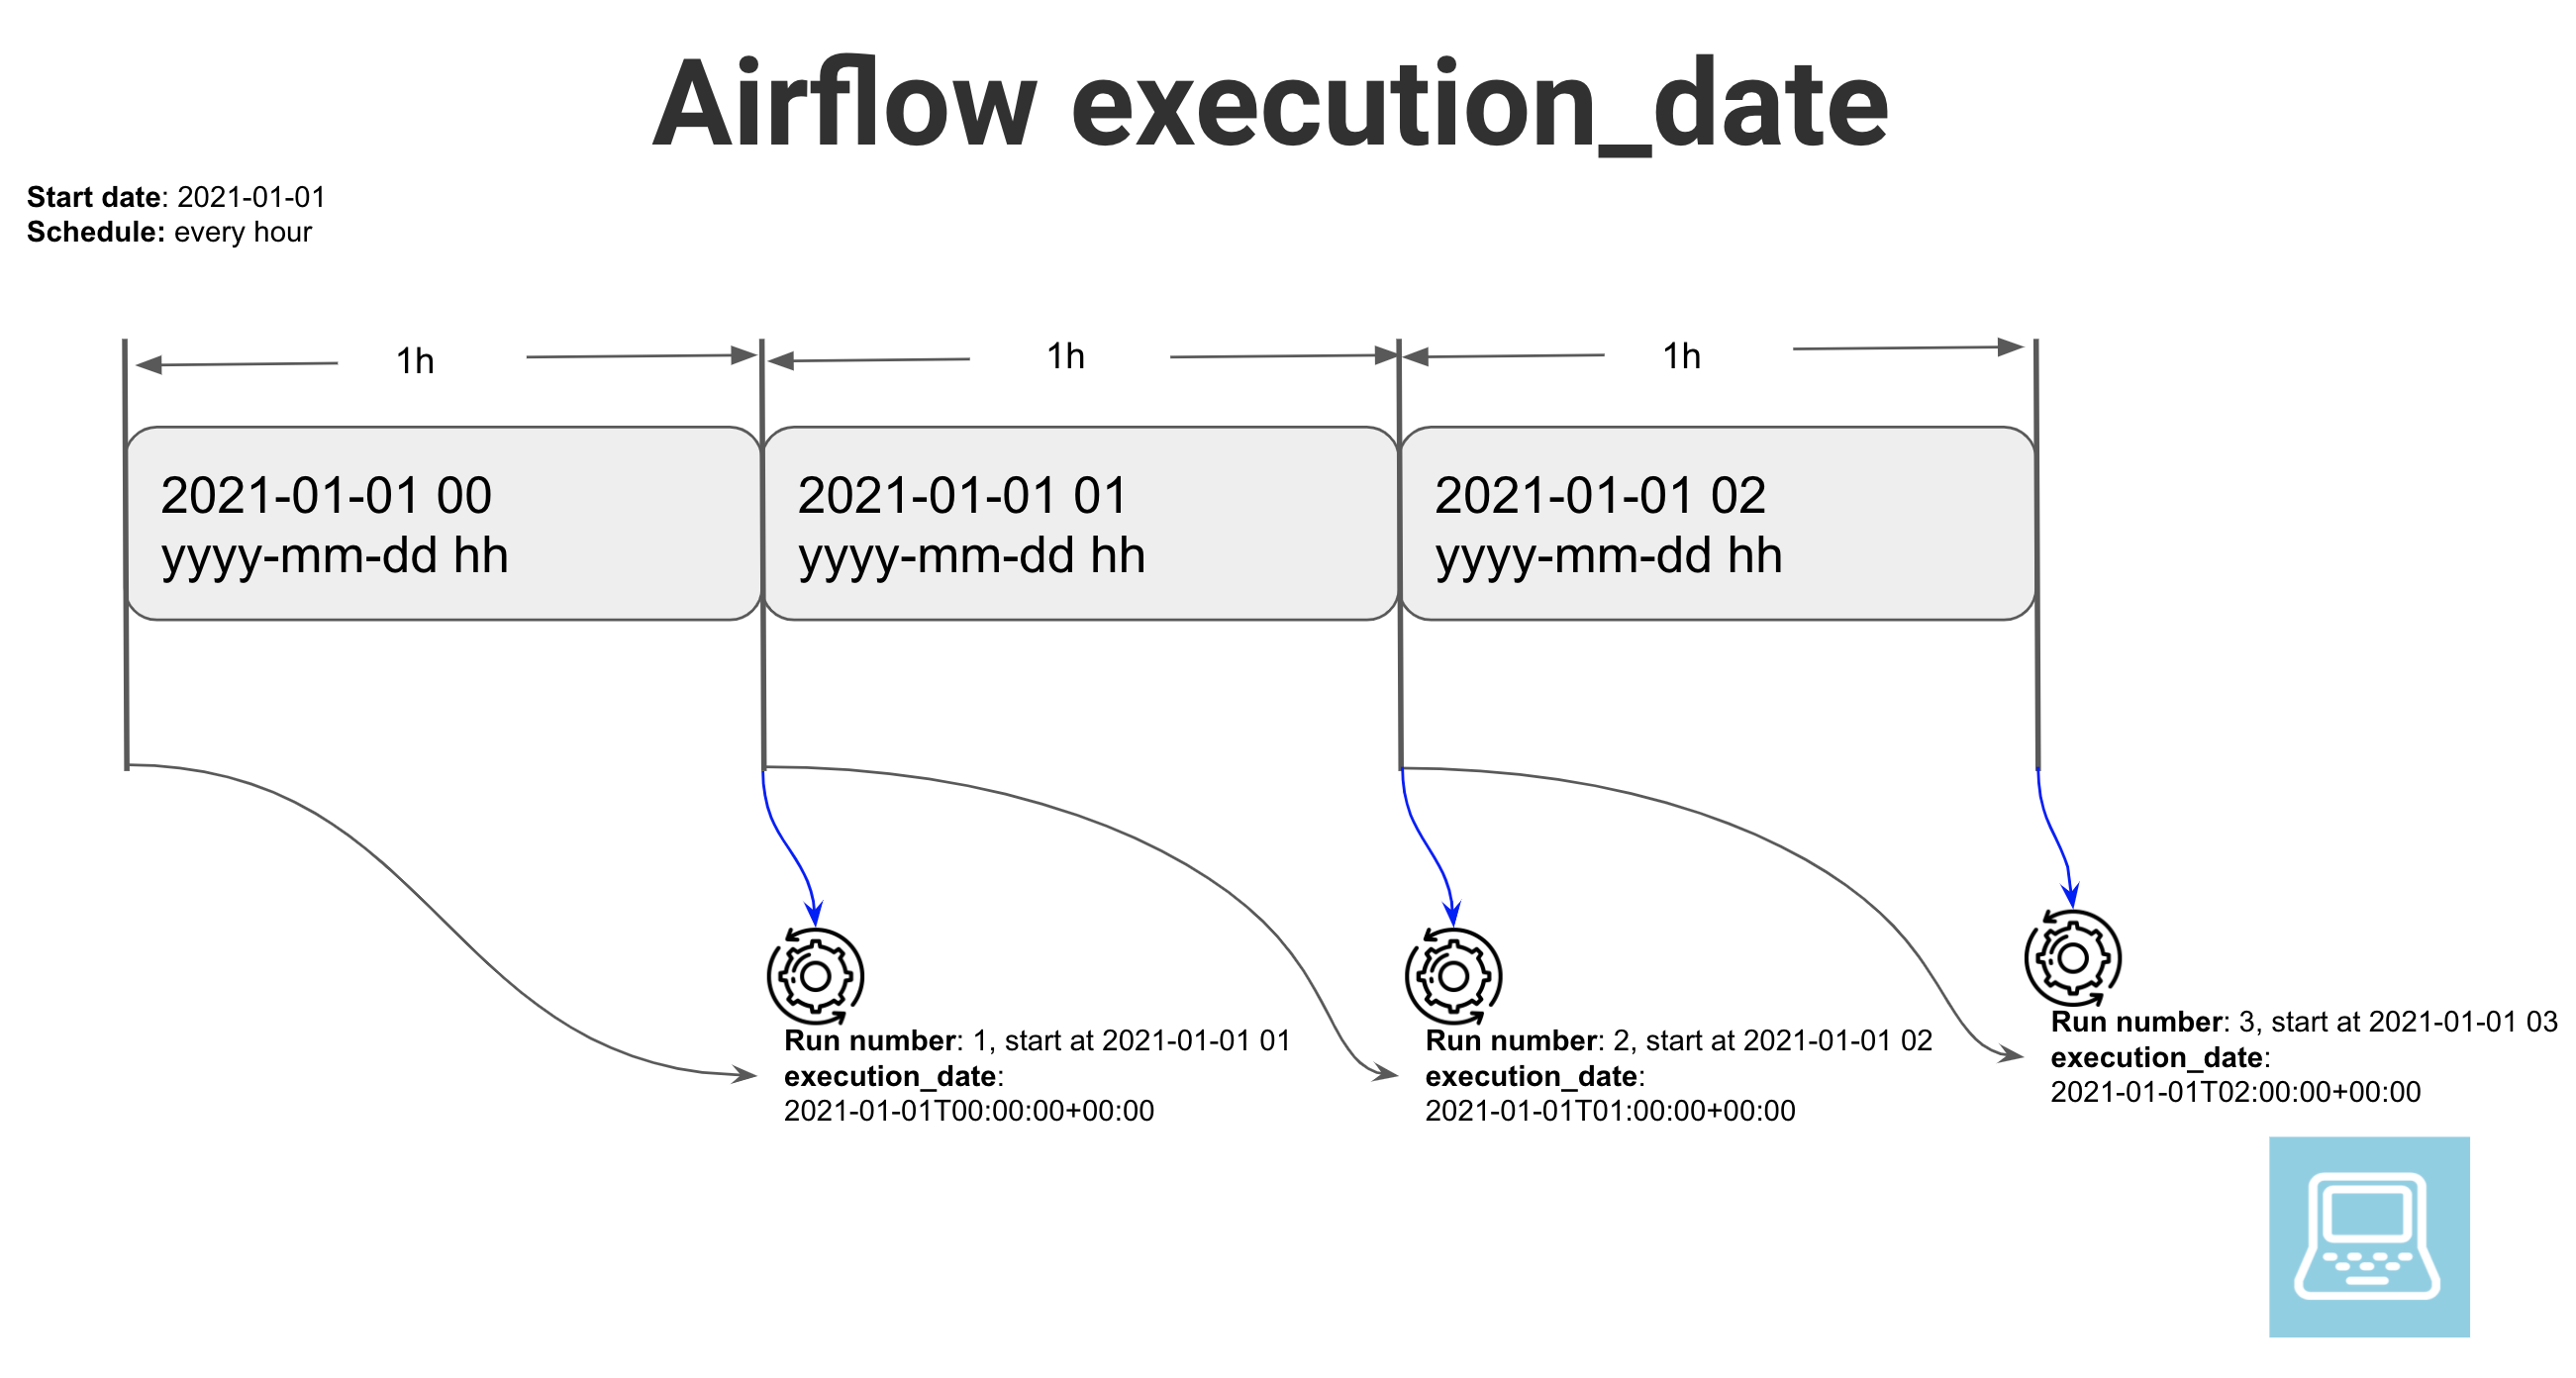
If you have uneven or complex schedules, note that Airflow will always consider the scheduled start time of the covered time interval as the execution_date.
Backfill
Now that we know what the execution_date is, we can use that to backfill already processed data.
Let’s assume we have an Airflow DAG set to run every hour, starting at 2020-01-01 00 UTC, which takes some input and generates an output. Let’s create a file called sample_dag.py in the current directory within the dags folder.
from datetime import datetime, timedelta

from airflow import DAG
from airflow.operators.postgres_operator import PostgresOperator

data_proc_script = """
INSERT INTO sample.output_data (
        event_id,
        id,
        input_text,
        processed_text,
        datetime_created,
        datetime_inserted
    )
SELECT '{{ macros.uuid.uuid4() }}' as event_id,
    id,
    input_text,
    CONCAT(input_text, ' World') as processed_text,
    datetime_created,
    now() as datetime_inserted
from sample.input_data
WHERE datetime_created::DATE = '{{ ds }}'
    AND EXTRACT(
        HOUR
        from datetime_created
    ) = {{ execution_date.hour }} ON CONFLICT (id) DO
UPDATE
SET event_id = EXCLUDED.event_id,
    id = EXCLUDED.id,
    input_text = EXCLUDED.input_text,
    processed_text = EXCLUDED.processed_text,
    datetime_created = EXCLUDED.datetime_created,
    datetime_inserted = EXCLUDED.datetime_inserted;
"""

default_args = {
    "owner": "startDataEngineering",
    "depends_on_past": True,
    "wait_for_downstream": True,
    "start_date": datetime(2021, 1, 1),
    "email": ["sde@startdataengineering.com"],
    "email_on_failure": False,
    "email_on_retry": False,
    "retries": 0,
}

dag = DAG(
    "sample_dag",
    default_args=default_args,
    schedule_interval="0 * * * *",
    max_active_runs=1,
)

process_data = PostgresOperator(
    dag=dag,
    task_id="process_data",
    sql=data_proc_script,
    postgres_conn_id="postgres_default",
    depends_on_past=True,
    wait_for_downstream=True,
)

process_data
This is a naive DAG with one task to read data from a table, add some text to it and insert it into another table. Use Crontab guru for cron schedule format examples.
Let’s run the DAG, give Airflow about 5 min to load the DAG and then go to http://localhost:8080/admin/airflow/tree?dag_id=sample_dag and turn on the DAG. Since this is being run on some day after 2020-01-01 and we have catchup set to true, our DAGs will start to run to catch up to the current date.
Let’s let the DAG run for a few minutes. In the meantime, we can go over the SQL script used in the DAG.
INSERT INTO sample.output_data (
        event_id,
        id,
        input_text,
        processed_text,
        datetime_created,
        datetime_inserted
    )
SELECT '{{ macros.uuid.uuid4() }}' as event_id,
    id,
    input_text,
    CONCAT(input_text, ' World') as processed_text,
    datetime_created,
    now() as datetime_inserted
from sample.input_data
WHERE datetime_created::DATE = '{{ ds }}'
    AND EXTRACT(
        HOUR
        from datetime_created
    ) = {{ execution_date.hour }} ON CONFLICT (id) DO
UPDATE
SET event_id = EXCLUDED.event_id,
    id = EXCLUDED.id,
    input_text = EXCLUDED.input_text,
    processed_text = EXCLUDED.processed_text,
    datetime_created = EXCLUDED.datetime_created,
    datetime_inserted = EXCLUDED.datetime_inserted;
This SQL script takes data from input_data filtered by date and time, and then upserts it into output_data table. Some of the interesting concepts here are
{ macros.uuid.uuid4() }: macros.uuid provides us access to the standard python UUID module. We can use any of the UUID module’s function here. In our case, we use it to generate unique identifier for each row in our output data.{ ds }: This provides the execution date inYYYY-MM-DDformat.{ execution_date.hour }: Sinceexecution_dateis a datetime Pendulum object, we can use any of pendulum’s functions..houris one of those functions which provides the hour as a number between 0 and 23.ON CONFLICT (id) DO UPDATE: We use this to keep records in our output unique. This is a postgres feature that allows us to writeUPSERT(update or insert) queries based on a unique identifier(id in our case). In our case, if a row corresponding to a givenidexists insample.output_datait will be updated, else a new record will be inserted into thesample.output_datatable.
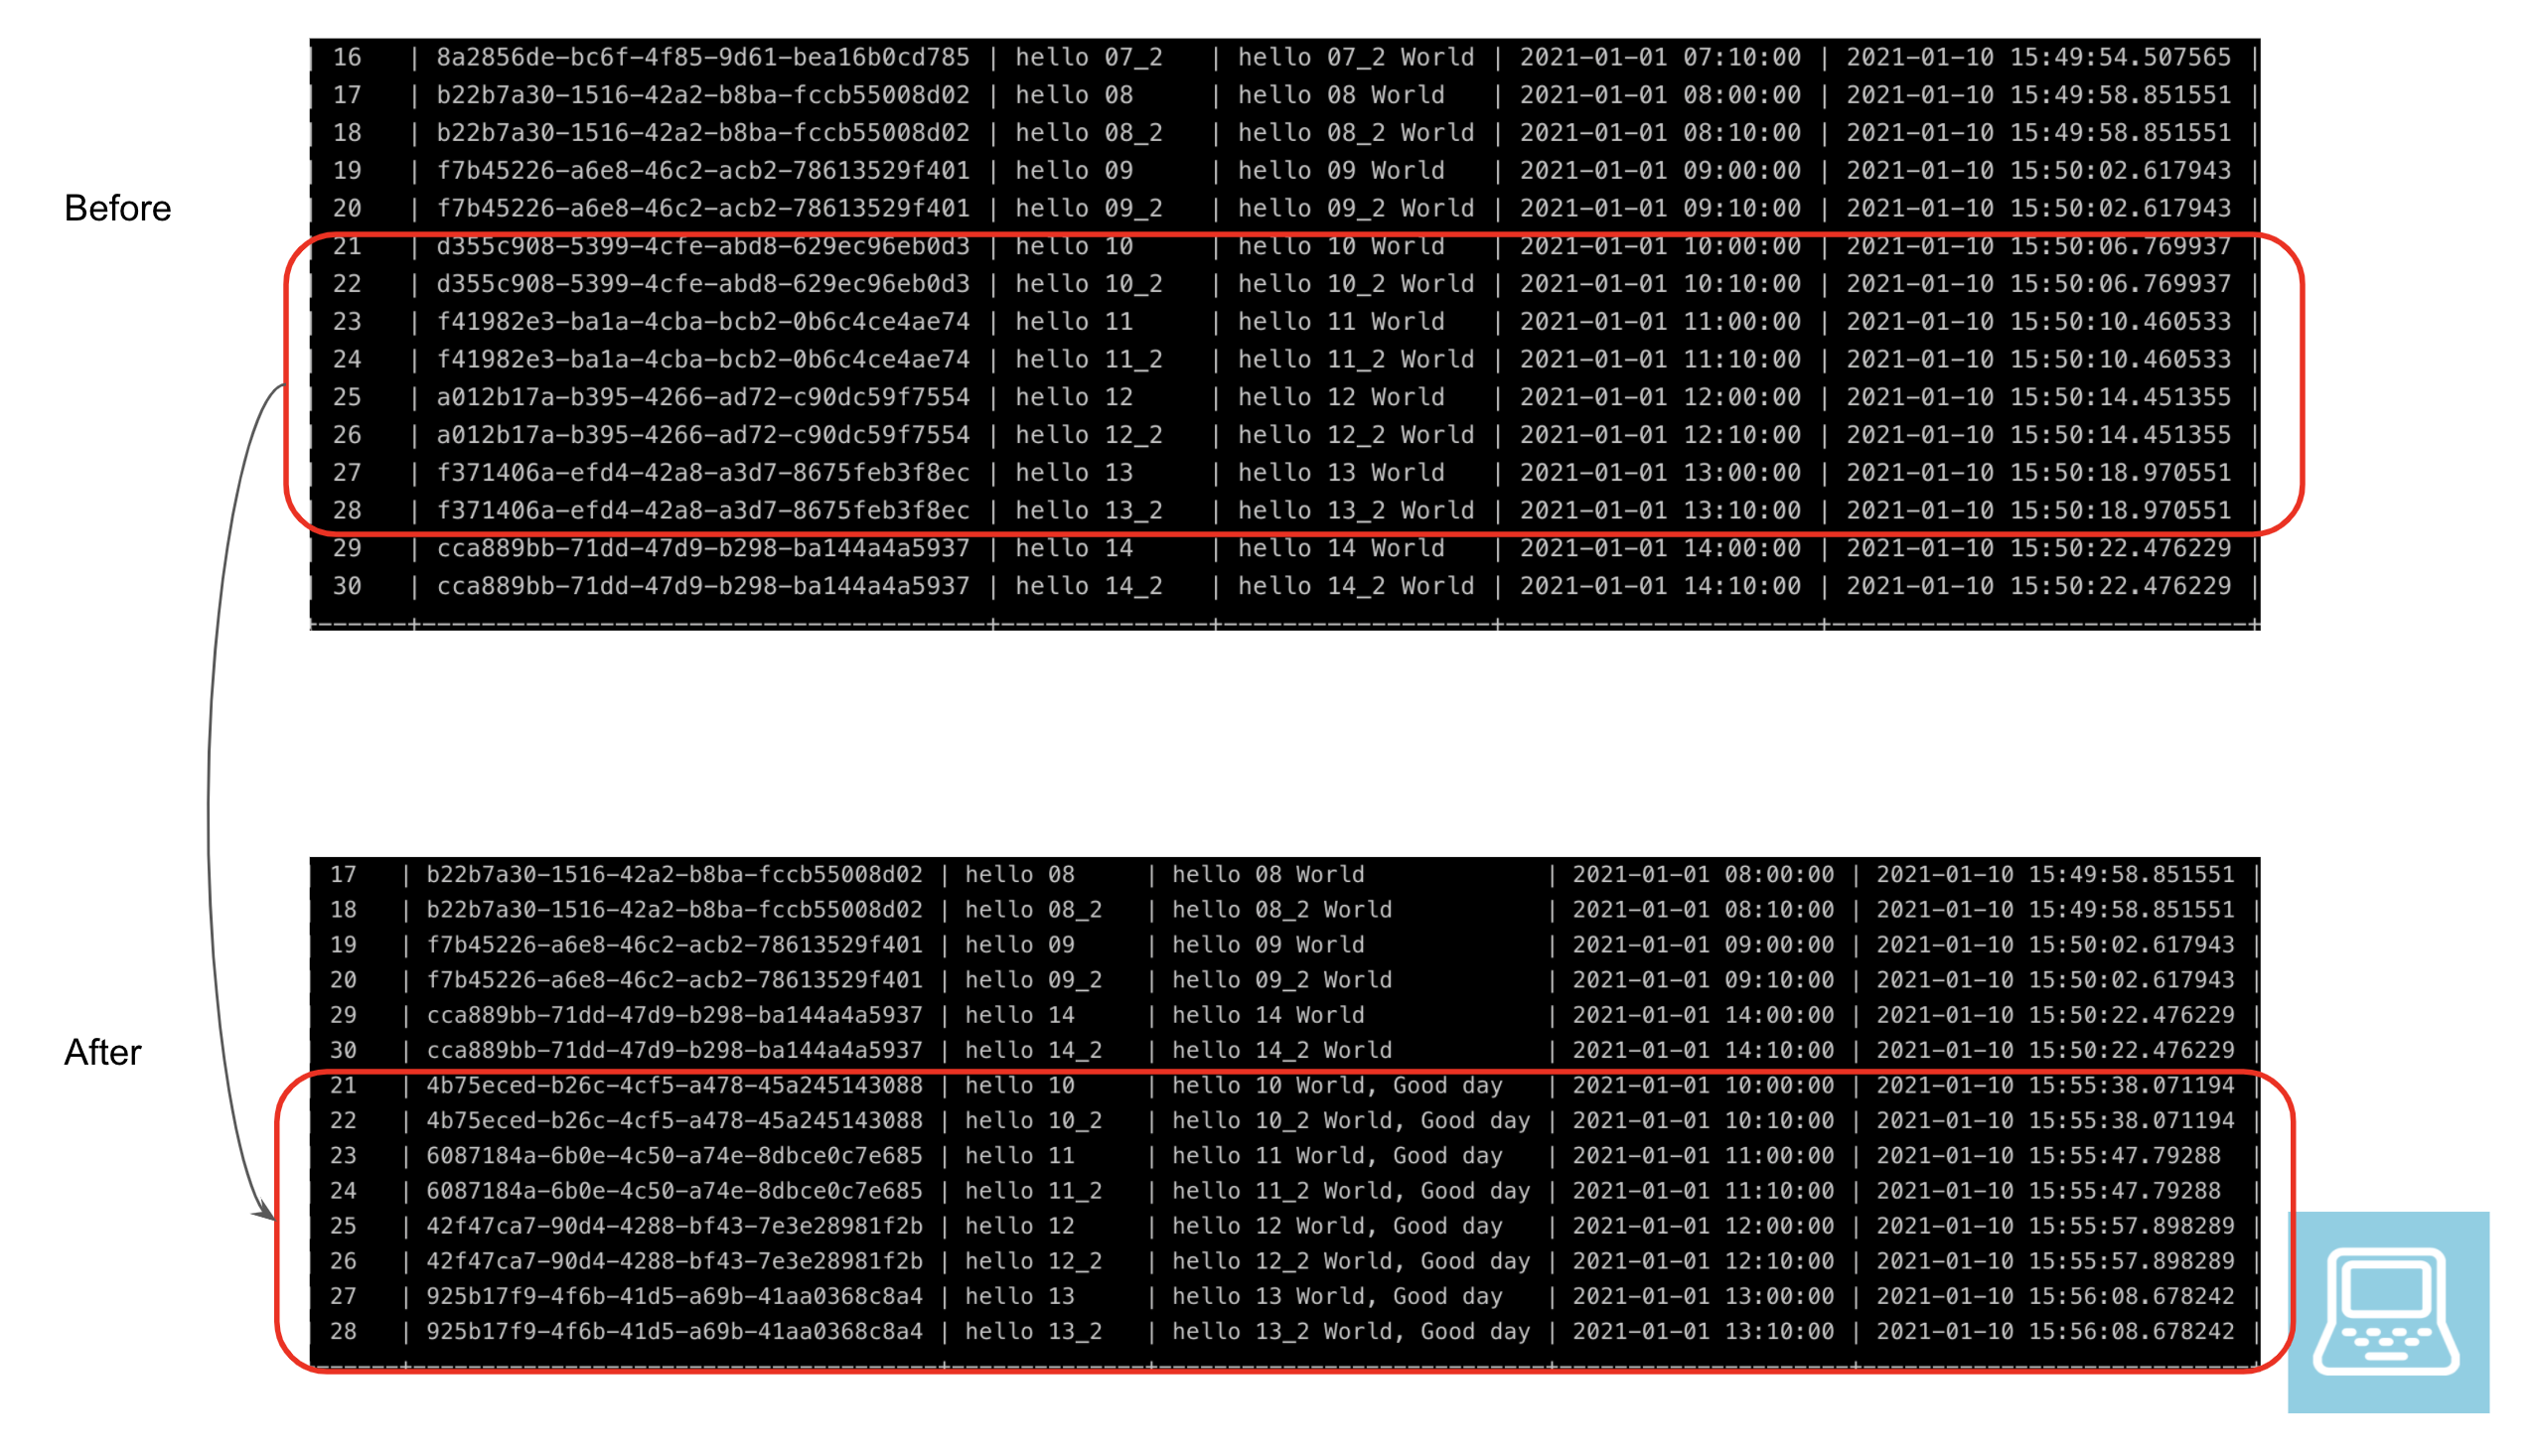
Our DAG would have run a few times by now. Let’s say we want to change the processed text to add the text World, Good day, instead of just World starting at 10AM UTC on 2020-01-01 and ending 13(1PM) UTC.
First we pause the running DAG, change World to World, Good day in your sample_dag.py and then run the commands shown below.
Once the backfill is completed you can change the text back to World and start your DAG again. You can use pgcli to login to the postgres db and do a simple select * from sample.output_data; to look at the backfilled dataset.
Let’s look at the before and after versions of the datasets. We can see that for the runs between the backfilled times, we see an additional Good day.
You can turn down your Airflow instance as shown below.
Conclusion
Hope this article gives you a good idea of how to use Airflows execution_date to backfill a SQL script and how to leverage Airflow Macros to bring pythonic capabilities to your SQL script. Also note that we have configured the write process to be an UPSERT and not an INSERT, since an INSERT would have introduced duplicate rows in the output. The next time you are writing an ETL pipeline, consider how it will behave in case a backfill would need to be done. This would help maintain idempotency of your DAG and prevent unintended side effects(which would have happened if we had used an INSERT).
As always, please let me know if you have any questions or comments in the comment section below.