Introduction
IaC can seem intimidating to people without DevOps experience. If you
Feel overwhelmed by multiple Terraform files with hundreds of lines in each file
Feel stuck when you need to deploy, migrate, or reconfigure, because AI wrote your Terraform files
Are struggling to deploy data infrastructure
Then this post is for you.
IaC is similar to git but for managing infrastructure.
By the end of this post, you will know what Terraform is, how it works, and how you can use it starting today.
Follow along with code: set up instructions
We use Terraform to explain IaC concepts, but you can use any tool you prefer.
Infrastructure-as-Code (IaC) makes infrastructure management easy
Data pipelines involve multiple infrastructure components: S3, Spark, DBs, Airflow, etc.
While infrastructure can be set up with tools like boto3, aws cli, etc, managing them is time-consuming & error-prone.
With IaC tools, we can manage infrastructure using config files. All we have to do is modify the config files, and IaC tools take care of changing our infrastructure accordingly.
Define infrastructure in Terraform config (.tf) files
Terraform files (.tf) are written in HCL (Hashicorp Configuration Language). The main components of a Terraform file are:
- Provider: Systems/Vendors we want to work with. Think of this as libraries you need to work with them (e.g., AWS, GCP, local file systems, etc.)
- Resource: Infrastructure we want, e.g., S3, EC2, EMR, etc
- Data: Used to get information from a provider, which we will then use to set up some resource.
- Output: Used to print information. E.g., EC2 ID, etc.
Let’s see how it works.
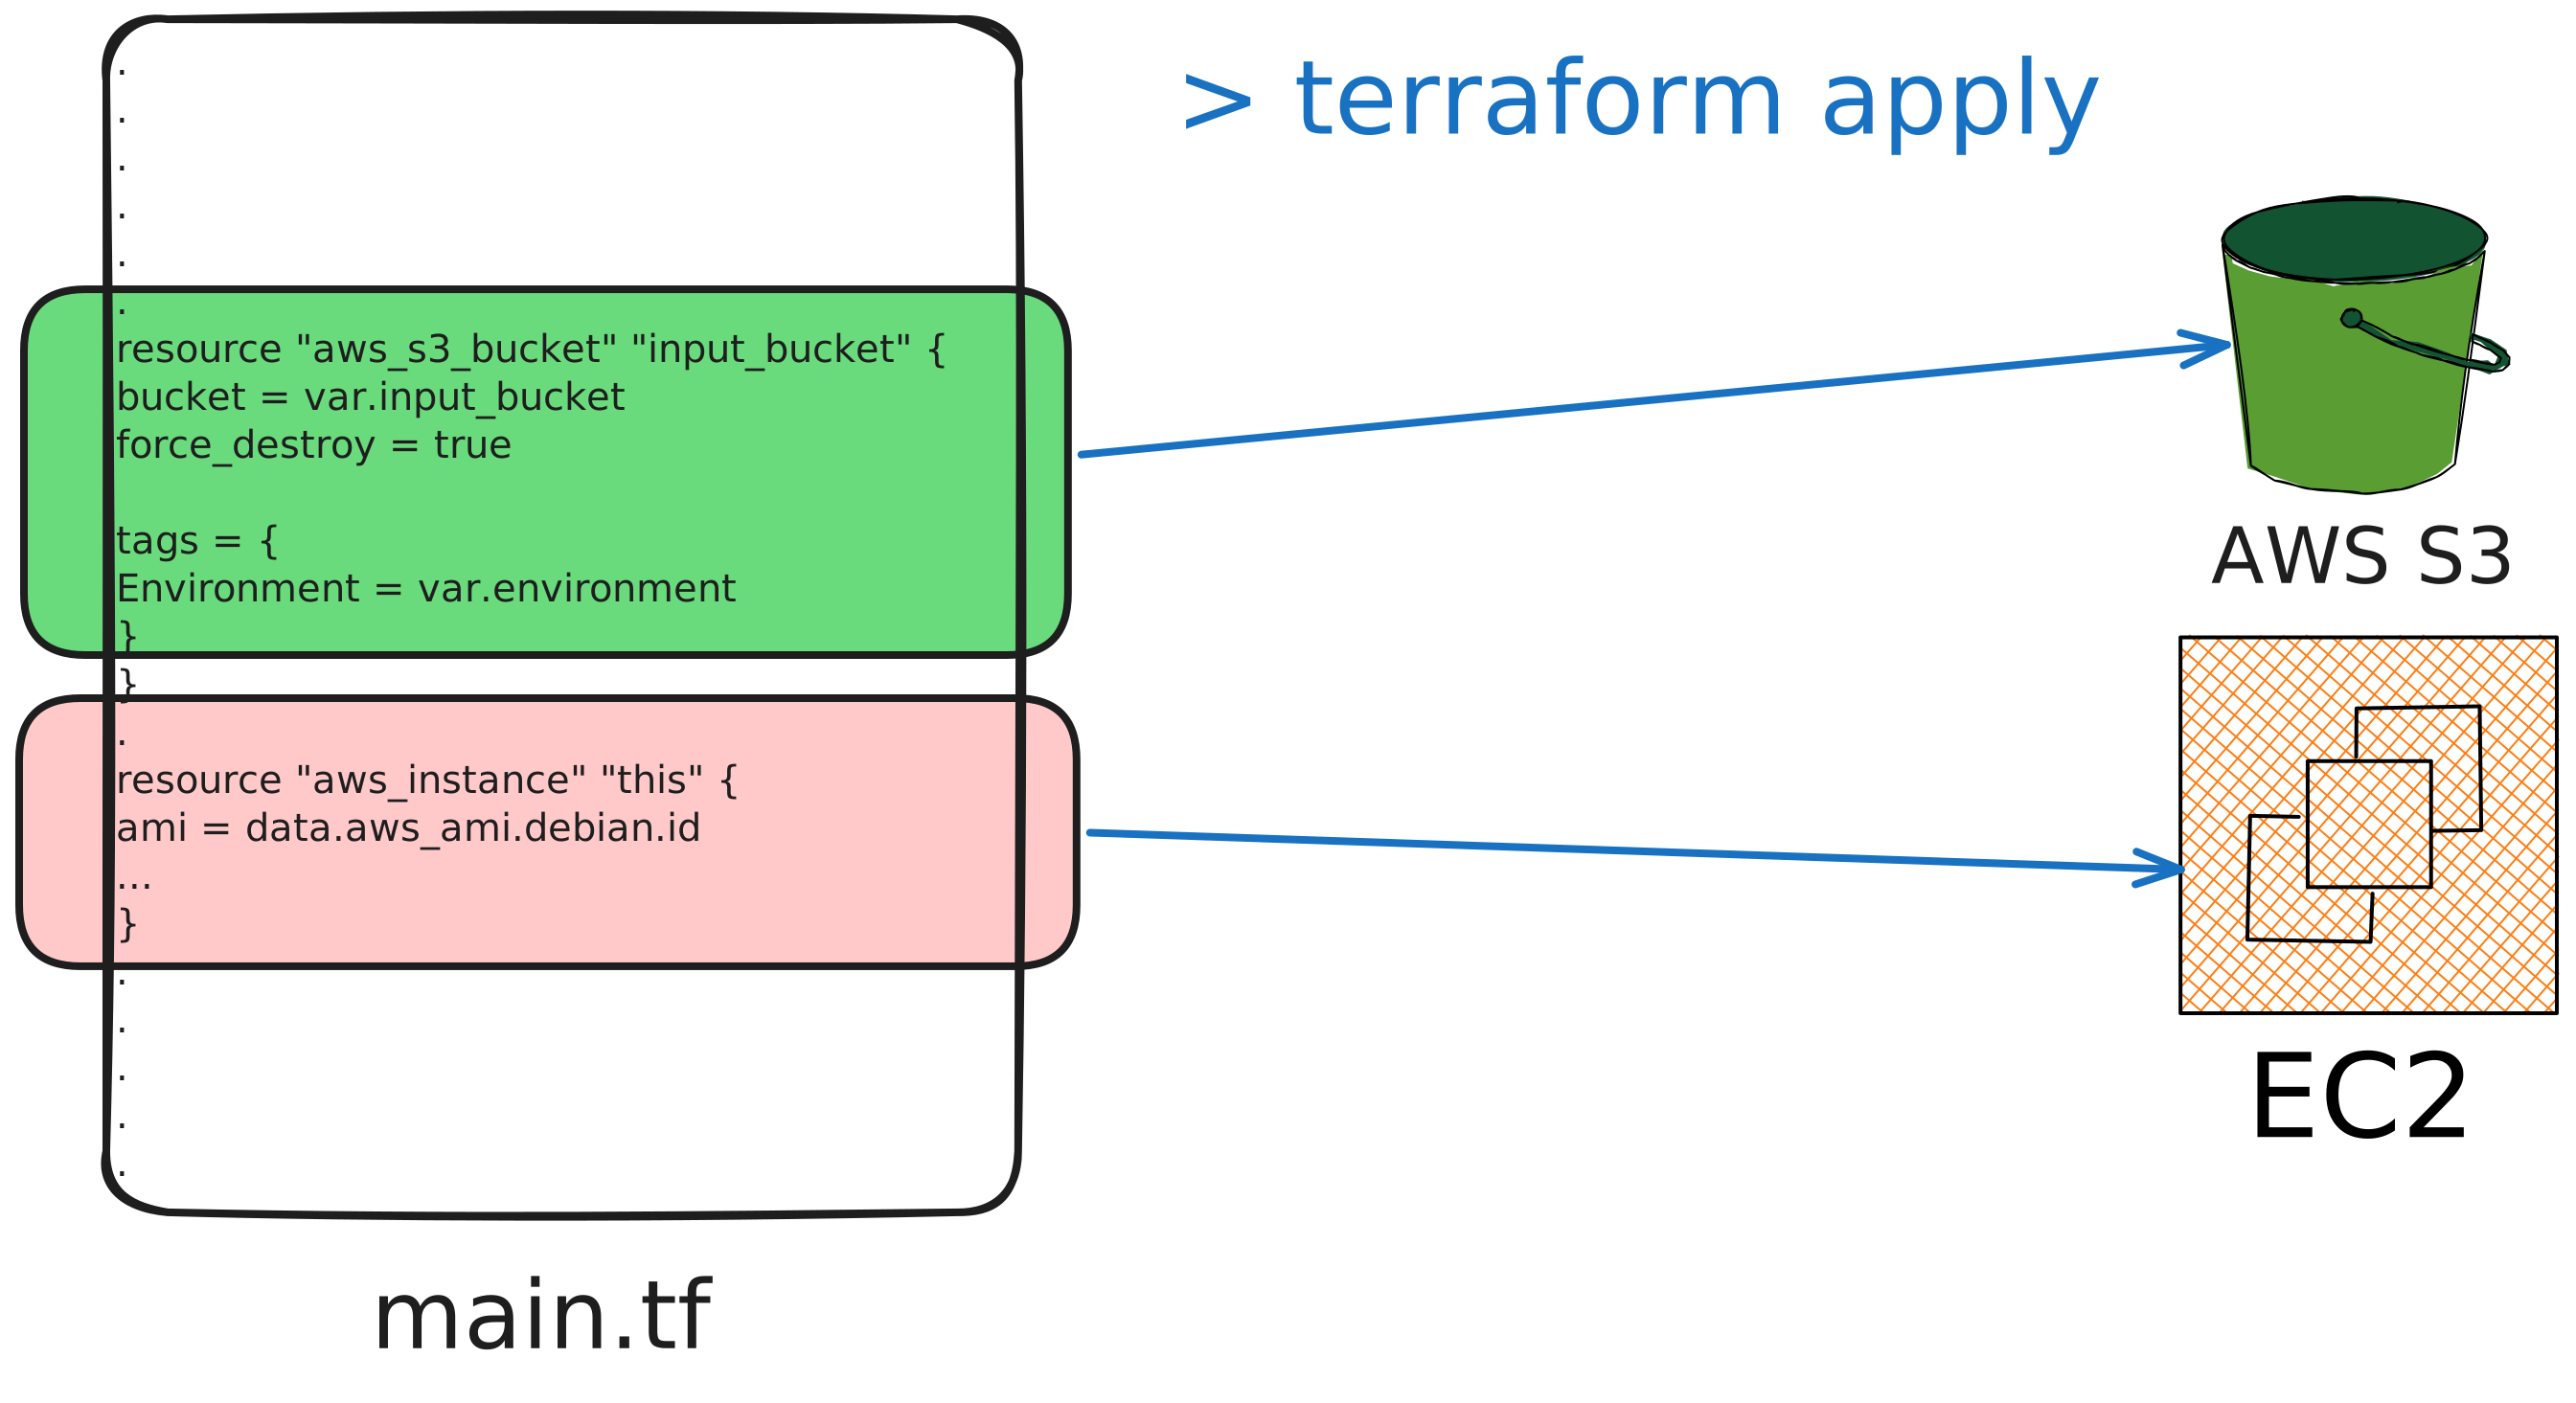
Let’s look at our Terraform file.
terraform/main.tf
terraform {
required_providers {
aws = {
source = "hashicorp/aws"
version = "~> 5.92"
}
}
required_version = ">= 1.2"
}
provider "aws" {
region = "us-east-1"
}
# ----------------------------------------
# S3 Bucket
# ----------------------------------------
resource "aws_s3_bucket" "input_bucket" {
bucket = "sde-iac-tutorial-bucket"
force_destroy = true
}
# ----------------------------------------
# AMI
# ----------------------------------------
data "aws_ami" "debian" {
most_recent = true
owners = ["136693071363"]
filter {
name = "name"
values = ["debian-12-amd64-*"]
}
filter {
name = "virtualization-type"
values = ["hvm"]
}
}
# ----------------------------------------
# IAM Role (EC2 -> S3 access)
# ----------------------------------------
resource "aws_iam_role" "ec2" {
name = "ec2-s3-role"
assume_role_policy = jsonencode({
Version = "2012-10-17"
Statement = [{
Effect = "Allow"
Principal = { Service = "ec2.amazonaws.com" }
Action = "sts:AssumeRole"
}]
})
}
resource "aws_iam_role_policy" "s3_access" {
role = aws_iam_role.ec2.id
policy = jsonencode({
Version = "2012-10-17"
Statement = [{
Effect = "Allow"
Action = [
"s3:GetObject",
"s3:PutObject",
"s3:DeleteObject",
"s3:ListBucket"
]
Resource = [
aws_s3_bucket.input_bucket.arn,
"${aws_s3_bucket.input_bucket.arn}/*"
]
}]
})
}
resource "aws_iam_instance_profile" "ec2" {
name = "ec2-s3-profile"
role = aws_iam_role.ec2.name
}
# ----------------------------------------
# EC2 Instance
# ----------------------------------------
resource "aws_instance" "this" {
aRmi = data.aws_ami.debian.id
instance_type = "t3.micro"
iam_instance_profile = aws_iam_instance_profile.ec2.name
user_data = <<-EOF
#!/bin/bash
apt-get update -y
apt-get install -y python3 python3-pip git
pip3 install boto3 --break-system-packages
EOF
}- 1
- AWS provider to work with their services
- 2
- Define which AWS region to use
- 3
- Create an S3 bucket
- 4
- Get aws image ID for the Debian 12 official image
- 5
- Create IAM Profile -> role -> policy to connect to S3
- 6
- Allow GET, PUT, DELETE, and LIST permissions to S3 for the Policy
- 7
- EC2 with S3 accessible profile
- 8
- Install libraries for the pipeline script to write data to S3
In the Terraform file, we
- Define our provider: AWS
- Created resources: S3, IAM profile, EC2
- Enabled EC2 -> S3 write permissions with an IAM profile
Change the bucket name (line 21). Before running the below command.
Let’s set up our infrastructure.
- 1
- Downloads the required_provider libraries
- 2
-
Validates
.tffiles - 3
-
Formats
.tffiles - 4
- Creates a plan to update infrastructure
- 5
- Shows the plan and asks for approval to apply changes
The config files are usually stored in a terraform folder (specified with the -chdir flag).
The Terraform CLI looks for all .tf files in the running directory.
Once complete, verify that the S3 bucket and EC2 instance have been created.
# check infrastructure
aws s3 ls
aws ec2 describe-instances \
--filters "Name=instance-state-name,Values=running" \
--query 'Reservations[].Instances[].{ID:InstanceId, Name:Tags[?Key==`Name`].Value, Type:InstanceType, State:State.Name, PublicIP:PublicIpAddress, PrivateIP:PrivateIpAddress}' \
--output table- 1
- List all your S3 buckets.
- 2
- List your EC2 instances formatted as a table.
State files have details about active infrastructure
Terraform keeps track of the state of our infrastructure with a .tfstate file.
Let’s take a look at some information in our state file.
We can also use Terraform cli to check the state of our infrastructure.
Terraform only tracks infrastructure set up with it.
Infrastructure created by other tools will not be managed by Terraform.
Terraform uses .tf & .tfstate files to determine infrastructure changes
The apply command compares what we have specified in our .tf files with what is currently running, based on the .tfstate file.
Based on the difference, Terraform will show us a plan of changes it intends to make.
Let’s look at an example of changing the EC2 OS.
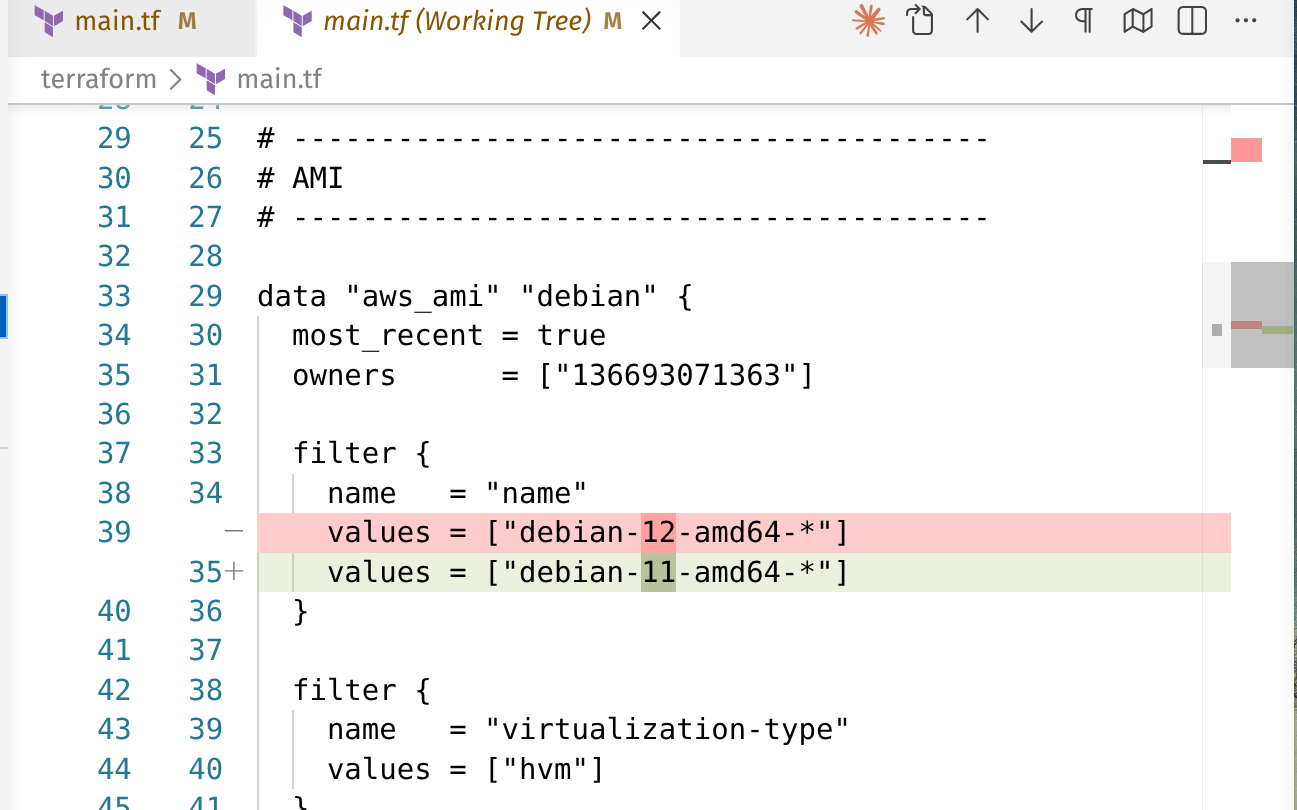
Now check the plan.
In the plan, look for
~: in-place update (safe, no cascade)-/+: destroy and recreate (check for downstream cascades)!: replaced due to upstream dependency
Terraform will understand all the cascading changes that need to be made and apply them in the right order.
Use .tfvars to store variables
We updated the bucket name and aws region directly in the main.tf.
However, as we will see in the CI/CD setup (coming soon), we need to be able to define different settings depending on the environment.
For this, we first define a variables.tf file that lists our allowed variables.
terraform/variables.tf
- 1
- us-east-1 as default
- 2
- Need to be defined at run time, else error
- 3
- Defaulting to the smallest size
Let’s move our bucket_name, region, and ec2 size to a variable file shown below.
terraform/envs/dev.tfvars
Update main.tf and replace hardcoded values with variables.
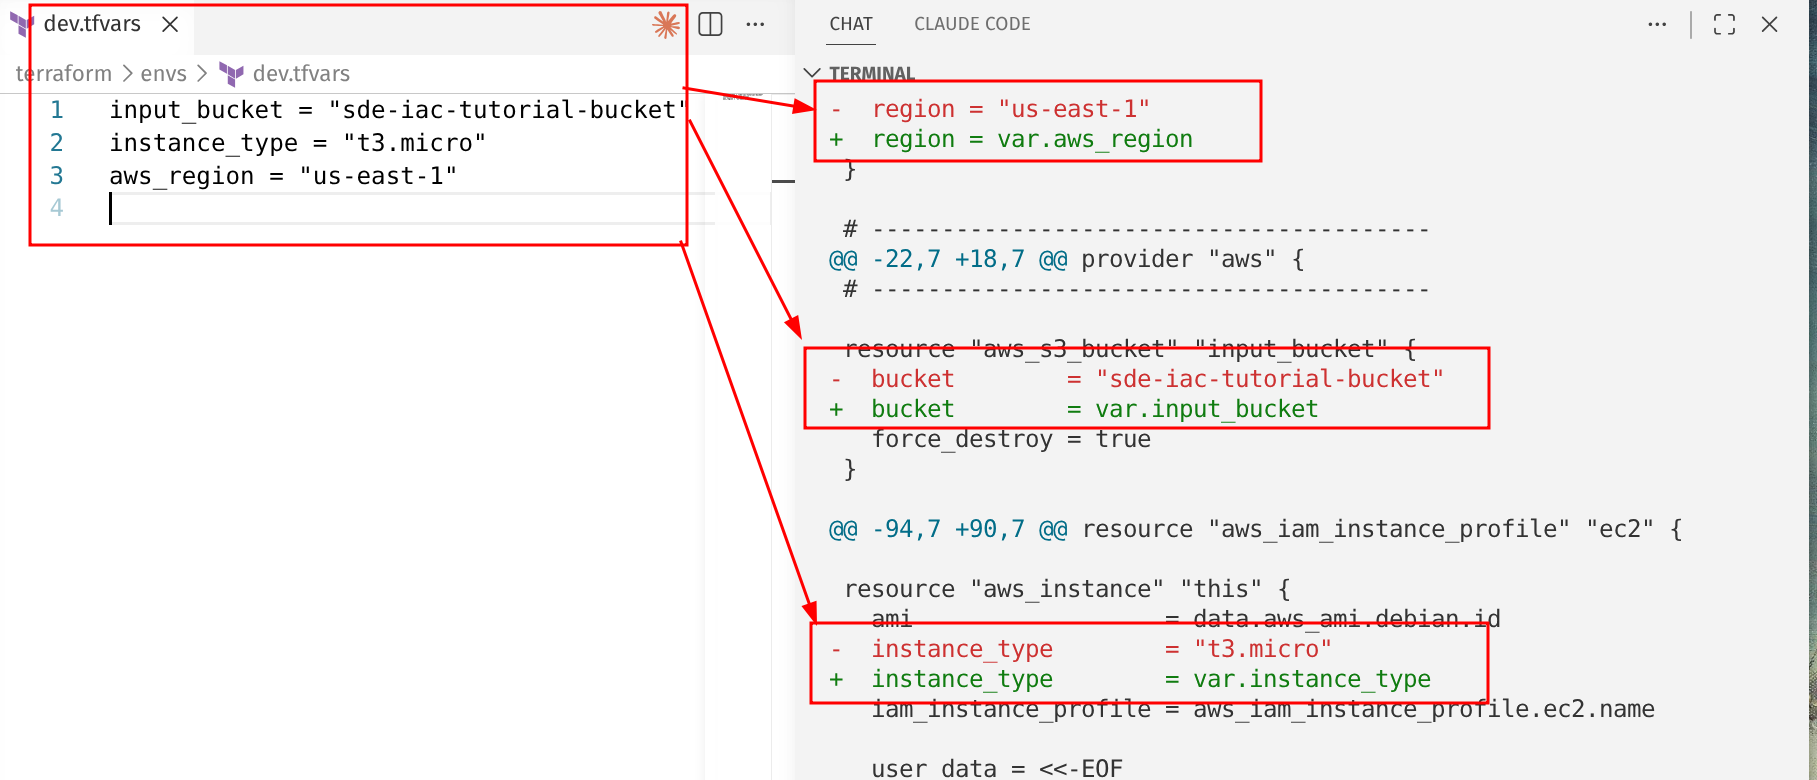
Now we need to specify the variable file to use with Terraform.
Store state file on the cloud to collaborate with the team
In a real project, we store state files in a shared location that your team can access. So that any change is reflected in a single location.
This location is called a backend. Terraform supports various backends with varying levels of reliability.
For our use case, let’s use an S3 backend.
To update our backend, let’s clean up the existing infrastructure based on the local state file.
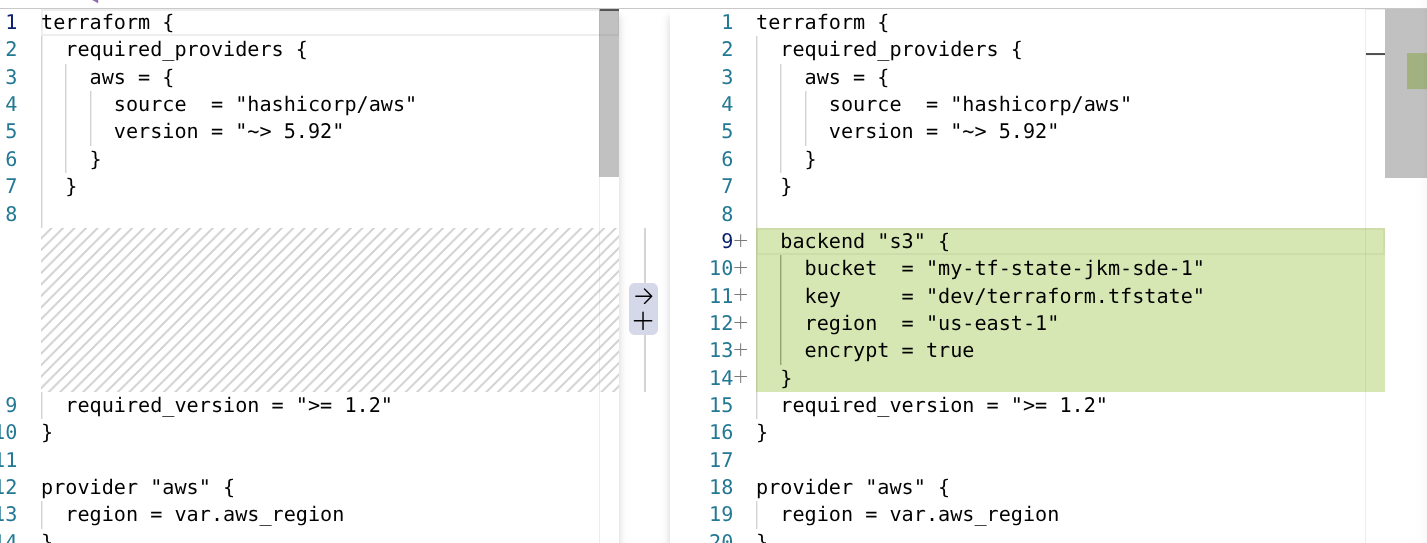
Now you will need to create an S3 bucket for your backend. Create this with the bootstrap script.
- 1
- init again to set up the backend state
Let’s look at the backend data to see if our state files are showing up.
tf files are stored within a /terraform folder
Most companies organize Terraform files as shown below.
- 1
- A bootstrap script to create the backend S3 bucket
- 2
-
envs/dev.tfvarshas environment-specific variables - 3
-
terraform/main.tfhas the key infrastructure - 4
-
variables.tfto define allowed variables(& defaults) at runtime
Tear down infrastructure with destroy
Do not forget to tear down your infrastructure with the destroy command.
Conclusion
To recap, we saw
- How IaC makes managing data infrastructure easy
- Defining infrastructure as terraform files
- Storing current state of infrastructure in
.tfstatefiles - Using variables with
.tfvarsfile - Using a cloud backend to store shared state files.
The next time you are setting up infrastructure, do not blindly prompt LLMs to write your terraform files. Only you have the necessary context to figure out what needs to be built.
Use the concepts in this post to set up your infrastructure.
To truly understand Terraform, you need to be able to explain it plainly.
In your own words, share your main takeaway from this post.